Developer Guide
- Acknowledgements
- Setting up, getting started
- Design
- Implementation
- Documentation, logging, testing, configuration, dev-ops
- Appendix: Requirements
- Appendix: Instructions for manual testing
- Appendix: Effort
Acknowledgements
- This product is adapted from AddressBook Level-3.
- Libraries used: JavaFX, Jackson, JUnit5.
Setting up, getting started
Refer to the guide Setting up and getting started.
Design
.puml files used to create diagrams in this document can be found in the diagrams folder. Refer to the PlantUML Tutorial at se-edu/guides to learn how to create and edit diagrams.
Architecture

The Architecture Diagram given above explains the high-level design of the App.
Given below is a quick overview of main components and how they interact with each other.
Main components of the architecture
Main has two classes called Main and MainApp. It is responsible for:
- At app launch: Initializes the components in the correct sequence and connects them up with each other.
- At shut down: Shuts down the components and invokes cleanup methods where necessary.
Commons represents a collection of classes used by multiple other components.
The rest of the App consists of four components:
-
UI: The UI of the App. -
Logic: The command executor and handles autocomplete. -
Model: Holds the data of the App in memory. -
Storage: Handles reading and writing data to the hard disk.
How the architecture components interact with each other
The Sequence Diagram below shows how the components interact with each other for the scenario where the user issues the command delete 1.

Each of the four main components will:
- Define its API in an
interfacewith the same name as the Component. - Implement its functionality using a concrete
{Component Name}Managerclass, which follows the corresponding APIinterfacementioned in the previous point.
For example, the Logic component defines its API in the Logic.java interface and implements its functionality using the LogicManager.java class which follows the Logic interface. Other components interact with a given component through its interface rather than the concrete class. This is to prevent the outside component being coupled to the implementation of a component, as illustrated in the partial class diagram below.

The sections below give more details of each component.
UI component
The API of this component is specified in Ui.java

The UI consists of a MainWindow that is made up of parts, e.g.,CommandBox, ResultDisplay, PersonListPanel, StatusBarFooter, etc. All these, including the MainWindow, inherit from the abstract UiPart class which captures the commonalities between classes that represent parts of the visible GUI.
The UI component uses the JavaFX UI framework. The layout of these UI parts are defined in matching .fxml files that are present in the src/main/resources/view folder. For example, the layout of the MainWindow is specified in MainWindow.fxml
The UI component does the following:
- Executes user commands using the
Logiccomponent. - Listens for changes to
Modeldata so that the UI can be updated with the modified data. - Keeps a reference to the
Logiccomponent, because theUIrelies on theLogicto execute commands. - Depends on some classes in the
Modelcomponent, as it displaysPersonandTodoobjects residing in theModel.
Logic component
API : Logic.java
Below is a partial class diagram of the Logic component.

How the Logic component works:
- When
Logicis called upon to execute a command, it uses theSoConnectParserclass to parse the user command. - This results in a
Commandobject (more precisely, an object of one of its subclasses e.g.,AddCommand) which is executed by theLogicManager. - The command can communicate with the
Modelwhen it is executed (e.g., to add a contact). - The result of the command execution is encapsulated as a
CommandResultobject which is returned fromLogic.
The Sequence Diagram below illustrates the interactions within the Logic component for the execute("delete 1") API call.

DeleteCommandParser should end at the destroy marker (X), but due to a limitation of PlantUML, the lifeline reaches the end of diagram.
Here are the other classes in Logic (omitted from the class diagram above) that are used for parsing a user command:

How the parsing works:
- When called upon to parse a user command, the
SoConnectParserclass creates anXYZCommandParser(XYZis a placeholder for the specific command name e.g.,AddCommandParser) which uses the other classes shown above to parse the user command and create aXYZCommandobject (e.g.,AddCommand) which theSoConnectParserreturns back as aCommandobject. - All
XYZCommandParserclasses (e.g.,AddCommandParser,DeleteCommandParser, etc.) inherit from theParserinterface so that they can be treated similarly where possible, e.g., during testing.
Here are the other classes in Logic (omiited from the class diagram above) that are used for autocompleting a user’s search command:
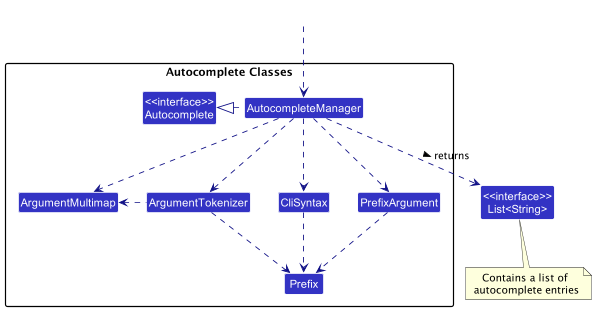
How the autocompleting works:
- When called upon to autocomplete a user’s search command, the
AutocompleteManagerclasses uses the other classes shown above to autocomplete and create a list of autocomplete entries. - The list of autocomplete entries will be passed to
CommandBoxfor display.
Model component
API : Model.java

The Model component does the following:
- Stores the SoConnect data, i.e., all
Personobjects and allTodoobjects (which are contained in aUniquePersonListobject and aUniqueTodoListobject respectively). - Stores the currently ‘selected’
PersonorTodoobjects (e.g., results of a search query) as a separate filtered list which is exposed to outsiders as an unmodifiableObservableListthat can be ‘observed’ (e.g., the UI can be bound to this list so that the UI automatically updates when the data in the list change). - Stores a
UserPrefobject that represents the user’s preferences. This is exposed to the outside as aReadOnlyUserPrefobjects. - Does not depend on any of the other three components (as the
Modelrepresents data entities of the domain, they should make sense on their own without depending on other components).
Tag list in the SoConnect, which Person references. This allows SoConnect to only require one Tag object per unique tag, instead of each Person needing their own Tag objects. 
Storage component
API : Storage.java

The Storage component does the following:
- Saves both SoConnect data and user preference data in
jsonformat, and read them back into corresponding objects. - Inherits from
SoConnectStorage,TodoListStorage, andUserPrefStorage, which means it can be treated as any one of them (if only one of the functionality is needed). - Depends on some classes in the
Modelcomponent (because theStoragecomponent’s job is to save/retrieve objects that belong to theModel).
Common classes
Classes used by multiple components are in the soconnect.commons package.
Implementation
This section describes some noteworthy details on how certain features are implemented.
Sorting feature
Implementation
The sorting mechanism is facilitated by SortCommand and SortCommandParser.
Additionally, the mechanism utilises the following operations in UniquePersonList to carry out sorting:
-
UniquePersonList#sortByName(Boolean isReverse)— Sorts the list of contacts by Name in alphabetical order. -
UniquePersonList#sortByPhone(Boolean isReverse)— Sorts the list of contacts by Phone number in increasing order. -
UniquePersonList#sortByEmail(Boolean isReverse)— Sorts the list of contacts by Email in alphabetical order. -
UniquePersonList#sortByAddress(Boolean isReverse)— Sorts the list of contacts by Address in alphabetical order. -
UniquePersonList#sortByTag(Tag tag, Boolean isReverse)— Sorts the list of contacts by a specified Tag. Contacts containing it will be at the top of the list.
These operations sort in reverse order when isReverse is true.
These operations are exposed in the Model interface under the same method signature.
Given below is an example usage scenario and how the sorting mechanism behaves at each step.
Step 1. The user enters sort t/!friend n/ command to perform a multi-level sort. SortCommandParser calls ArgumentTokenizer#tokenizeToList() to separate the parameters of t/!friend and n/. The separated parameters are stored in a list that preserves the order that the user entered them in. SortCommandParser checks the list to confirm that at least 1 valid parameter has been entered.
Step 2. Each parameter is processed by SortCommandParser#convertArguments. They are checked for reversed sorting through the presence of !. The friend string is checked to see if it fulfils the requirements of the Tag class. If the user entered string values for non-Tag parameters (n/NAME, p/PHONE, e/EMAIL, a/ADDRESS), the string values are ignored and the command continues execution as per normal.
Step 3. The sort command sorts the currently displayed list by Name first, calling Model#sortByName(Boolean isReverse) where isReverse = false.
Step 4. The sort command reverse sorts the currently displayed list by the friend Tag next, calling Model#sortByTag(Tag tag, Boolean isReverse) where isReverse = true.
The following sequence diagram shows how the sort operation works:
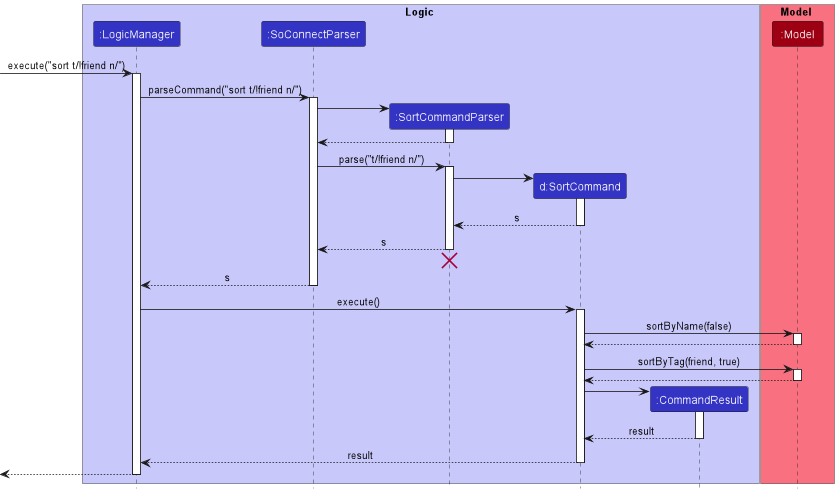
SortCommandParser should end at the destroy marker (X) but due to a limitation of PlantUML, the lifeline reaches the end of diagram.
Step 5. The user is shown the sorted list of contacts. The sorted list contains the same contacts as the previous displayed list. It has two sections, the first section contains contacts without the friend tag and the second section contains contacts with the friend tag. Each section is sorted by Name in alphabetical order.
Design consideration
Aspect: How to implement multi-level sorting:
-
Alternative 1 (current choice): Sort the list once for each parameter entered by the user.
- Pros: Easy to implement.
- Cons: May have performance issues in terms of time needed to sort.
-
Alternative 2: Single composite sorting method that combines all the individual sorting for each parameter.
- Pros: Save time as only 1 sorting operation is carried out.
- Cons: Harder to modify when more parameters are added. Can result in more bugs due to complexity.
Search feature
Implementation
The search mechanism is facilitated by SearchCommand and SearchCommandParser.
This feature allows user to customise the contacts displayed based on the information provided. For example, user can decide to have specific search result that satisfies all the conditions or to have more generic result that only satisfies one of the conditions.
It implements the following main operations:
-
SearchCommand#execute(Model model)— Updates filtered person list to contain contacts that match the search query. -
SearchCommandParser#parse()— Parses search query based on the condition and information specified.
Given below is an example usage scenario and how the search mechanism behaves at each step.
Step 1. The user executes search n/John a/NUS command to perform a joint search. SearchCommandParser calls ArgumentTokenizer#tokenize to group the search parameters according to the prefix /n and /a.
Step 2. The search command search the SoConnect by matching the search parameters and condition with the available contact information, calling StringUtil#containsKeywordsIgnoreCase(String sentence, String keywords).
Step 3. The search command then updates filtered person list to contains the matching contacts. If no matching contact is found,
the search command will call StringUtil#containsSomeKeywordsIgnoreCase(String sentence, String keywords) to search for contacts that match partially to the search parameters.
The following sequence diagram shows how the search operation works:
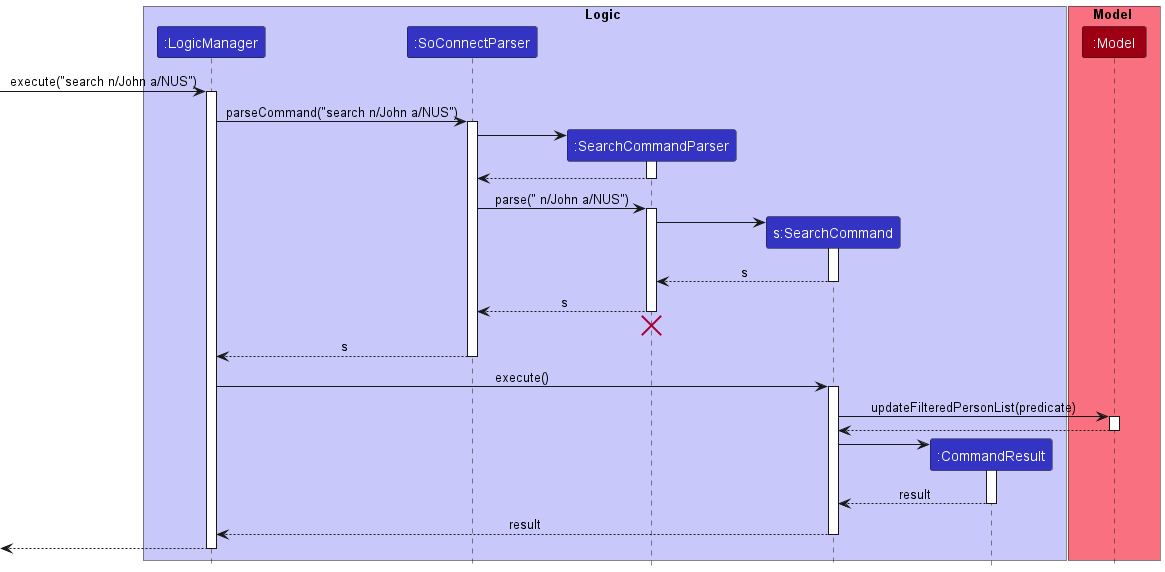
SearchCommandParser should end at the destroy marker (X) but due to a limitation of PlantUML, the lifeline reaches the end of diagram.
Step 4. The user is shown the filtered list. The filtered list contains all contacts that are relevant to the user’s search query.
Design consideration
Aspect: How to implement searching:
-
Alternative 1 (current choice): Search the list once for each parameter entered by the user.
- Pros: Easy to implement.
- Cons: May have performance issues in terms of time needed to search.
-
Alternative 2: Single complex searching method that combines all the individual searching for each parameter.
- Pros: Save time as only 1 search operation is carried out.
- Cons: Harder to modify when more parameters are added. Can result in more bugs due to complexity.
{more aspects and alternatives to be added}
Autocomplete Feature
Implementation
The autocomplete mechanism is facilitated by AutocompleteManager and CommandBox. TAutocompleteManager contains a UniquePersonList which is used to filter and generate a list of autocomplete entries. The CommandBox calls methods from AutocompleteManager to get a list of autocomplete entries.
The main methods in AutocompleteManager are:
-
getAutocompleteEntries(String userInput)- Gets a list of autocomplete entries. -
getSearchCommandArguments(String userInput)- Gets the arguments from the command if command is a search command, otherwise an invalid argument. -
getLastPrefixArguemnt(String argsString, Prefix... prefixes- Gets the last prefix and argument from theargsString. -
updateFilteredPersonList(String argsString)- Updates theUniquePersonListwith filter. -
generateAutocompleteEntries(String argsWithoutLastPrefixArguement, String lastPrefixArgument)- Generates a list of autocomplete entries by completing the sentence of thelastPrefixArgument.
The main methods in CommandBox are:
-
setAutocompleteListener()- A listener that triggersautocompleteActionwhenever user presses a key on the keyboard. -
autocompleteAction()- Gets a list of autocomplete entries fromAutocompleteManagerand displays it. -
populatePopup(List<String> autocompleteEntries, String originalSearchInput)- Fills up the autocomplete display box with the autocomplete entries.
This feature is an enhancement on the search feature (i.e. it only works when user is doing a searching). It only autocompletes the last prefix and argument of the user input.
Given below is an example usage scenario and how the autocomplete mechanism behaves at each step.
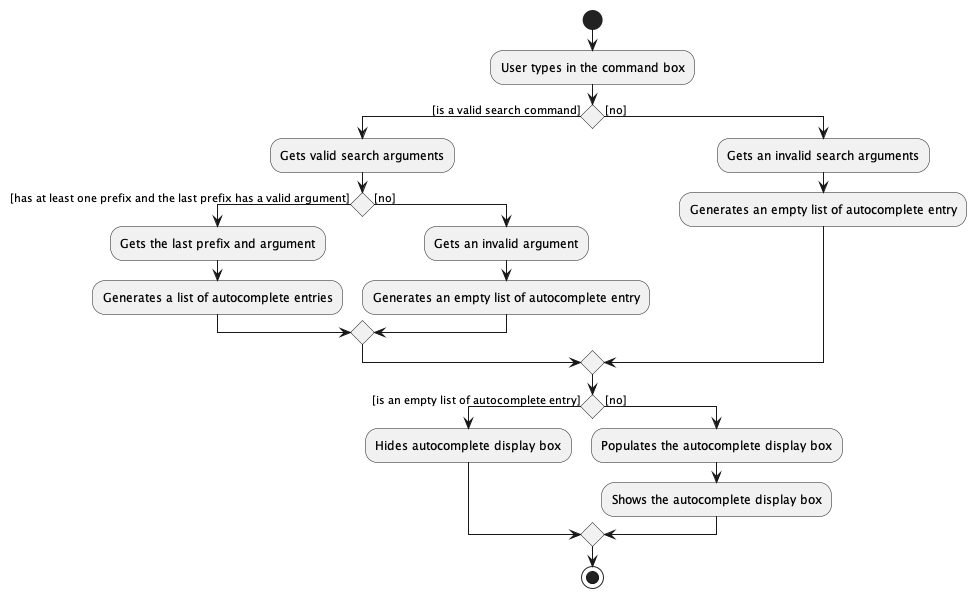
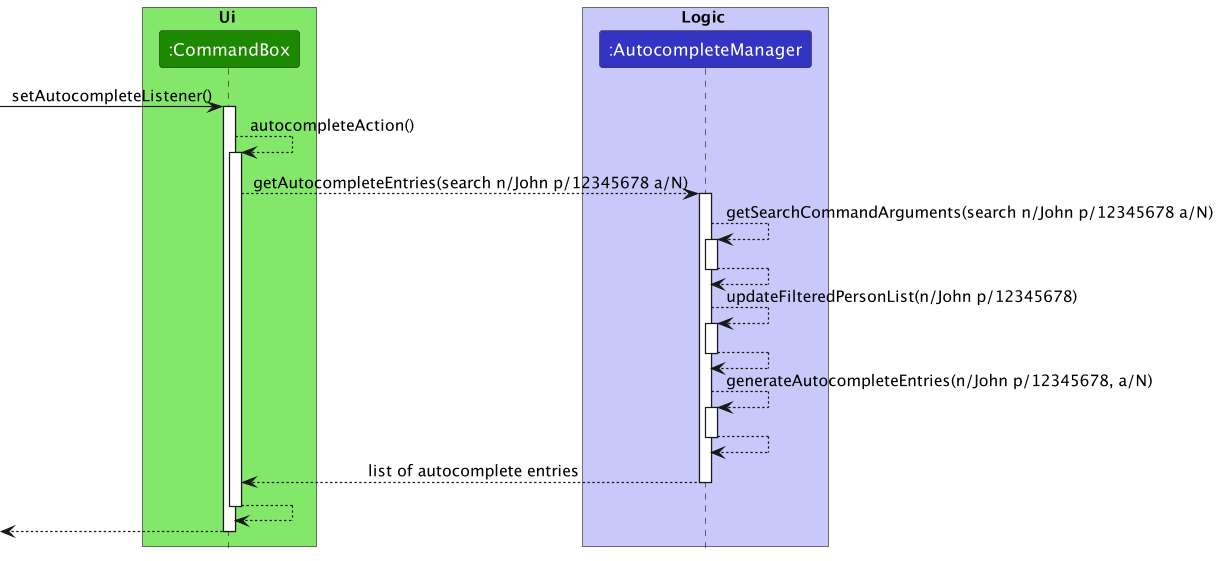
Step 1. The user enters search n/John p/12345678 a/N in the CommandBox. The CommandBox#setAutocompleteListener() calls CommandBox#autocompleteAction() as a key is pressed when the user types the command.
Step 2. The CommandBox#autocompleteAction() calls AutocompleteManager#getAutocompleteEntries(String userInput) to get a list of autocomplete entries.
Step 3. The AutocompleteManager#getSearchCommandArguments(String userInput) will check if the command is a valid search command and return the valid search command arguments, otherwise an invalid argument and AutocompleteManagerwill return an empty list to CommandBox. Hence, for user input search n/John a/N, the valid search command arguments is n/John p/12345678 a/N.
Step 4. The search command arguments will be passed to AutocompleteManager#getLastPrefixArgument(String argsString, Prefix... prefixes) to get the last prefix and argument. If there is no valid last prefix and argument found, it will then return an invalid argument and similarly, AutocompleteManager returns an empty list to CommandBox. Given n/John p/12345678 a/NUS, the last prefix and argument is a/N where a/ is the prefix and N is the argument.
Step 5. The AutocompleteManager#updateFilteredPersonList(String argsString) takes in the arguments without the last prefix and argument - n/John p/12345678 and filters the UniquePersonList based on the condition and contact information available in ` n/John p/12345678`.
OR condition, no filter will be applied to UniquePersonList (i.e. this returns every person in the list). This is because when the user wants to perform an OR condition search, the Person in UniquePersonList only has to satisfy one of the arguments given. Since we are autocompleting only the last prefix and argument, the Person in UniquePersonList will only need to satisfy the last prefix and argument.
Step 6. After the UniquePersonList is filtered, AutocompleteManager#generateAutocompleteEntries(String argsWithoutLastPrefixArgument, String lastPrefixArgument) will filter the filtered UniquePersonList with the last prefix and argument to generate a list of autocomplete entries.
For example, the filtered UniquePersonList has Person1 - {n/John Loh, p/12345678, a/NUS}, Person2 - {n/John Teo, p/12345678, a/NTU} and Person3 - {n/John Wong, p/12345678, a/SMU}. A filter and autocomplete will be done using the last prefix and argument - a/N, so this will filter out Person3 as the person’s address a/SMU does not match with a/N. After filtering, the prefix and argument will be autocompleted and the list of autocomplete entries will be return to CommandBox.
Person1 - {n/John Loh, p/12345678, a/NUS}, used above means the
UniquePersonList has a Person with information n/John Loh, p/12345678 and a/NUS.
Step 7. The CommandBox#autocompleteAction will pass the list of autocomplete entries to CommandBox#populatePopup(List<String> autocompleteEntries, String originalSearchInput) to populate the autocomplete display box with the autocomplete entries and display to the user.
The following activity diagram summarizes what happens when a user types a command in the CommandBox:
The following sequence diagram shows how the autocomplete operation works:
Design consideration
Aspect: How to generate autocomplete entries:
-
Alternative 1 (current choice): Use the streams feature in Java to filter the
UniquePersonListand get the autocomplete entries.- Pros: Easy to implement, many useful operations available.
- Cons: Less efficient as more time to compare the strings.
-
Alternative 2: Implement a trie data structure to store information and obtain the autocomplete entries from
the trie data structure.
- Pros: More efficient way to searching a string.
- Cons: More memory to store the strings. Have to refactor and modify the existing class and methods.
Tag adding feature
Implementation
The tag adding mechanism is facilitated by TagAddCommand and TagAddCommandParser.
Additionally, The mechanism utilises the following operations in UniqueTagList and UniquePersonList.
-
UniqueTagList#hasTag(Tag tag)- Checks if the tagList has the tag. -
UniquePersonList#setPerson(Person target, Person editedPerson)- Sets the same person with the new tag.
These operations are exposed in the Model interface under the same method name.
Given below is an example usage scenario and how the tag adding mechanism behaves at each step.
Step 1. The user executes tag add 1 t/friend command to add the tag, friend, to the contact indicated by the INDEX, 1.
TagAddCommandParser calls ArgumentTokenizer#tokenizeToList() to separate the parameters of 1 and t/friend.
Step 2. The tag add command collects the list of contacts shown, containing them in Model#getFilteredPersonList().
Step 3. The tag add command recreates the same contact and adds the new tag, containing this new contact in TagAddCommand#createEditedPerson(Person personToEdit, Tag tag).
Step 4. The tag add command replaces the old contact with the new, updated contact, calling Model#setPerson(Person target, Person editedPerson).
The following activity diagram summarizes what happens when a user executes a tag add command:
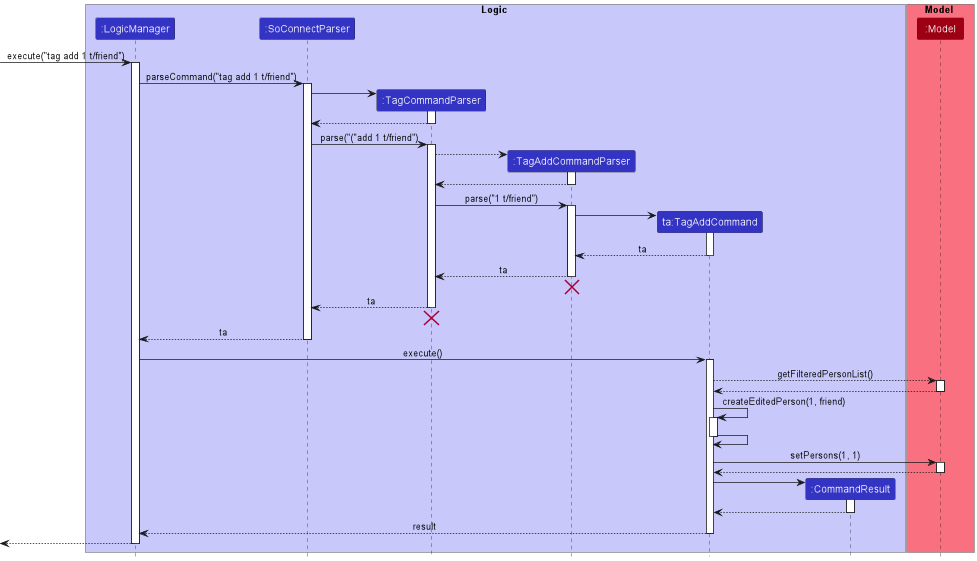
TagAddCommandParser and TagCommandParser should end at the destroy marker (X) but due to a limitation of PlantUML, the lifeline reaches the end of diagram.
Step 5. The contact indicated by INDEX now has the friend tag.
Design consideration
Aspect: How to implement tag add:
-
Alternative 1 (current choice): Creates a new contact with the tag included.
- Pros: Prevents direct access into the tags of a contact.
- Cons: Potential error occurs if some form of duplication is allowed.
-
Alternative 2: Directly add the tag into the contact .
- Pros: Easy to implement.
- Cons: Easy to access into the tags of a contact. Could cause accidental bugs.
Tag editing feature
The tag adding mechanism is facilitated by TagEditCommand and TagEditCommandParser.
Additionally, The mechanism utilises the following operations in UniqueTagList, UniquePersonList and UniqueTodoList.
-
UniqueTagList#editTag(Tag oldTag, Tag newTag)- Changes the old tag with the new tag. -
UniquePersonList#changeRelevantPersonTag(oldTag, newTag)- Updates every person who has the old tag with the new tag. -
UniqueTodoList#changeRelevantTodoTag(Tag oldTag, Tag newTag)- Updates every task which has the old tag with the new tag.
These operations are exposed in the Model interface under the same method name.
Given below is an example usage scenario and how the tag editing mechanism behaves at each step.
Step 1. The user executes tag edit t/friend t/bestFriend command to edit the old tag, friend, to the new tag, bestFriend.
TageditCommandParser calls ArgumentTokenizer#tokenizeToList() to separate the parameters of t/friend and t/bestFriend.
Step 2. The tag edit command edits the old tag with the new tag, calling Model#editTag(oldTag, newTag).
The following activity diagram summarizes what happens when a user executes a tag add command:
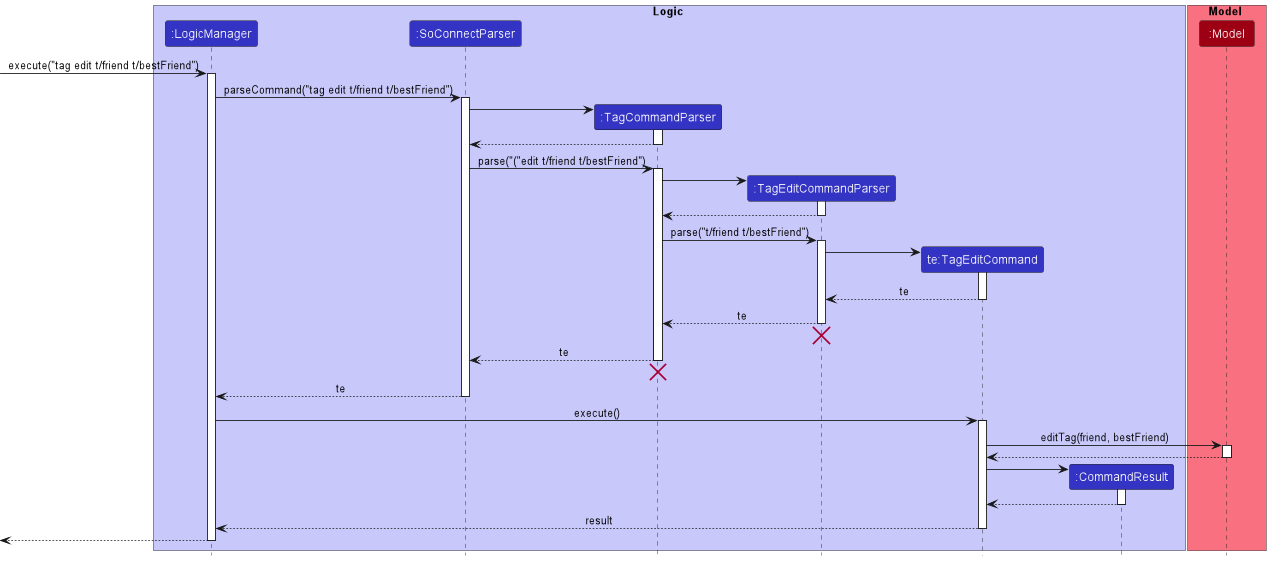
TagEditCommandParser and TagCommandParser should end at the destroy marker (X) but due to a limitation of PlantUML, the lifeline reaches the end of diagram.
Step 3. The old tag on every contact and every task is now replaced with the new tag for display.
Design consideration
Aspect: How to implement tag edit:
-
Alternative 1 (current choice): Creates a new tag and replaces the old tag with the new one.
- Pros: Prevents direct access into the information of a tag.
- Cons: Tedious. Necessary to manually change the old tag in every contact and every task.
-
Alternative 2: Change the tag’s name.
- Pros: Easy to implement.
- Cons: Can potentially introduce bugs due to direct access into the tag’s implementation.
{Explain here how the data archiving feature will be implemented}
Customise Order Feature
Implementation
This feature is mainly implemented by the CustomiseOrderCommand and PersonCard classes. The following methods are the main ones:
-
CustomiseOrderCommand#execute()- saves the new attribute order in thepreferences.jsonfile by callingModel#setGuiSettings(). -
PersonCard#setAttributes()- reads the order from thepreferences.jsonfile and builds thePersonCardin the order specified.
Given below is an example usage scenario and how this feature behaves at each part of the mechanism.
Step 1. The user launches the application. The user sees a list of contacts, each contact contains a name, a phone number, an email, an address and possibly some tags. Under each contacts’ name, the current order the user sees is: TAGS, PHONE, EMAIL and ADDRESS (this is also the default order).
Step 2. The user executes customise order e/ as the user wants the emails appear right below the name.
Step 3. SoConnectParaser processes the input and calls the parser CustomiseCommandParser to parse " order e/".
Step 4. CustomiseCommandParser processes the input and calls the parser CustomiseOrderCommandParser to parse " e/".
Step 5. CustomiseOrderCommandParser processes the input into a list of attributes. In this case, the list of attributes only contains EMAIL and is missing the attributes TAGS, PHONE and ADDRESS. The missing attributes are added to the list according to the default order mentioned above. The list of attributes now contains EMAIL, TAGS, PHONE and ADDRESS.
Step 6. CustomiseOrderCommandParser creates a CustomiseOrderCommand with the list of attributes.
Step 7. CustomiseOrderCommandParser returns the CustomiseOrderCommand.
Step 8. Logic executes the CustomiseOrderCommand.
Step 9. CustomiseOrderCommand#execute() calls Model#setGuiSettings() to save the new attribute order in preferences.json.
The following sequence diagram illustrates Steps 3 to 9:
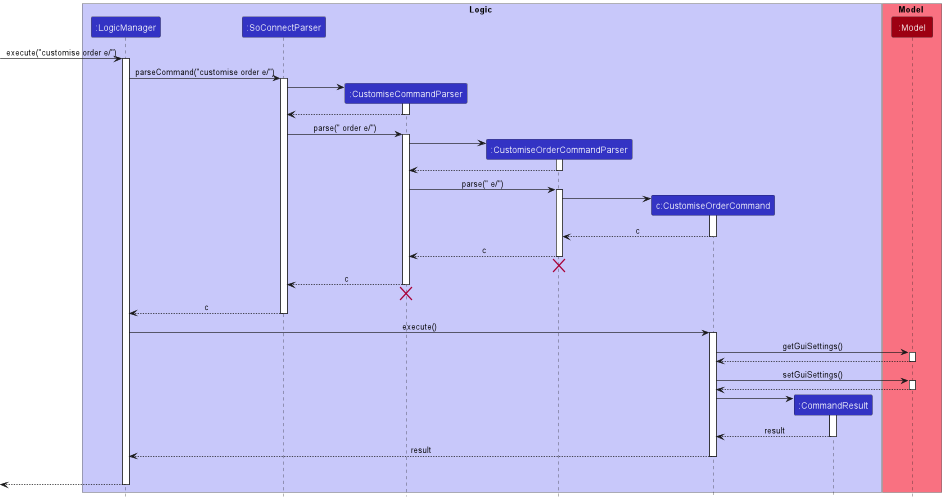
CustomiseOrderCommandParser and CustomiseCommandParser should end at the destroy marker (X) but due to a limitation of PlantUML, the lifeline reaches the end of diagram.
Step 10. The user sees the new ordering after PersonCard#setAttributes() sets the attributes based of the new order in preferences.json.
Design consideration
-
Alternative 1 (current choice): Sets the order by using 4 placeholder JavaFX
FlowPane.- Pros: Easy to implement.
- Cons: Hard to maintain if different styling required for different attributes.
-
Alternative 2: Have 24 different FXML files and use the one that is in the required order.
- Pros: Easy to implement.
- Cons: Harder to maintain and make changes.
Documentation, logging, testing, configuration, dev-ops
Appendix: Requirements
Product scope
Target user profile: NUS SoC Student
- Has a need to manage a significant number of contacts and tasks (from NUS modules and co-curricular activities).
- Prefers desktop apps over other types (easy access to laptop for NUS/SoC modules).
- Can type fast (from SoC coding modules).
- Prefers typing to mouse interactions (from SoC coding modules).
- Is reasonably comfortable using CLI apps (from SoC coding modules).
Value proposition:
- Manage contacts and tasks faster than a typical mouse/GUI driven app.
- Organise and separate their school contacts from personal contacts.
- Organise and separate their school tasks from personal tasks.
- Practice and train their typing speed.
- Increase their familiarity with using CLI tools.
User stories
Priorities: High (must have) - * * *, Medium (nice to have) - * *, Low (unlikely to have) - *
| Priority | As a … | I want to … | So that I can… |
|---|---|---|---|
* * * |
new user | see usage instructions | refer to instructions when I forget how to use the App |
* * * |
user | add a new contact | |
* * * |
user | delete a contact | remove entries that I no longer need |
* * * |
user | view all my contacts | keep track of all my contacts in one place |
* * |
user | edit a contact | update it or correct mistakes |
* * |
user | clear all my contacts | save time deleting them one by one |
* * |
user | create a new tag | categorise my contacts |
* * |
user | delete a tag | remove redundant tags |
* * |
user | edit a tag | provide better naming |
* * |
user | tag a contact | add it to a category |
* * |
user | untag a contact | remove it from a category |
* * |
user | search using a name, phone number, email or address | find a contact easily without reading through the list |
* * |
user | search with a tag | find groups of contacts that share a common tag |
* * |
user | search with multiple tags | narrow my search results to only contacts that have all the specified tags |
* * |
user | search with multiple tags | broaden my result results to contacts that have any of the specified tags |
* * |
user | view contacts related to my search query | find contacts even when I mistype their name |
* * |
user | hide contact details | focus on certain information of each contact |
* * |
user | show contact details | view certain information of each contact |
* |
user | customise the order of information for contacts | view more important information before others |
* * |
user | have an autocomplete for my current search query | search faster by names and minimize the chance of an unsuccessful search |
* * |
user with many contacts | specify the default order of my contacts | avoid re-sorting the list everytime |
* * |
user with many contacts | sort contacts by name, email, phone number, or address | organise my contacts list |
* * |
user with many contacts | sort contacts according to tags | view contacts with a specified tag before other contacts |
* * |
user with many contacts | sort contacts by multiple fields | organise my contacts list with greater degree |
* * |
user | add a new todo | |
* * |
user | delete a todo | remove a todo that I have completed |
* * |
user | edit a todo | update it or correct my mistakes |
* * |
user | clear all my todos | save time on deleting them one by one |
* * |
user | filter the list of todos shown | only view the portion of list I need at the moment |
Use cases
(For all use cases below, the System is the SoConnect and the Actor is the user, unless specified otherwise)
Use case: Delete a contact
MSS
- User requests to list contacts.
- SoConnect shows a list of contacts.
- User requests to delete a specific contact in the list.
-
SoConnect deletes the contact.
Use case ends.
Extensions
-
1a. The list is empty.
Use case ends.
-
3a. The given index is invalid.
-
3a1. SoConnect shows an error message.
Use case resumes at step 2.
-
Use case: Search contacts
MSS
- User requests to search a specific word in the list.
-
SoConnect shows a list of contacts related to the word.
Use case ends.
Extension
-
1a. The list is empty.
Use case ends.
-
3a. There is no input after search.
-
3a1. SoConnect shows an error message and the same list of contacts.
Use case ends.
-
Use case: Edit a tag
MSS
- User requests for list of tags.
- SoConnect shows the list of tags.
- User changes a tag.
-
SoConnect updates the tag.
Use case ends.
Extensions
-
1a. There are no tags.
Use case ends.
-
3a. There is no such current tag.
-
3a1. SoConnect shows an error message.
Use case resumes at step 2.
-
-
3b. The new tag already exist.
-
3b1. SoConnect shows an error message.
Use case resumes at step 2.
-
Use case: Add tag to Contact
MSS
- User requests for the contact.
- SoConnect gives the contact.
- User requests to add tag to the contact.
-
SoConnect adds the tag to the contact.
Use case ends.
Extensions
-
1a. There is no such name in the contacts.
-
1a1. SoConnect shows an error message.
Use case resumes at step 1.
-
-
3a. There is no such tag in the taglist.
-
3a1. SoConnect shows aan error message.
Use case resumes at step 2.
-
Use case: Sort by name
MSS
- User enters command to sort the contact list by name.
-
SoConnect sorts the list by name and displays the new list.
Use case ends.
Use case: Hide phone number of all contacts
MSS
- User requests phone number to be hidden.
-
SoConnect no longer displays phone number of each contact.
Use case ends.
Use case: Show phone number of all contacts
MSS
- User requests phone number to be shown.
-
SoConnect now displays phone number of all contacts.
Use case ends.
Use case: Order contact details
MSS
- User requests details to be shown in the following order: address, email, phone number, tags.
-
SoConnect now displays in the following order: address, email, phone number, tags.
Use case ends.
Non-Functional Requirements
- Should work on any mainstream OS as long as it has Java
11or above installed. - Should be able to hold up to 1000 contacts and todos without a noticeable sluggishness in performance for typical usage.
- A user with above average typing speed for regular English text (i.e. not code, not system admin commands) should be able to accomplish most of the tasks faster using commands than using the mouse.
- Should be for a single user i.e. (not a multi-user product).
- Should have its data stored locally and the data should be in a human editable text file.
- Should not use a Database Management System for data storage.
- Should work without requiring an installer.
- Should not depend on a remote server.
- Should not cause any resolution-related inconveniences to the user.
- Should be packaged in a single JAR file and its size should not exceed 100MB.
- Should not have hard-to-test features or features that make the product hard-to-test, i.e., features that require creating user accounts, login, logout etc., audio-related features and Features that depend heavily on remote APIs.
Glossary
- Mainstream OS: Windows, Linux, Unix, OS-X.
- CLI: A text-based user interface used to run programs.
- GUI: A graphical user interface (GUI) is a form of user interface that allows users to interact with programs through graphical icons and audio indicator.
- JavaFX: A Java library used to develop client applications.
- kLoC: Stands for thousands of lines of code.
- NUS: National University of Singapore.
- SoC: School of Computing, a computing school in NUS.
- Private Contact Detail: A contact detail that is not meant to be shared with others.
- Autocomplete: A feature that shows a list of completed words or strings without the user needing to type them in full.
- Autocomplete Entry: A sentence that has been completed with autocomplete.
- Todo: A task that the user needs to complete.
Appendix: Instructions for manual testing
Given below are instructions to test the app manually.
Launch and shutdown
-
Initial launch.
-
Download the jar file and copy into an empty folder.
-
Double-click the jar file Expected: Shows the GUI with a set of sample contacts and todos. The window size may not be optimum.
-
-
Saving window preferences.
-
Resize the window to an optimum size. Move the window to a different location. Close the window.
-
Re-launch the app by double-clicking the jar file.
Expected: The most recent window size and location is retained.
-
Contact Management
Adding a contact
- Adding a new contact.
- Prerequisite: There is no contact named
John Doe. - Test case:
add n/John Doe p/98765432 e/johnd@example.com a/John street, block 123, #01-01. - Expected: New contact with the same details added in the contact list.
- Prerequisite: There is no contact named
- Adding a contact that has existed before.
- Prerequisite: There is a contact named
Betsy Crowein the contact list. - Text case:
add n/Betsy Crowe t/friend e/betsycrowe@example.com a/Newgate Prison p/1234567. - Expected: Error message
This person already exists in the SoConnect.is displayed.
- Prerequisite: There is a contact named
Editing a contact
- Editing an existing contact.
- Prerequisite: There is a contact in the 2nd index of contact list and no existing contact has the name Betsy Crower.
- Test case:
edit 2 n/Betsy Crower. - Expected: Edits the name of the 2nd contact to be Betsy Crower.
Listing all contacts
- Prerequisite: There are some existing contacts.
- Test case:
list. - Expected: Display all contacts.
Searching for a contact
- Searching an existing contact.
- Prerequisite: There is a contact named
Susanin the contact list. - Test case:
search n/susan. - Expected: Display all contacts that contain
susanas name, includingSusan.
- Prerequisite: There is a contact named
Sorting contacts
- Prerequisite: There are some existing contacts.
- Test case:
sort n/. - Expected: Display all contacts with the names sorted from A - Z.
Deleting a contact
-
Deleting a contact while all contacts are being shown.
-
Prerequisites: List all contacts using the
listcommand. Multiple contacts in the list. -
Test case:
delete 1.
Expected: First contact is deleted from the list. Details of the deleted contact shown in the status message. Timestamp in the status bar is updated. -
Test case:
delete 0.
Expected: No contact is deleted. Error details shown in the status message. Status bar remains the same. -
Other incorrect delete commands to try:
delete,delete x,...(where x is larger than the list size)
Expected: Similar to previous.
-
Clearing all contacts
- Prerequisite: There are some existing contacts.
- Test case:
clear. - Expected: All contacts are erased.
Todo Management
Adding a todo
- Adding a new todo.
- Prerequisite: There is an existing
CS2100tag and no existing todo has the details that will be provided below. - Test case:
todo add d/Watched recorded videos for CS2100 date/24-10-2022 pr/low t/CS2100. - Expected: New todo with the same details is shown in the list.
- Prerequisite: There is an existing
Editing a todo
- Editing an existing todo.
- Prerequisite: There is a todo in the 1st index of contact list.
- Test case:
todo edit 1 d/Read notes for ST2334. - Expected: Edits the description of the 1st todo to be Read notes for ST2334.
Deleting a todo
- Prerequisite: There is a todo in the 2nd index of contact list.
- Test case:
todo delete 2. - Expected: Todo in the 2nd index is deleted and is no longer shown.
Clearing all todos
- Prerequisite: There are some existing todos.
- Test case:
todo clear. - Expected: All todos are erased.
Filtering todos shown
- Showing all todos
- Prerequisite: There are some existing todos.
- Test case:
todo show. - Expected: All todos are shown.
Tag Management
Creating a tag
- Prerequisite: There is no tag named
math. - Test case:
tag create t/math. - Expected: A new
mathtag is created.
Deleting a tag
- Prerequisite: There is a tag named
english. - Test case:
tag delete t/english. - Expected: The
englishtag is deleted and can no longer be used.
Editing a tag
- Prerequisite: There is a tag named
englishand there isn’t a tag namedliterature. - Test case:
tag edit t/english t/literature. - Expected: The
englishtag is now shown asliterature.
Adding a tag to a contact
- Prerequisite: There is a tag named
englishand a contact in the 1st index in the contact list. - Test case:
tag add 1 t/english. - Expected: The
englishtag is attributed to the contact in the 1st index.
Removing a tag from a contact
- Prerequisite: There is a tag named
englishattributed to a contact in the 1st index in the contact list. - Test case:
tag remove 1 t/english. - Expected: The
englishtag is no longer attributed to the contact in the 1st index.
Customisation
Customising order of details
- Prerequisite: The current contact cards are displayed by name, followed by address, phone number, email and tags.
- Test case:
customise order a/ e/ p. - Expected: The contact cards are now displayed by name, followed by address, email, phone number and tags.
Hiding contact details
- Prerequisite: The current contact cards are displayed by name, followed by address, phone number, email and tags.
- Test case:
customise hide a/ e/ p. - Expected: The contact cards are now displayed by name, followed by tags.
Showing contact details
- Prerequisite: The current contact cards are displayed by name, followed by tags.
- Test case:
customise show a/ e/ p. - Expected: The contact cards now display information such as name, address, email, phone number and tags (might be unordered).
Appendix: Effort
Morphing of AB3
Achievements:
- Refactored all the packages to suit SoConnect identity.
- Added new logic class called
Autocompletethat can automatically make search suggestion for user. - Added new commands for Contact Management, Todo Management, Tag Management and Customisation.
- For Contact Management, we implemented new command
sortto allow for sorting contacts and replaced the limitedfindcommand with more advancedsearchcommand that was inspired by how Google works. - For Todo Management, we put in almost the same effort required to implement Contact Management from scratch, as Todo Management offers almost the same range of functionalities as Contact Management.
- For Tag Management, we implemented new classes that mirror the functionalities of Contact and Todo Management, as it is also capable of adding, editing, deleting tags.
- For Customisation, we implemented dynamic styling that allows user to modify how the information fields are shown.
Challenges:
- As we were adding a lot of functionalities and made modifications to existing AB3 features, we had to spend a lot of time to make sure everything was well integrated and connected.
- We had to put a lot of consideration into the commands design, as our product is dealing with not just contacts, but also todos.
Revamping of UI
Achievement: We transformed the AB3 traditional interface to a sophisticated, modern-looking UI that is more user-friendly and pleasing to use.
Challenges:
- None of us was familiar with JavaFX. Therefore, we needed to put a large amount of time into mastering JavaFX from scratch as well as understanding the structure of AB3.
- We had to restructure a lot of .fxml and .css files to allow for easier readability as well as incorporating the UI design into our features.
- Since we made many additions, such as Todo Management, Tag Management and Customisation, we had to put a lot of effort into producing a well-integrated and working UI that allows all these features to run smoothly.