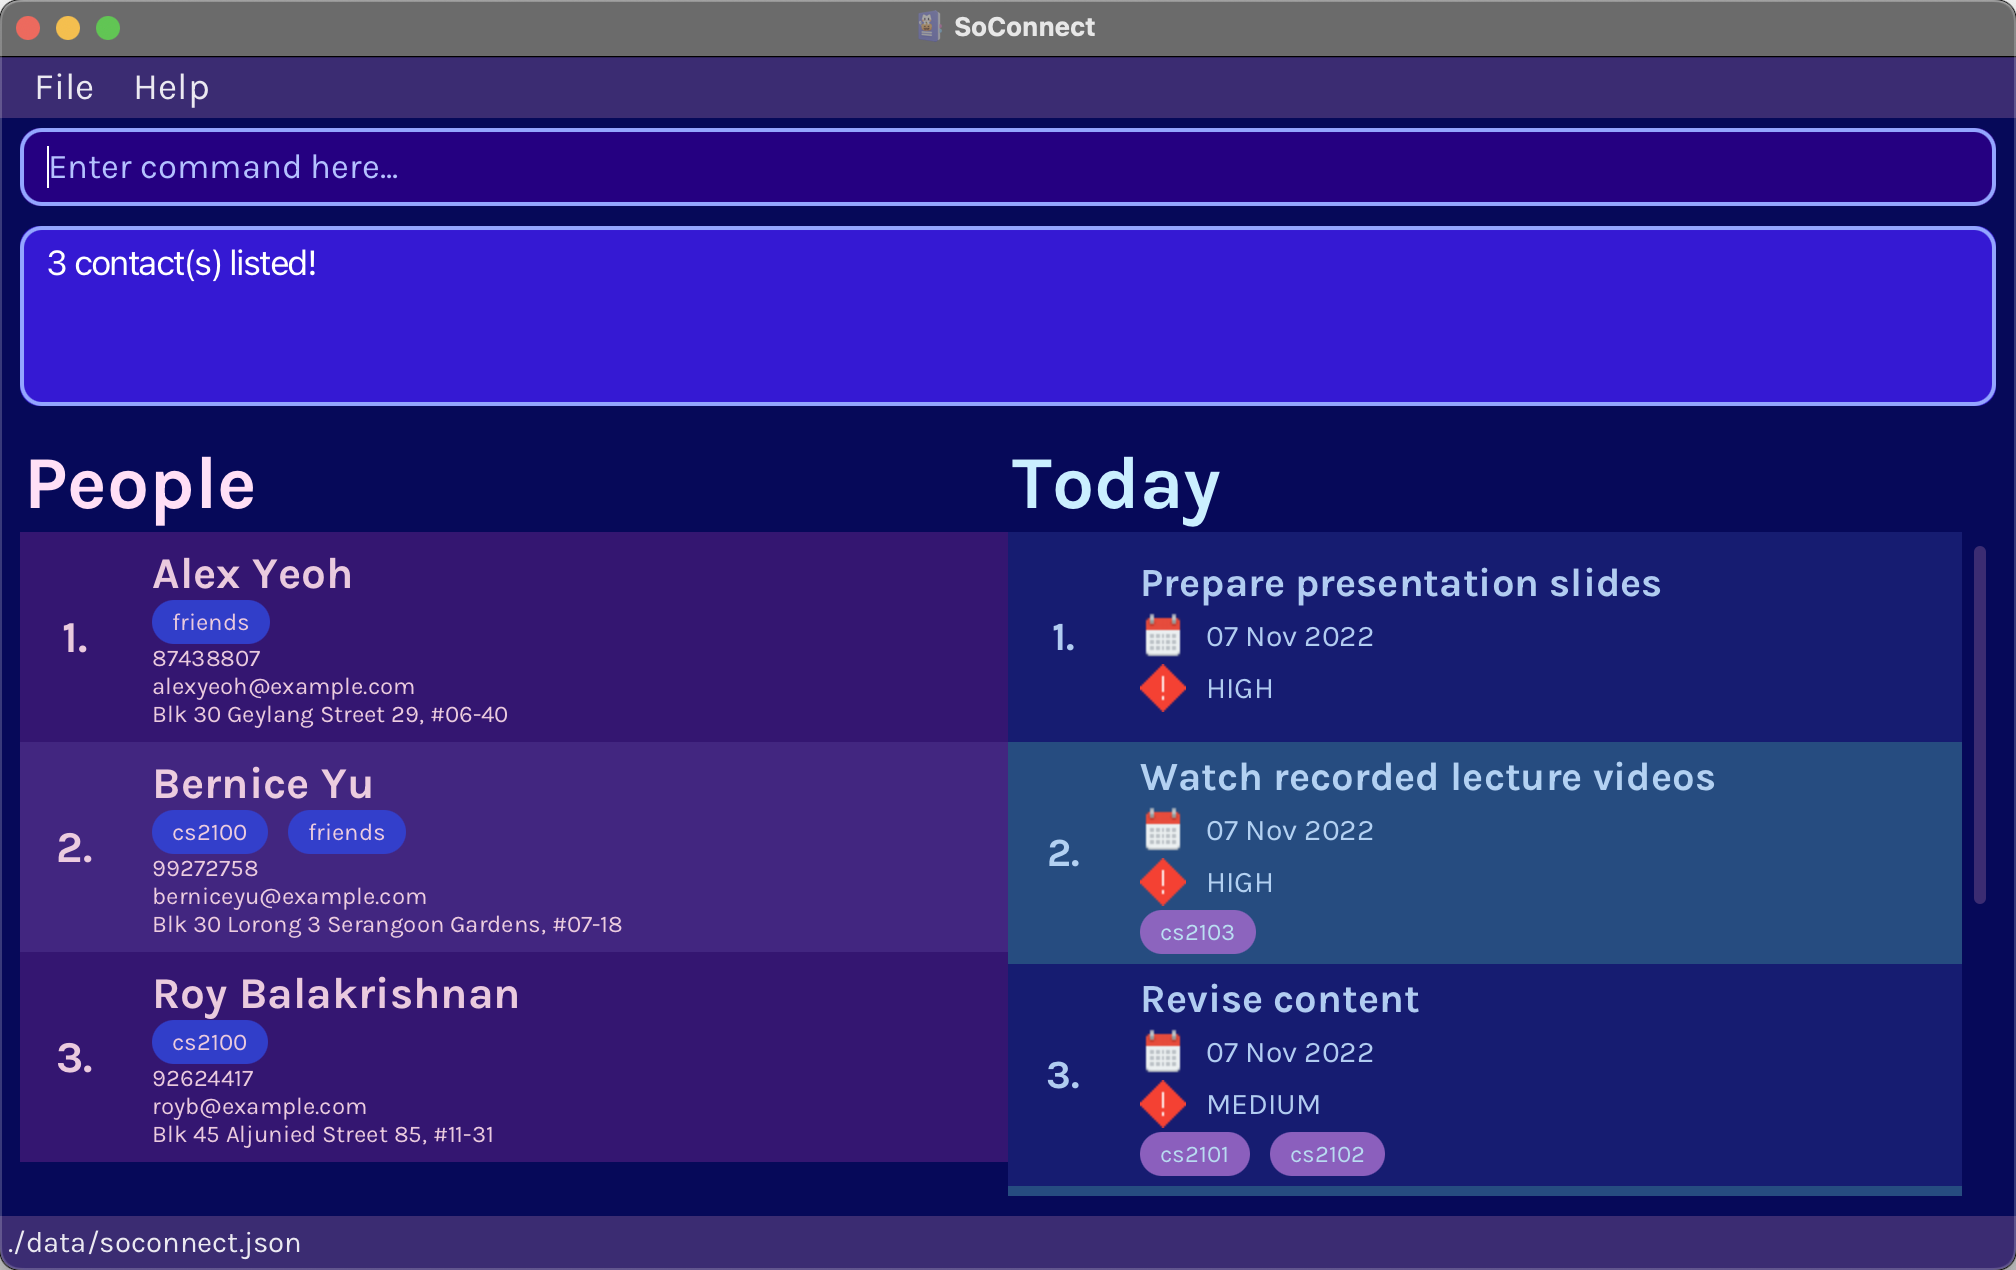
User Guide
1. Welcome to SoConnect’s User Guide!
Here, you can find everything you need to know about SoConnect, the ultimate solution for your everyday contacts and tasks management headaches!
If you are an SoC student, you are probably stressing over lack of social interactions and mounting assignments right now. Well, look no further! SoConnect is built to help you stay better connected to school life by doing your tedious management tasks, so you can focus on creating real friends and finishing schoolwork quickly.
Interested to use SoConnect? Then you are in the right place! In this user guide, we will cover step-by-step instructions from installing the app to customising it according to your preference. Whether you are a beginner or an advanced user, this guide will solve all your problems, just like our app!
2. Table of Contents
- 1. Welcome to SoConnect’s User Guide!
- 2. Table of Contents
- 3. Introduction
- 4. Using This Guide
- 5. Installation
- 6. Quickstart
- 7. Commands
- 8. FAQ
- 9. Command Summary
- 10. Glossary
3. Introduction
SoConnect is a 2-in-1 desktop app for managing contacts and tasks. It is originally built to help NUS SoC students stay better connected to their school life, in terms of social connections and school tasks.
SoConnect leverages on the simplicity of Command Line Interface (CLI) to optimize your productivity, while still maintaining user-friendliness through its Graphical User Interface (GUI). If you can type fast, SoConnect can get your contact and task management work done faster than even the popular applications such as Microsoft People and To Do!
Let’s look at the overview of our main features.
3.1. Contact Management
SoConnect allows you to store all your contact information, so that you no longer need to stress about forgetting someone. You can:
- Quickly add, view, edit and delete your contact.
- Sort your displayed contact list by name, email, address, phone number and tag.
- Tag specific people in your contact list.
- Search efficiently, just like using Google.
- What’s more, we even let you customise how you want your contact list to be shown!
3.2. Todo Management
SoConnect helps you keep track of your todo list, so that you can focus on finishing tasks quickly. You can:
- Quickly add, view, edit and delete your todo.
- Filter your todo according to deadline, tag and priority.
- Tag specific todo in your list, so that you can leverage on our Contact Management feature to find people who might be able to help you finish the task quickly!
4. Using This Guide
4.1. Navigate Around
If you are a first time user, we understand that you might be confused on how to even start up the application in the first place. Therefore, you can go to the Installation section to download SoConnect, if you have not done so.
Once SoConnect is installed, you can navigate to the Quickstart section, where we will cover the basics of using SoConnect.
If you are a returning user, you can head over to the Command Summary section for a quick overview of all commands in SoConnect. Alternatively, you can also read the detailed explanation of each command in the Commands section.
Have a question regarding the app? You might find the answer you are looking for in the FAQ section.
You can also refer to the Glossary section for definitions of commonly used terms in SoConnect.
4.2. Icons
In order to help you pay attention, we have used some icons along with highlighted text throughout this guide.
| Icon | Meaning |
|---|---|
| You should pay attention to this. | |
| You might find this useful. | |
| You can get additional information from this. | |
| You should be cautious about this. | |
| You should pay extra attention to this. |
4.3. Formatting and Notation
In case you are wondering why certain texts are styled differently, here are the meaning behind them:
- Text that are numbered and in purple font are headers which mark the beginning of a section or subsection of the guide.
- Words in bold are phrases that we want you to pay attention to.
- Links in blue will navigate you to place where you can find more explanation about the words.
5. Installation
5.1. How to Install
- Ensure you have Java 11 installed on your computer.
- Download the latest
SoConnect.jarfile from our release page. - Copy the file to an empty folder you want to use as the home folder for SoConnect. You can find more on how to do that here.
- Double-click the file to start SoConnect. You can head over to the Quickstart section for a guided tutorial on how to use the app.
![]() Note
Note
Empty folder is needed because all additional storage data and files will be saved in this folder.
5.2. Operating Systems
SoConnect currently can run smoothly on these operating systems:
- Ubuntu
- MacOS
- Windows
You can download and use SoConnect.jar on any of the above operating systems.
6. Quickstart
Upon completing this section, you should be able to explore SoConnect on your own. We will start by explaining different parts of the GUI, key definitions, command format, as well as trying out simple commands.
6.1. Layout
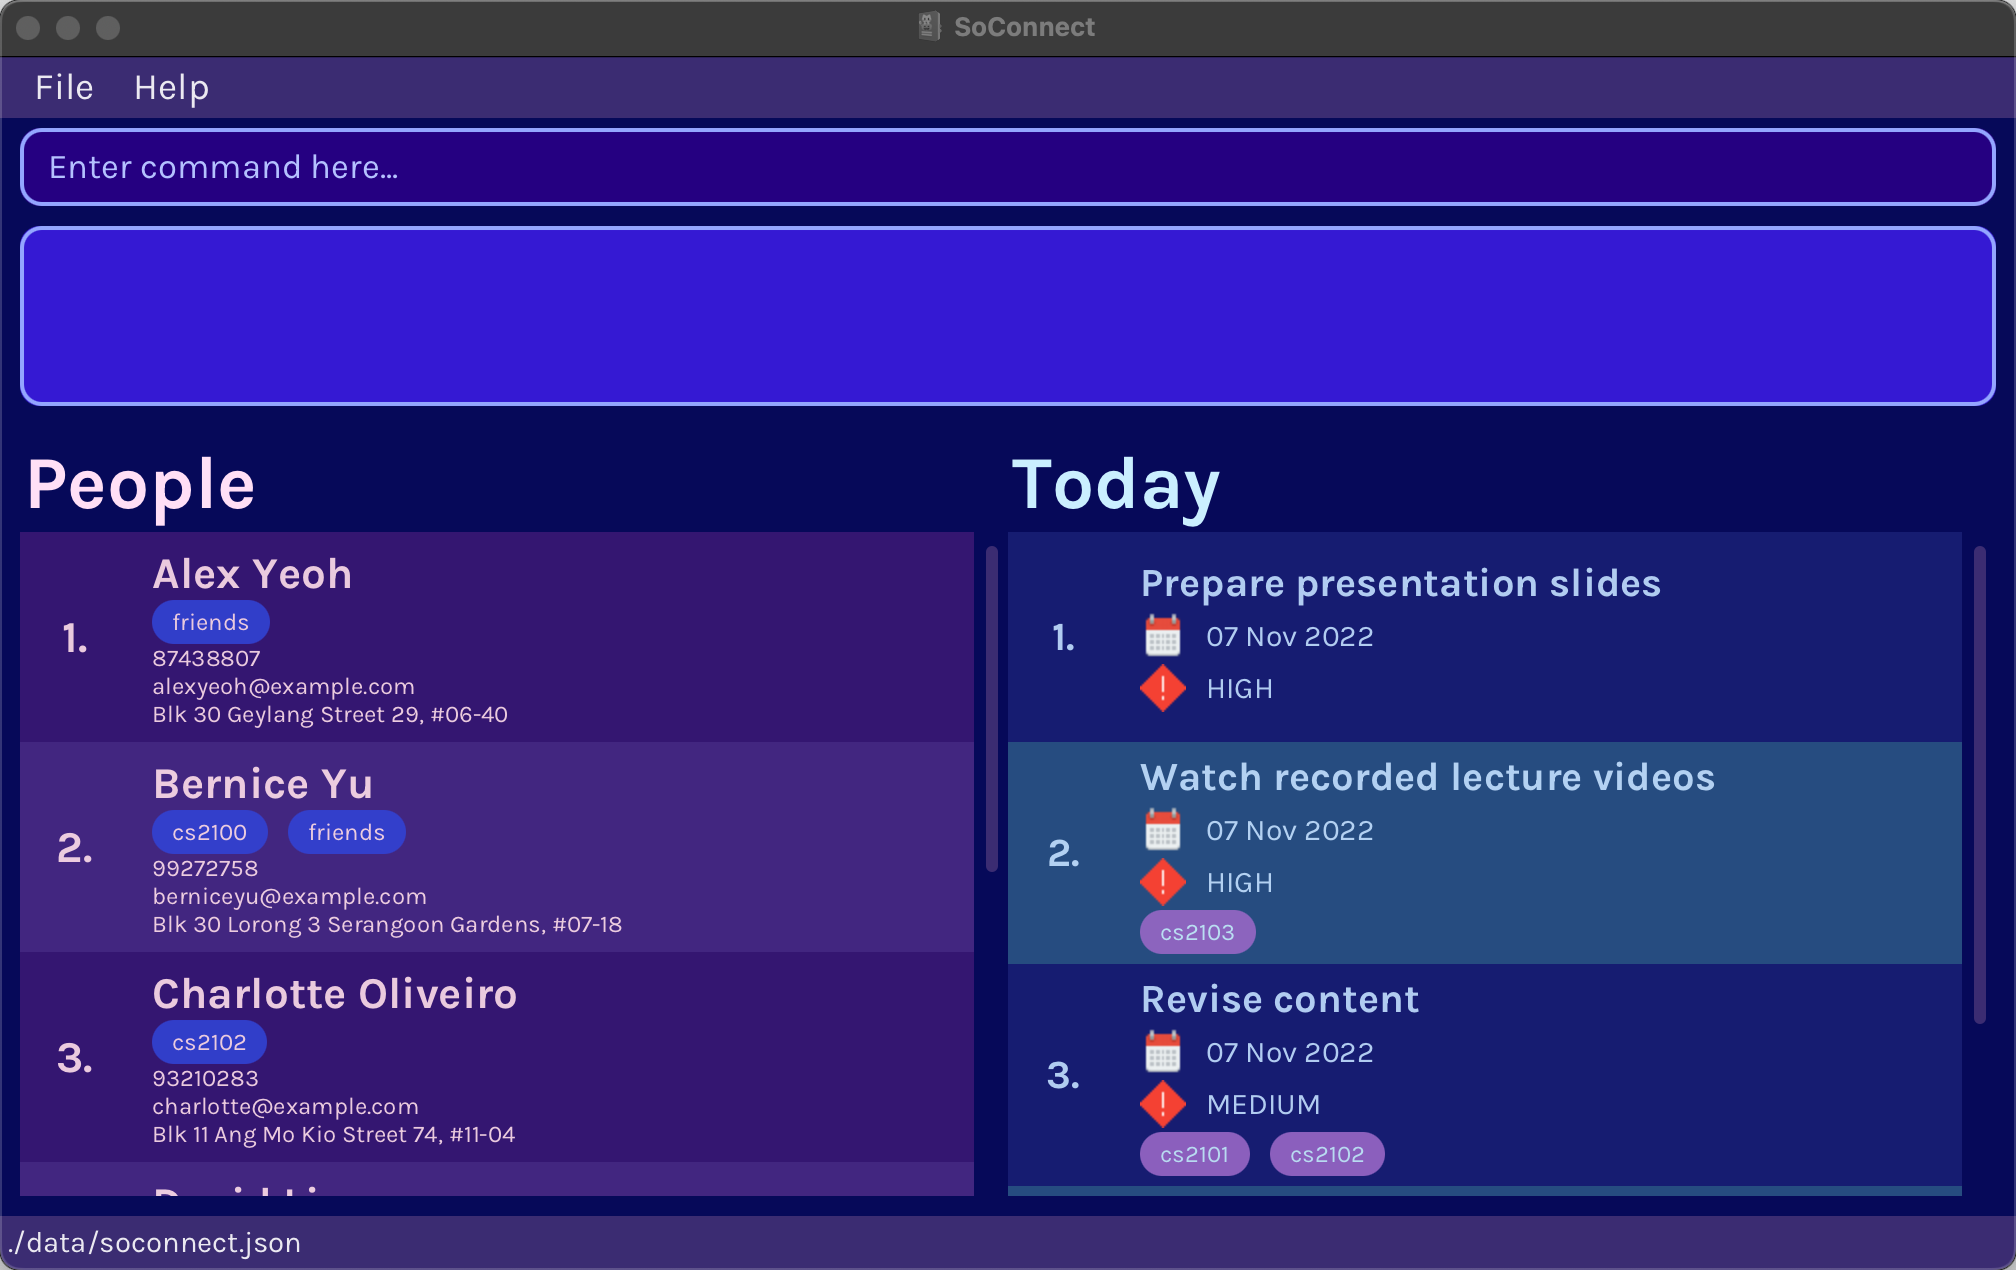
When you launch SoConnect, SoConnect will appear as a of Graphical User Interface (GUI). Let’s look at the layout of the different components in SoConnect.
SoConnect’s GUI Components:
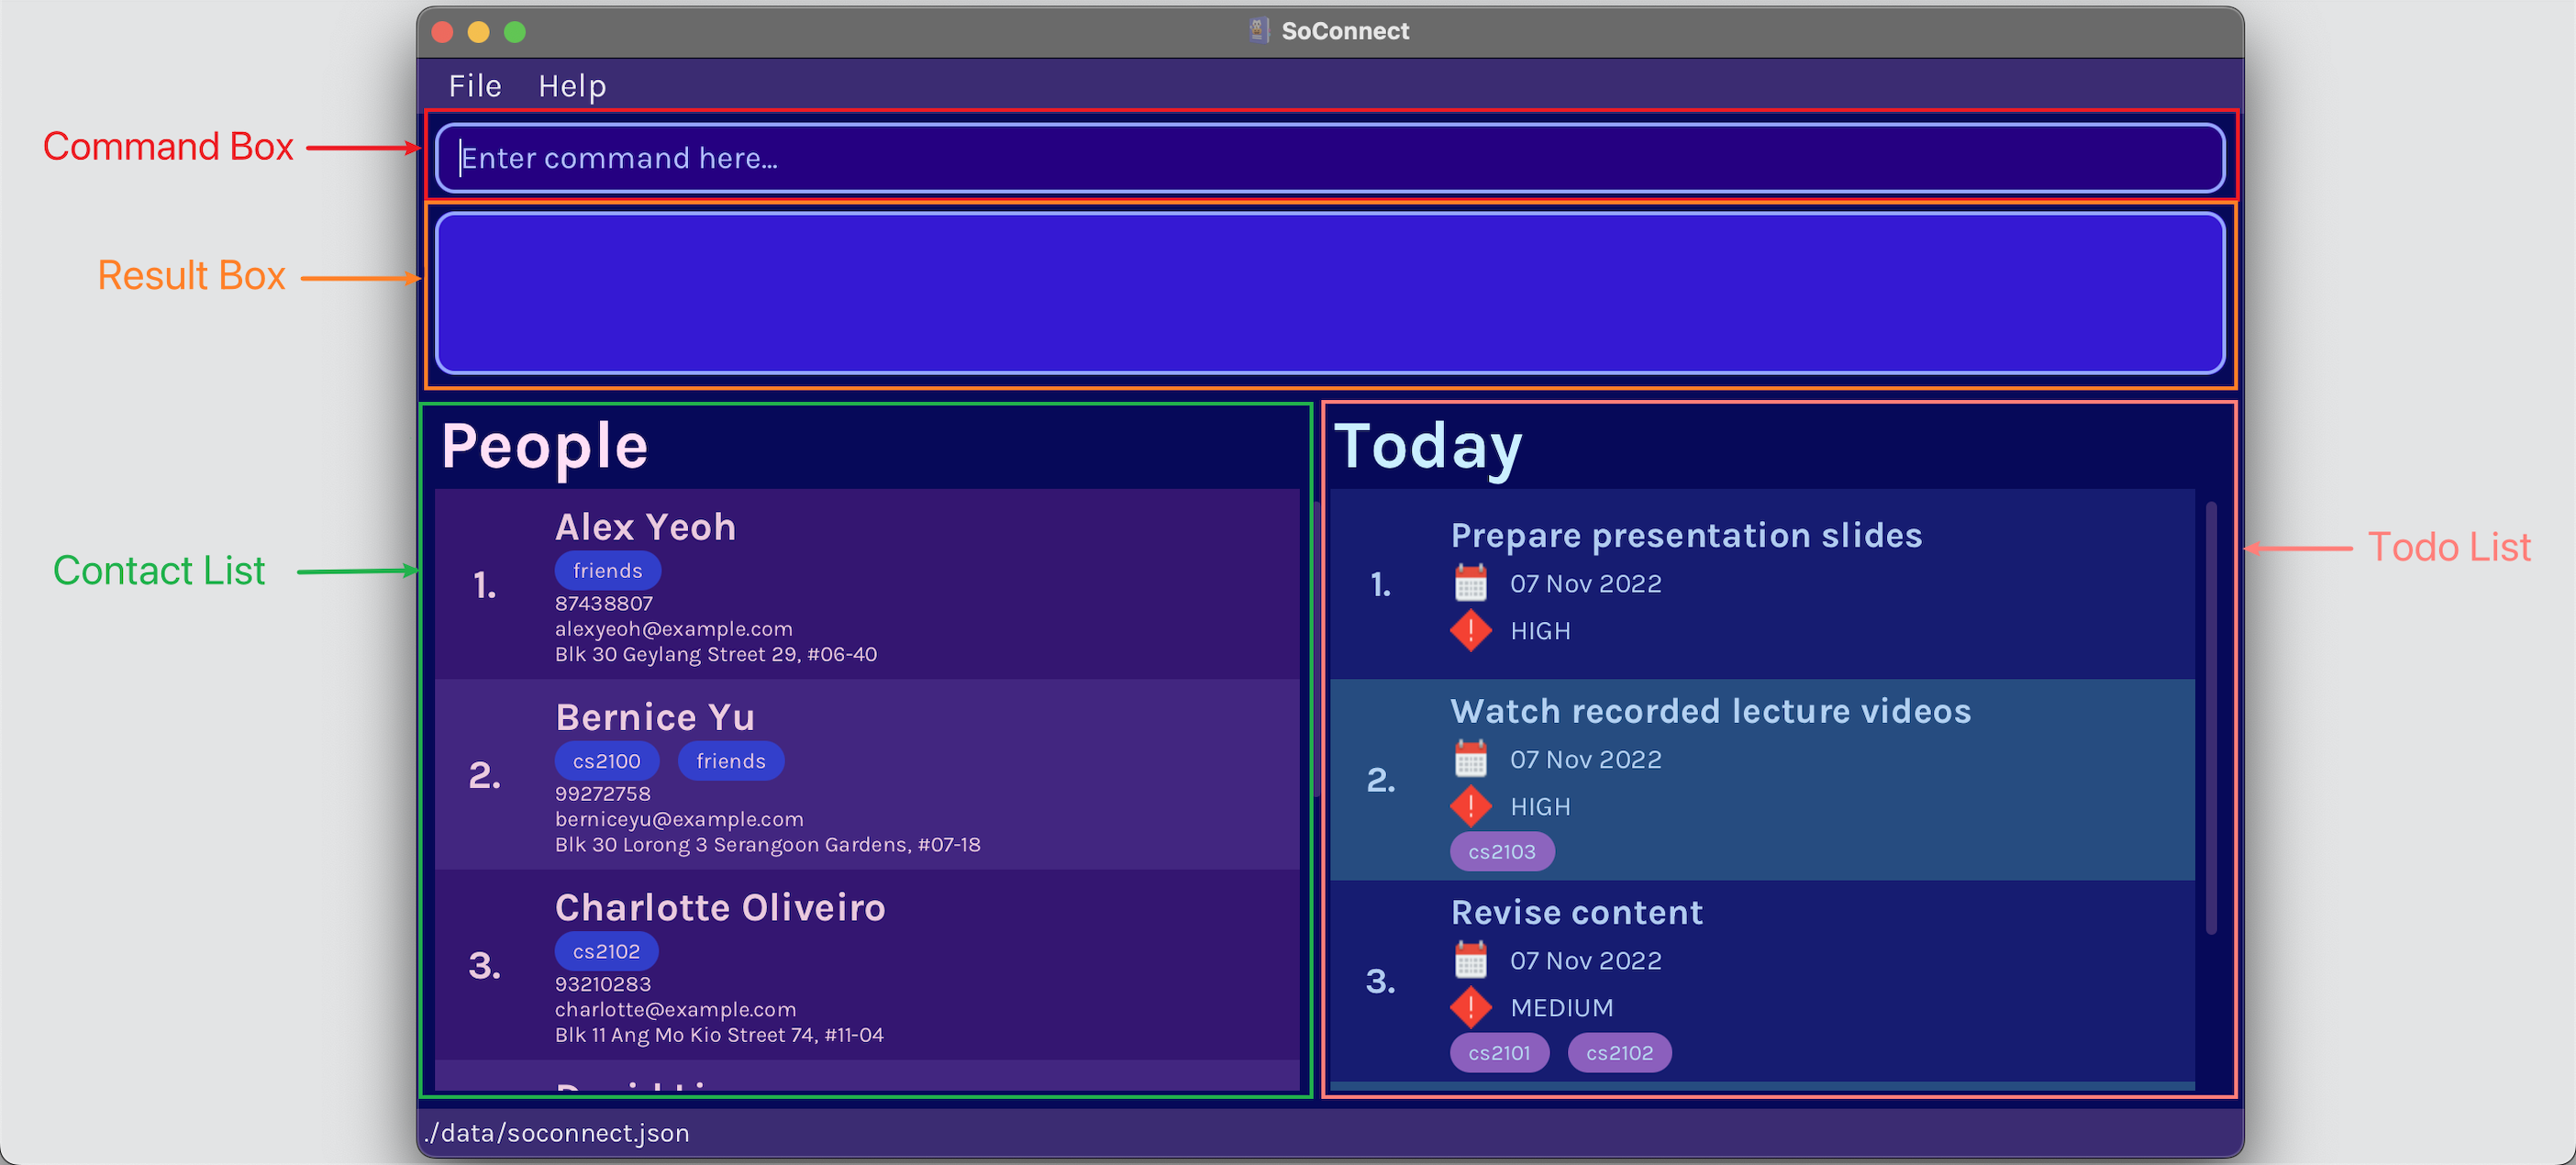
6.1.1. Command Box

- Command Box allows you to enter commands for actions that you wish to perform. Try typing
helpin the command box and see what happens!
6.1.2. Result Box
Success message:

Error message:

- The Result Box provides a feedback message after a command is entered.
- The feedback message will either be a success message to indicate that the command has successfully executed or an error message to inform you that there is an error with the command that you just entered.
6.1.3. Contact List
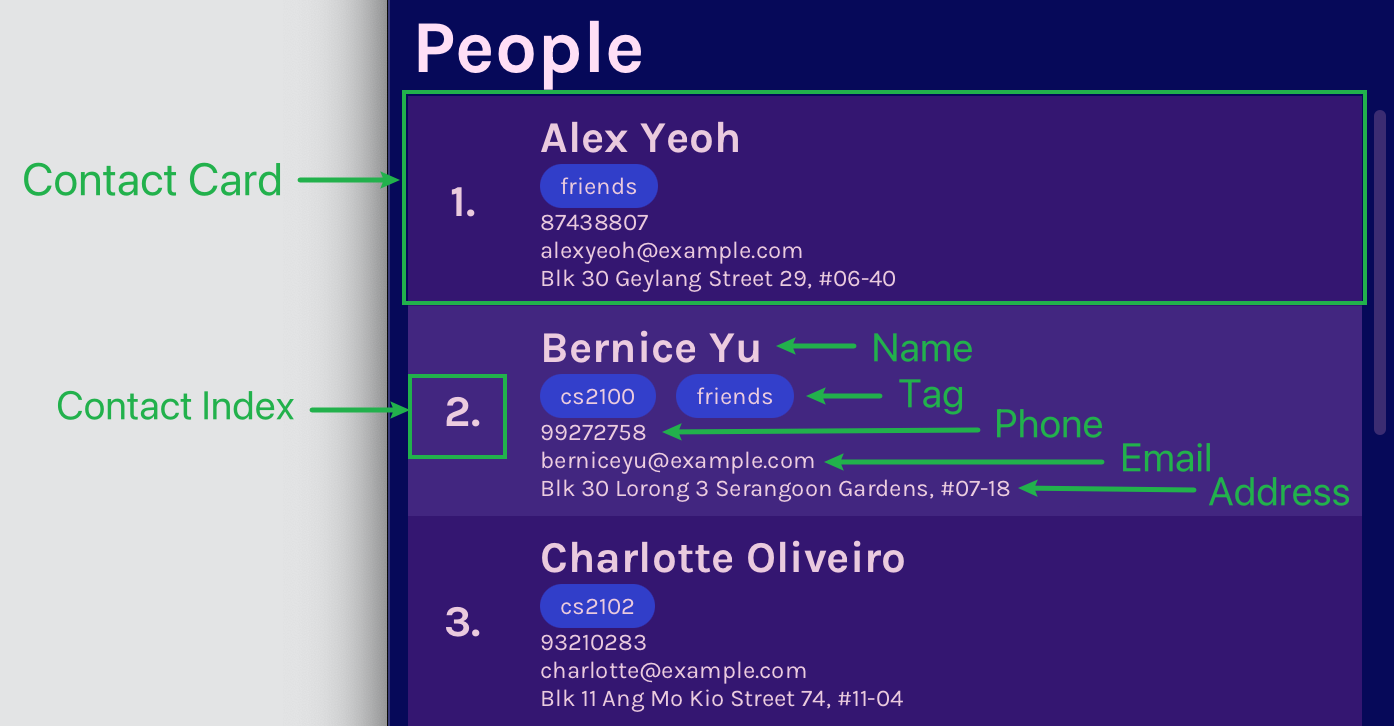
- Contact list displays the contacts with their information in the contact card.
6.1.4. Todo List
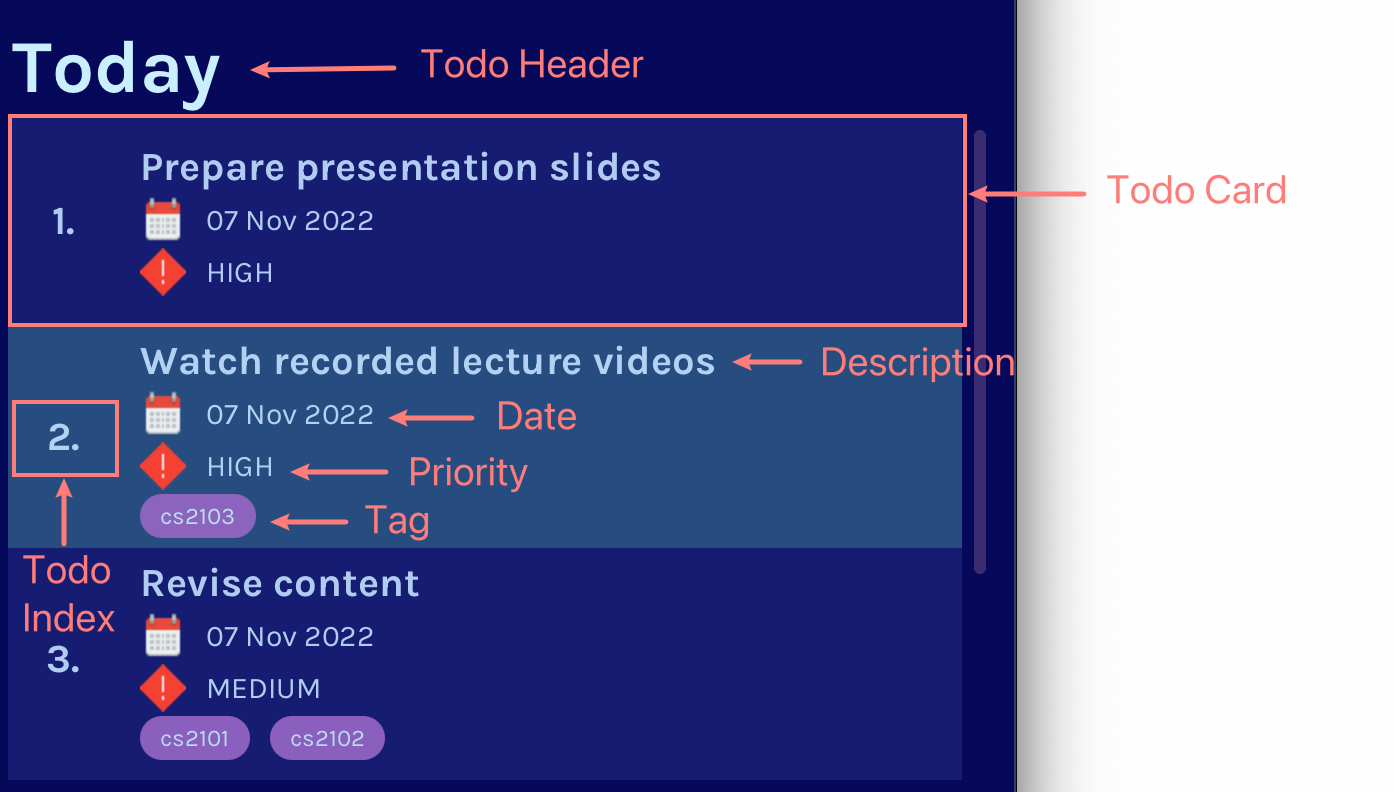
- Todo list displays the todos with their information in the todo card.
- The todo header changes based on the todos that are shown in the todo list.
6.2. Key Definitions
6.2.1. Command
Command is the action you want SoConnect to perform. Most commands require parameters after the command so that SoConnect has the required information to perform the action.
e.g. help
6.2.2. Parameter
A parameter has a prefix and information which are written together without a space in between. The information are words in UPPER_CASE and are to be provided by you. The prefix, which ends with a /, is specified before the information and determines the information type. Do note that some commands only require the prefix as a parameter.
e.g. n/NAME
6.3. Command Format
In the command box, you need to type the command along with the required parameters. You can leave the parameter field empty if it is optional, which is indicated by wrapped square brackets in the command format, e.g. search [e/EMAIL]
The parameters required for each command can be found in Command Summary and Commands.
![]() Note
Note
-
Words in
UPPER_CASEare the information to be supplied by the user.
e.g. if the format isadd n/NAME, you can typeadd n/John Doeto use the command. -
Items with
… after them can be used multiple times, including zero times.
e.g.[t/TAG]…can be used ast/friend,t/friend t/family, etc. -
Parameters can be in any order unless explicitly stated otherwise.
e.g. if the command specifiesn/NAME p/PHONE_NUMBER,p/PHONE_NUMBER n/NAMEis also acceptable. -
If a parameter is expected only once in the command, but you specify it multiple times, only the last occurrence of the parameter will be taken.
e.g. if you specifyp/12341234 p/56785678, onlyp/56785678will be taken. -
Irrelevant parameters for commands that do not take in parameters (such as
help,list,exitandclear) will be ignored.
e.g. if you typehelp 123, it will be interpreted ashelp. -
INDEXis used in commands to refer to a specific contact or todo by their index number on the currently displayed list. TheINDEXmust be a positive non-zero integer 1, 2, 3, …
6.4. How to Use the CLI
If you already know about Command Line Interface (CLI), you can skip this part and read the Commands.
To use the CLI, you can type a command, which is supposed to be typed in a certain format, in the command box and press Enter. SoConnect will perform a specific action. You could try using the CLI using some examples provided below.
The command format for help is just help. You can just type help into the CLI and press Enter, SoConnect will open the help window.
The command format for add is add n/NAME p/PHONE_NUMBER e/EMAIL a/ADDRESS [t/TAG]…. As mentioned here, since t/TAG is wrapped with square brackets and has the … at the back, you can choose whether to provide this parameter and even choose to provide this multiple times. The parameters can be provided in any order as long as they are after the command.
Valid usage e.g. add n/Betsy Crowe t/friend e/betsycrowe@example.com a/Newgate Prison p/1234567
Invalid usage e.g. add n/Joe Tan (Other parameters such as p/PHONE_NUMBER e/EMAIL a/ADDRESS must be provided as they are not wrapped in square brackets)
Do not worry about typing commands wrongly as SoConnect will guide you if and when you do so.
You can refer to the Command Summary for the full list of commands.
You can also refer to the Commands below for details of each command.
7. Commands
7.1. General Commands
Welcome to the General Commands section! In this section, you can learn about various miscellaneous commands and features of SoConnect. For the core commands of SoConnect, we have Contact Management Commands, Todo Management Commands, Tag Management Commands, and Customisation Commands.
7.1.1. Viewing help : help
If you are ever stuck or in need of help while using SoConnect, the help command will be there to assist you! The help command will link you to this user guide, providing you with easy access to guidance on how to use SoConnect.
Format: help
Example Input in Command Box:
help
Example Result:

7.1.2. Exiting the program : exit
When you are done with your contact management and todo management, you can exit SoConnect at any time using the exit command.
Format: exit
7.1.3. Saving the data
You won’t ever have to worry about losing your contacts or todos. SoConnect automatically saves your data in the hard disk after any command that changes the data.
7.1.4. Editing the data file
If you are an advanced user, SoConnect allows you to freely edit its data files and directly update your data.
- Your contact list and tag list are saved in a JSON file
[JAR file location]/data/soconnect.json.
- Your todo list is saved in a separate JSON file
[JAR file location]/data/todolist.json.
If your changes to a data file renders it invalid, SoConnect will discard the data file and start with an empty data file at the next run.
* Familiarise yourself with the format of the data files before attempting any changes.
* Backup your data files in a separate folder before attempting any changes.
7.1.5. Archiving data files [coming in v2.0]
7.2. Contact Management Commands
Welcome to the Contact Management Commands section! In this section, you can learn how to manage your contacts using SoConnect. Contacts help you to keep track of a person’s information by storing them all in 1 place. This way, you won’t have to worry about forgetting someone’s information and can find all of their information conveniently in 1 place.
A contact of a person consists of
- their name
- their phone number
- their email address
- their address
- (optional) tags to help you categorise your contacts
![]() Note
Note
- You might forget that you have already added a contact, but no need to worry about having duplicate contacts! We help you to detect duplicate contacts by checking existing contacts for the exact same name (case-sensitive) whenever you add a new contact or edit an existing contact.
- What if you are trying to add the contacts of 2 different people with the same name? You can make use of the case-sensitivity of names and numbers to help you differentiate between the contacts. (e.g.
Alex Yeoh,Alex yeoh,Alex Yeoh 1,Alex Yeoh 2can all be added as 4 different valid contacts) - Names currently only accept alphanumeric characters and spaces to help you avoid mistakes when typing them. If a name you are trying to add has special characters like
,or/, it is alright to leave the special characters out for now as SoConnect does not require you to store the exact legal names of your contacts.
7.2.1. Adding a contact: add
You can add a contact using the add command as shown below. While the NAME, PHONE_NUMBER, EMAIL, and ADDRESS parameters are mandatory, you can include as many TAG parameters as you wish (including none).
Format: add n/NAME p/PHONE_NUMBER e/EMAIL a/ADDRESS [t/TAG]…
![]() Note
Note
Tags have to be created first before you can add them to a contact.
- Refer to
Creating a Tagon how to create a tag.
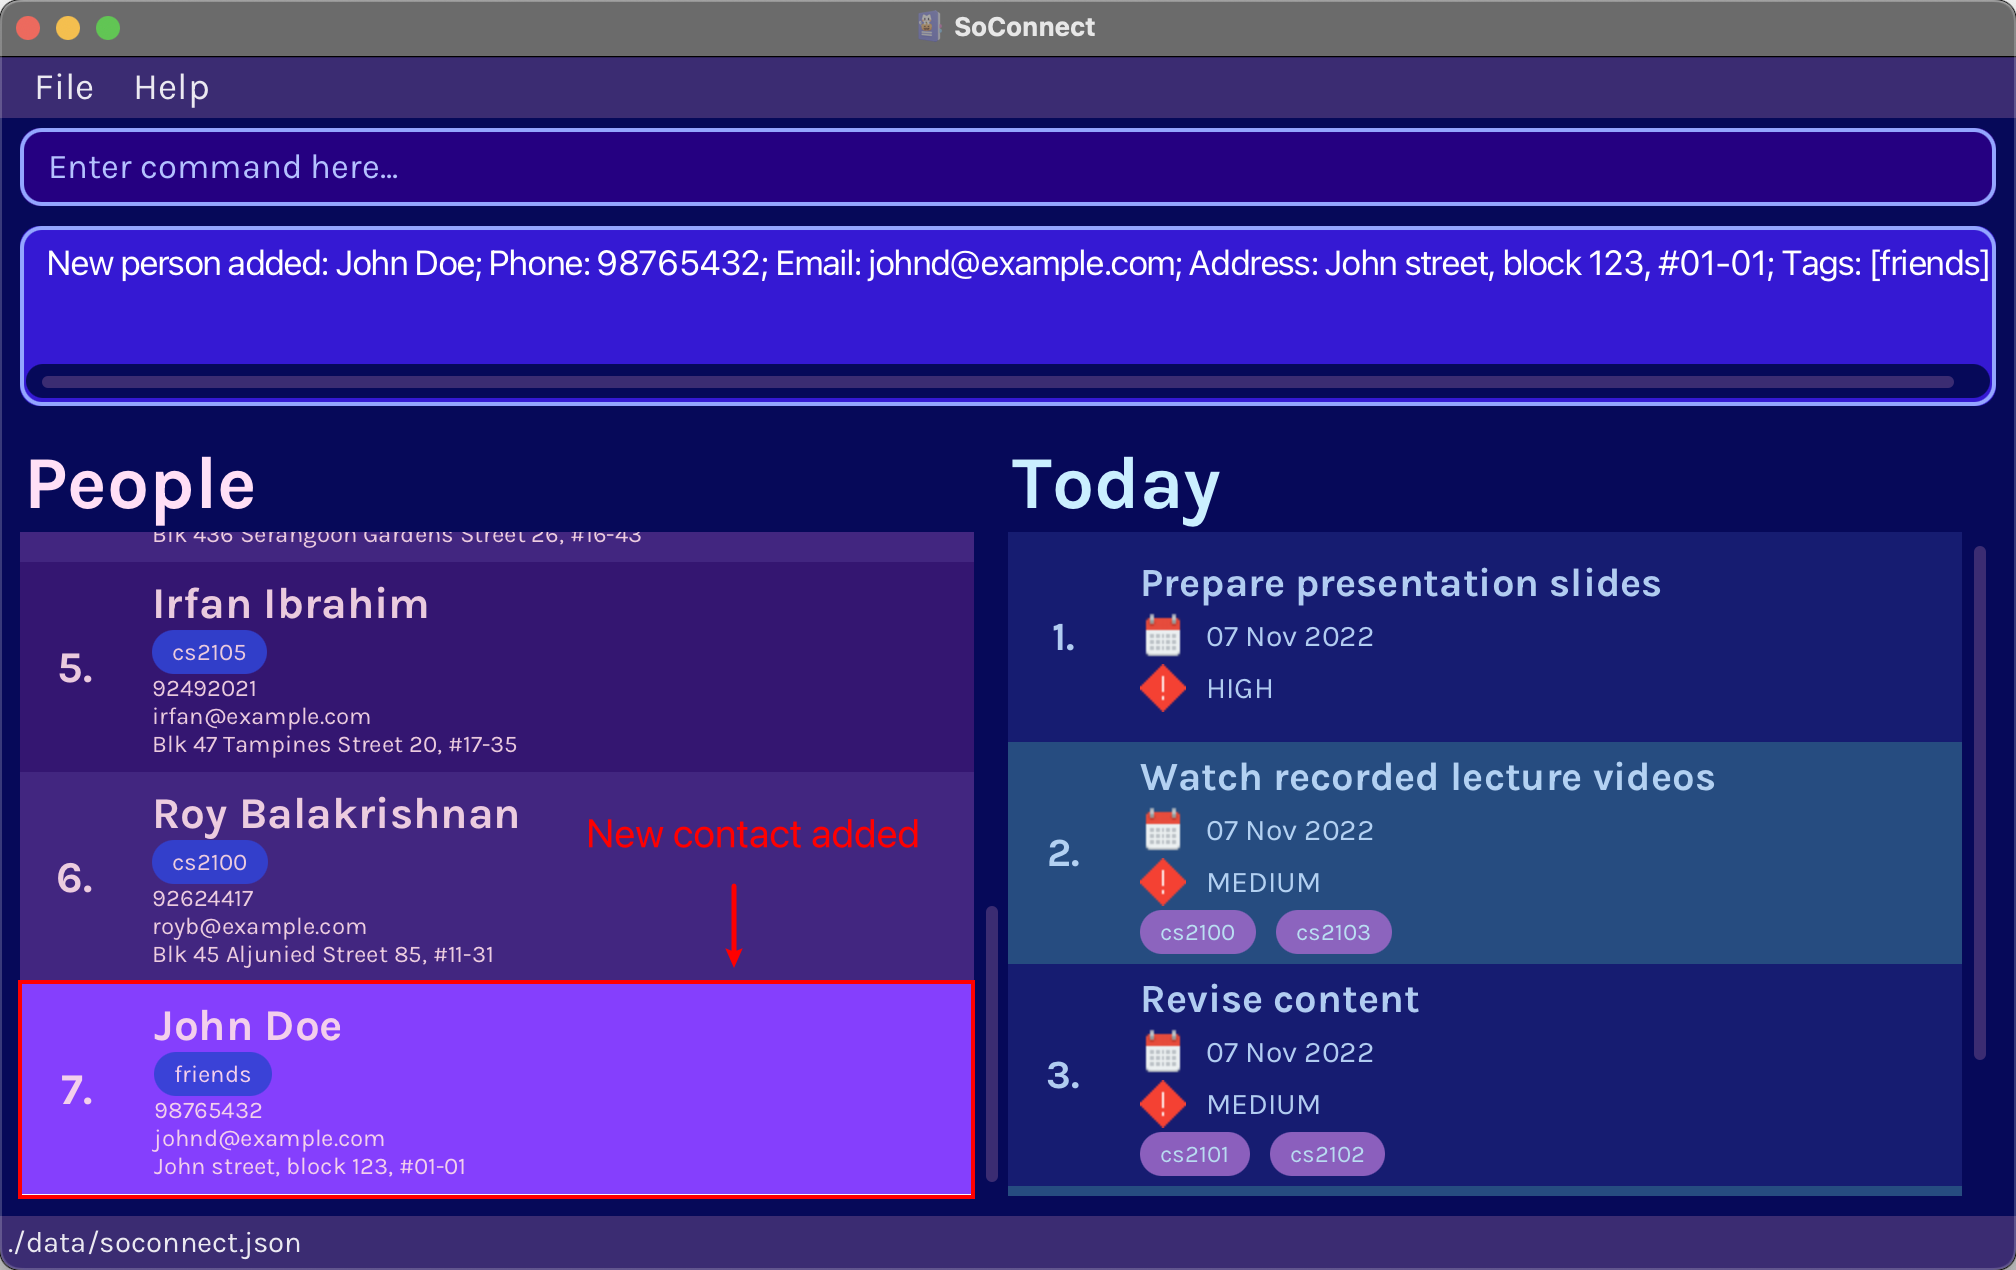
Example Input in Command Box:
add n/John Doe t/friends p/98765432 e/johnd@example.com a/John street, block 123, #01-01
Example Result:
7.2.2. Editing a contact : edit
You might have included the wrong information when adding a contact, or you might need to update the information of a contact. Regardless, you can accomplish both easily using the edit command as shown below. All you need is the INDEX of the contact you want to modify along with the parameters you want to update.
Format: edit INDEX [n/NAME] [p/PHONE] [e/EMAIL] [a/ADDRESS]
- At least 1 of the 4 optional parameters must be provided.
- Existing information will be updated with the parameters provided. Information of the parameters not provided will remain unchanged.
![]() Info
Info
To edit the tags of a contact, you can refer to adding a tag and removing a tag.
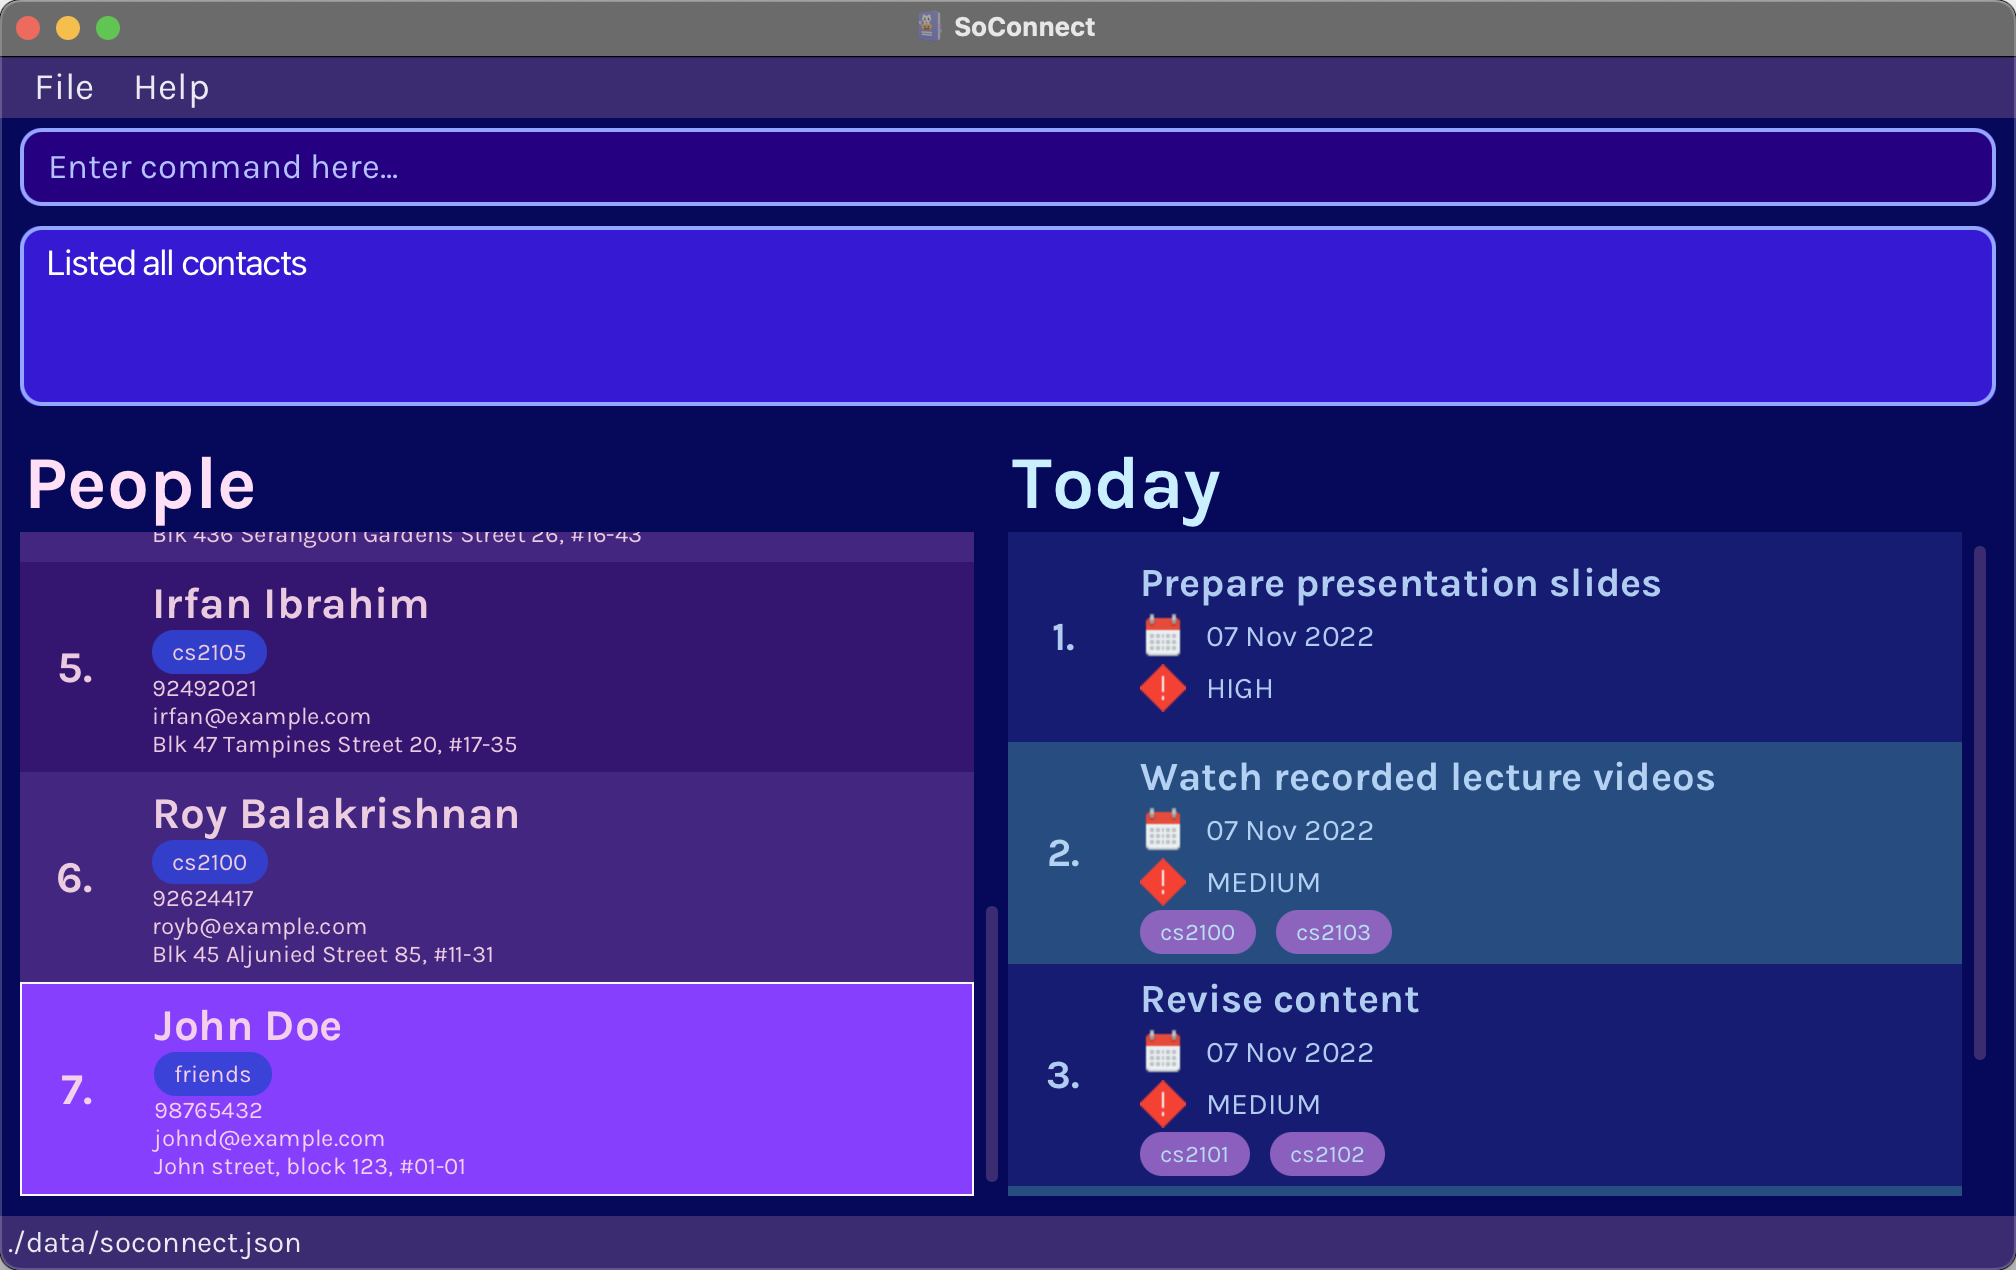
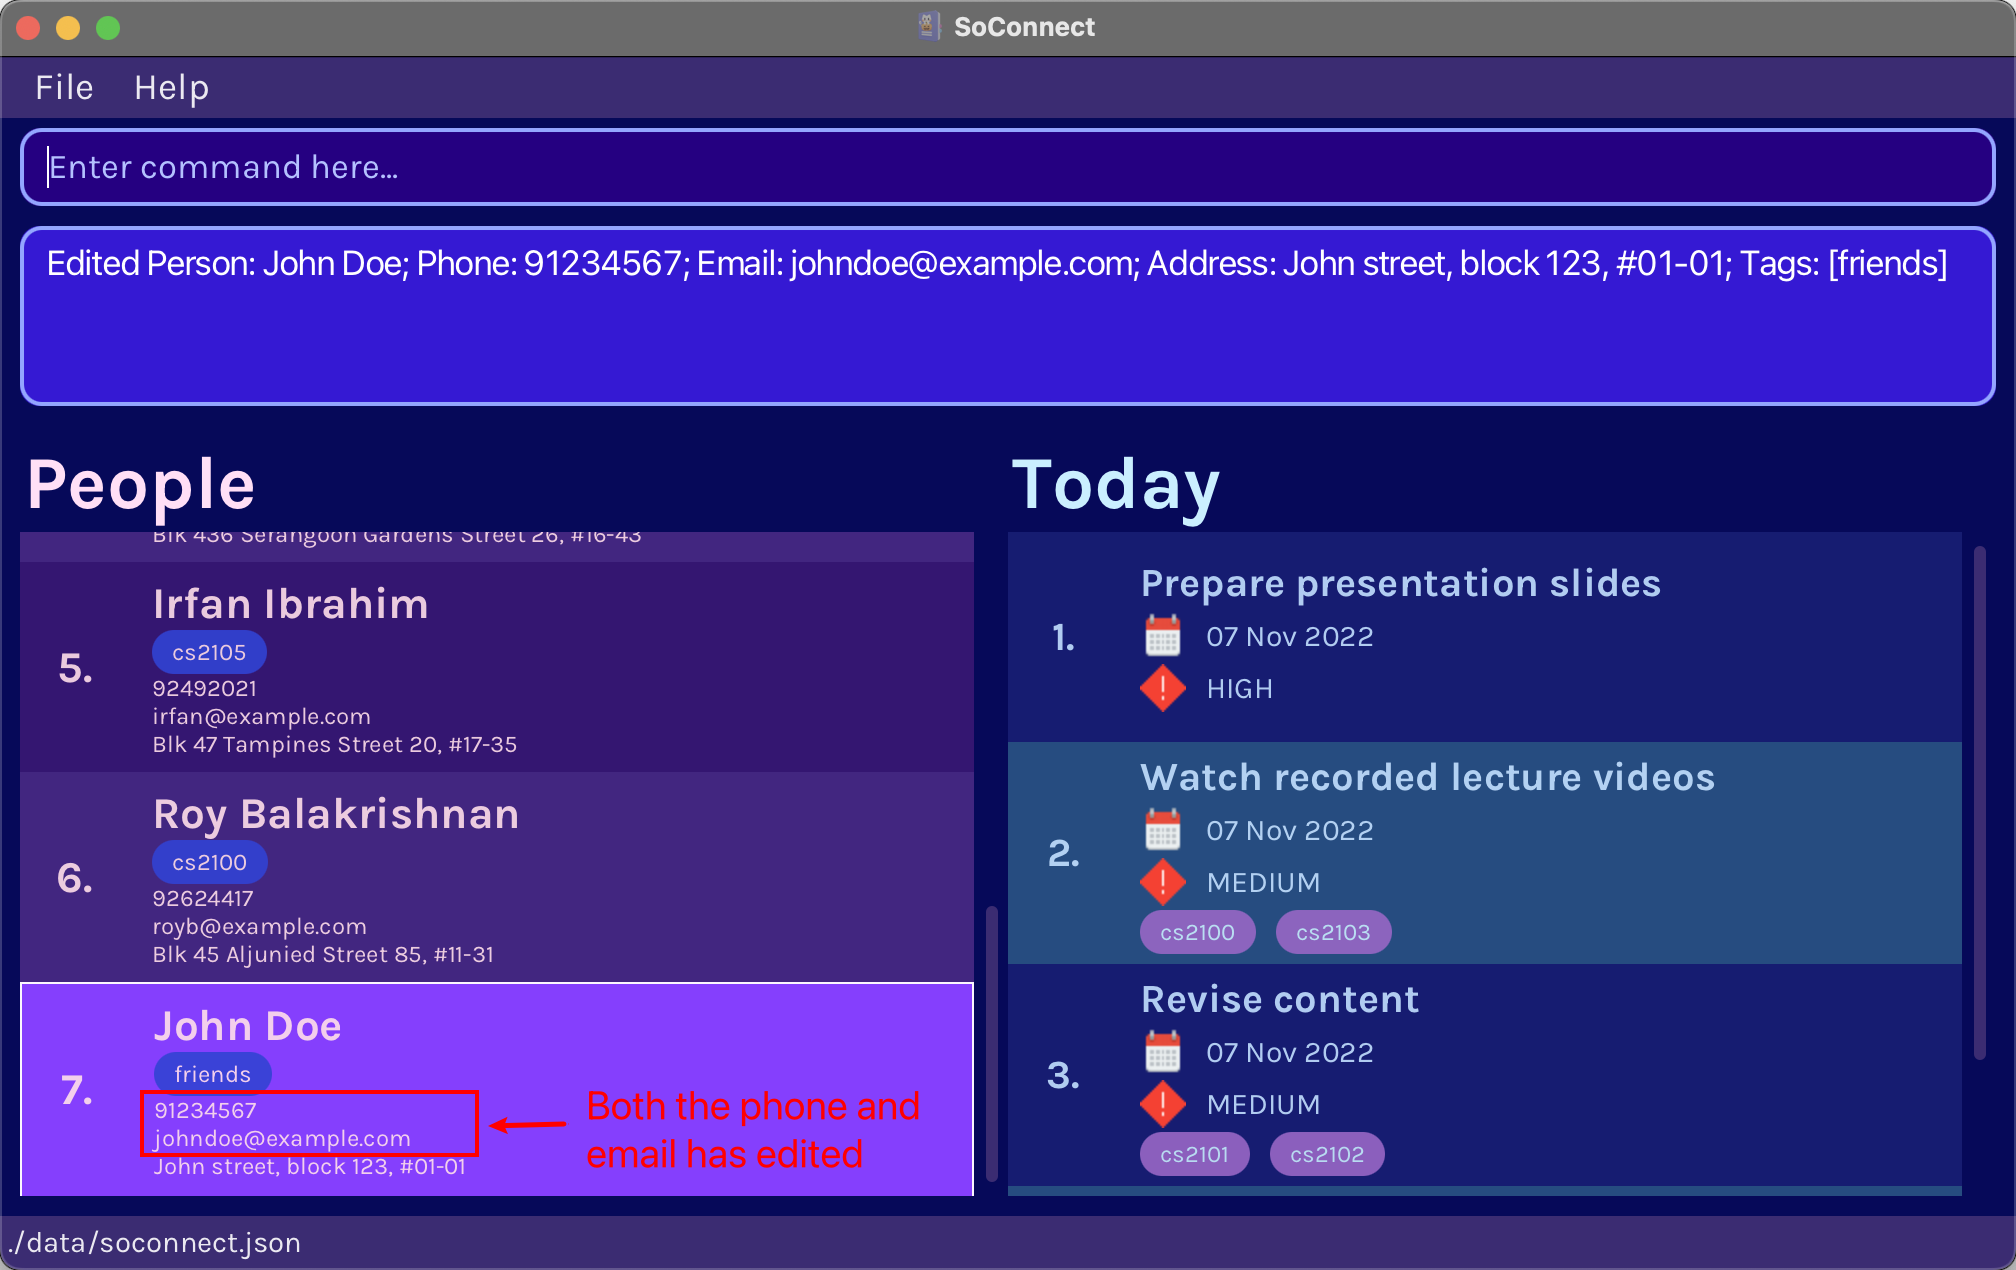
Example Input in Command Box:
edit 7 p/91234567 e/johndoe@example.com
Example Result:
Before:
After:
7.2.3. Listing all contacts : list
Whenever you need to view a list of all the contacts you have in your SoConnect, you can easily do so using the list command. You can directly use the list command without the need of any parameters!
Format: list
7.2.4. Searching for a contact: search
You can easily find the contacts that you are interested in using the search command as shown below. The search command has two formats - and condition and or condition search, it also comes with autocomplete feature to help you to search more efficiently without typing the command in full.
1. and Condition Search:
If you are looking for a very specific search result, you can use and condition search to search for contacts with information matching all of your given parameters.
Format: search [and] [n/NAME] [p/PHONE] [e/EMAIL] [a/ADDRESS] [t/TAG]…
- The search using
n/NAMEis case-insensitive. (e.g.hanswill matchHans). - At least 1 of the optional parameters must be provided.
![]() Tip:
Tip:
The word and is optional, so you can perform and condition search without including the word and, i.e. search n/Alex p/12345678 gives the same result as search and n/Alex p/12345678.
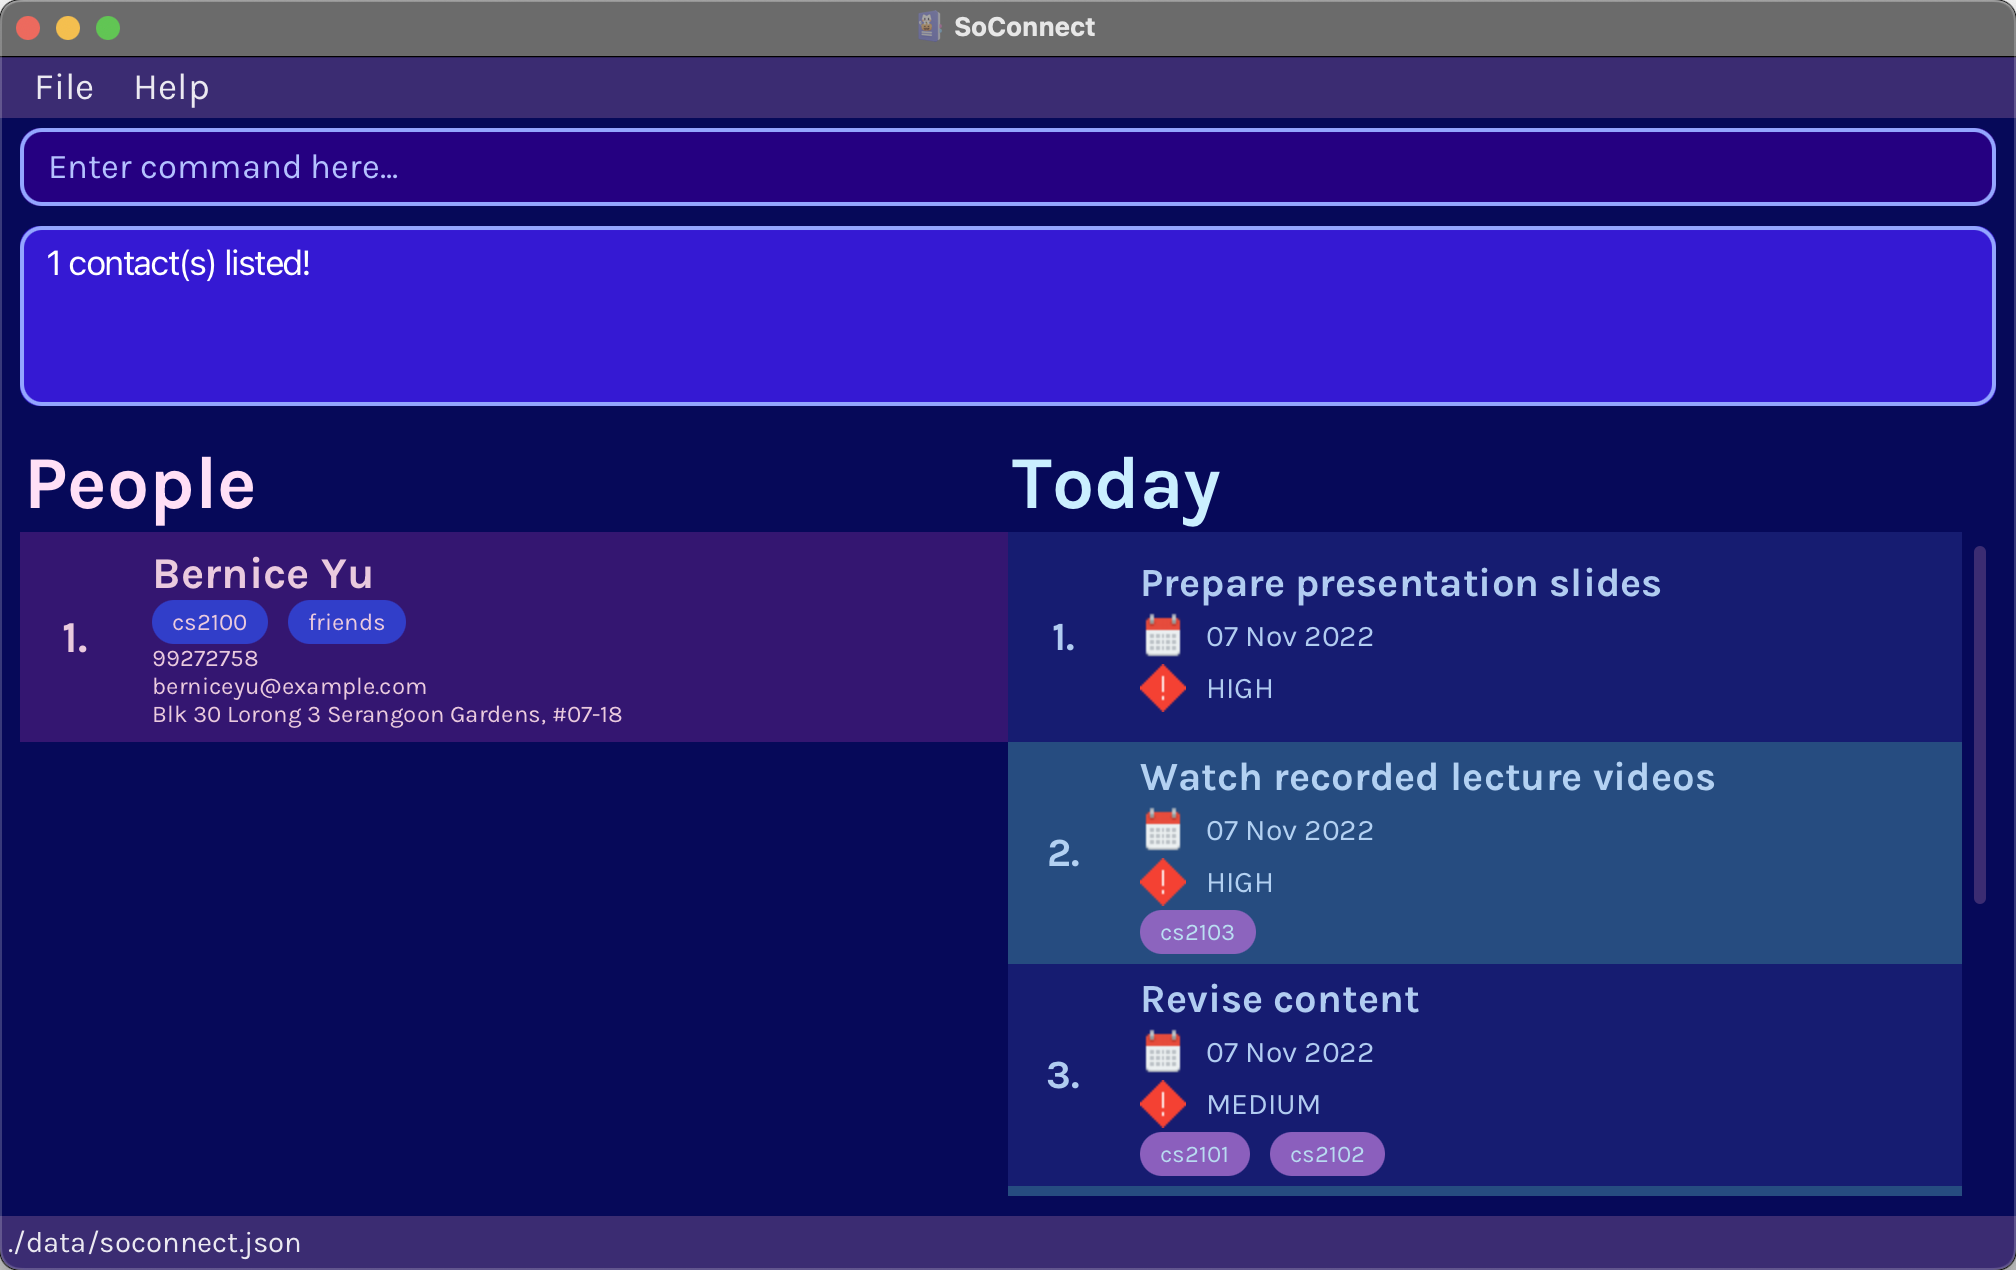
Example Input in Command Box:
search and n/Bernice t/cs2100 t/friends
Example Result:
2. or Condition Search:
If you wish to broaden your search result, you can use or condition search to search for contacts with information matching at least one of your given parameters.
Format: search or [n/NAME] [p/PHONE] [e/EMAIL] [a/ADDRESS] [t/TAG]…
- The search using
n/NAMEis case-insensitive. (e.g.hanswill matchHans). - At least 1 of the optional parameters must be provided.
Example Input in Command Box
search or n/Bernice t/cs2100 t/friends
Example Result
Notice there are more contacts listed as compared to search and n/Bernice t/cs2100 t/friends.
![]() Note
Note
For both and and or condition search, you still get a list of relevant contacts related to your search query if there are no search results available. This is useful as you might still get the contacts that you are searching for when you entered some characters wrongly.
A contact is considered relevant if there are high matches of characters between the contact information and search parameters. For example, the information David Li and Charlotte are relevant to search n/al because these names contain characters a and l in it.
![]() Info:
Info:
Autocomplete:

Autocomplete helps you to get your search done faster as you do not have to type the full parameter to search. This also reduce the chances of you typing the wrong character as you have lesser characters to type.
- Autocomplete generates a list of autocomplete entries based on the current search query.
- Autocomplete only completes the last parameter, in this case
t/f. - If no contact matches the current search query, empty list of autocomplete entries will be generated and autocomplete box will be hidden.
7.2.5. Sorting contacts : sort
Organising your contacts can make tracking and managing them easier, especially when you have lots of contacts. You can organise your contacts in the order you prefer using the sort command as shown below. Given below are the orders that you can choose each parameter to be sorted by.
How names (n/), emails (e/), addresses (a/ ) are sorted:
- In alphabetical order. (e.g.
Alcomes beforeAlfredwhich comes beforeBrad) - Case-insensitive. (e.g.
Al,al,AL, andaLare identical when it comes to sorting)
How phone numbers (p/) are sorted:
- In increasing numerical order. (e.g.
123comes before125which comes before1234)
How tags (t/TAG) are sorted:
- Contacts with the TAG you specified will come before contacts without the TAG.
![]() Note
Note
- When sorting by tags, unlike other parameters, you have to specify a value (an existing
TAG) to sort by. - For other parameters (i.e.
n/ e/ a/ p/), values provided are ignored. (e.g. sorting byn/Alfredis a valid command, the list will be sorted by name alphabetically, and the name givenAlfredis ignored)
Format: sort [n/] [p/] [e/] [a/] [t/TAG]…
- At least 1 of the optional parameters must be provided.
- To sort in reverse order from the orders given above, use these modified parameters:
[n/!] [p/!] [e/!] [a/!] [t/!TAG].
![]() Tip
Tip
You can use multiple parameters to sort if you want to organise your contacts even more! Your list will be sorted by the first parameter you provide as per usual. Here’s how the other parameters will be used:
- Contacts with identical values for the first parameter are identified. (e.g. same phone number, same email, same address, or contains the same tag)
- Each group of contacts with the same identical values would appear together on your list. This is where your second parameter will be used.
- Each group will go through another round of sorting by your second parameter to determine the order within the group. If there are still contacts with identical values for the second parameter in the group, the process repeats with the remaining parameters (if provided).
Example Input in Command Box:
sort n/!
Example Result:
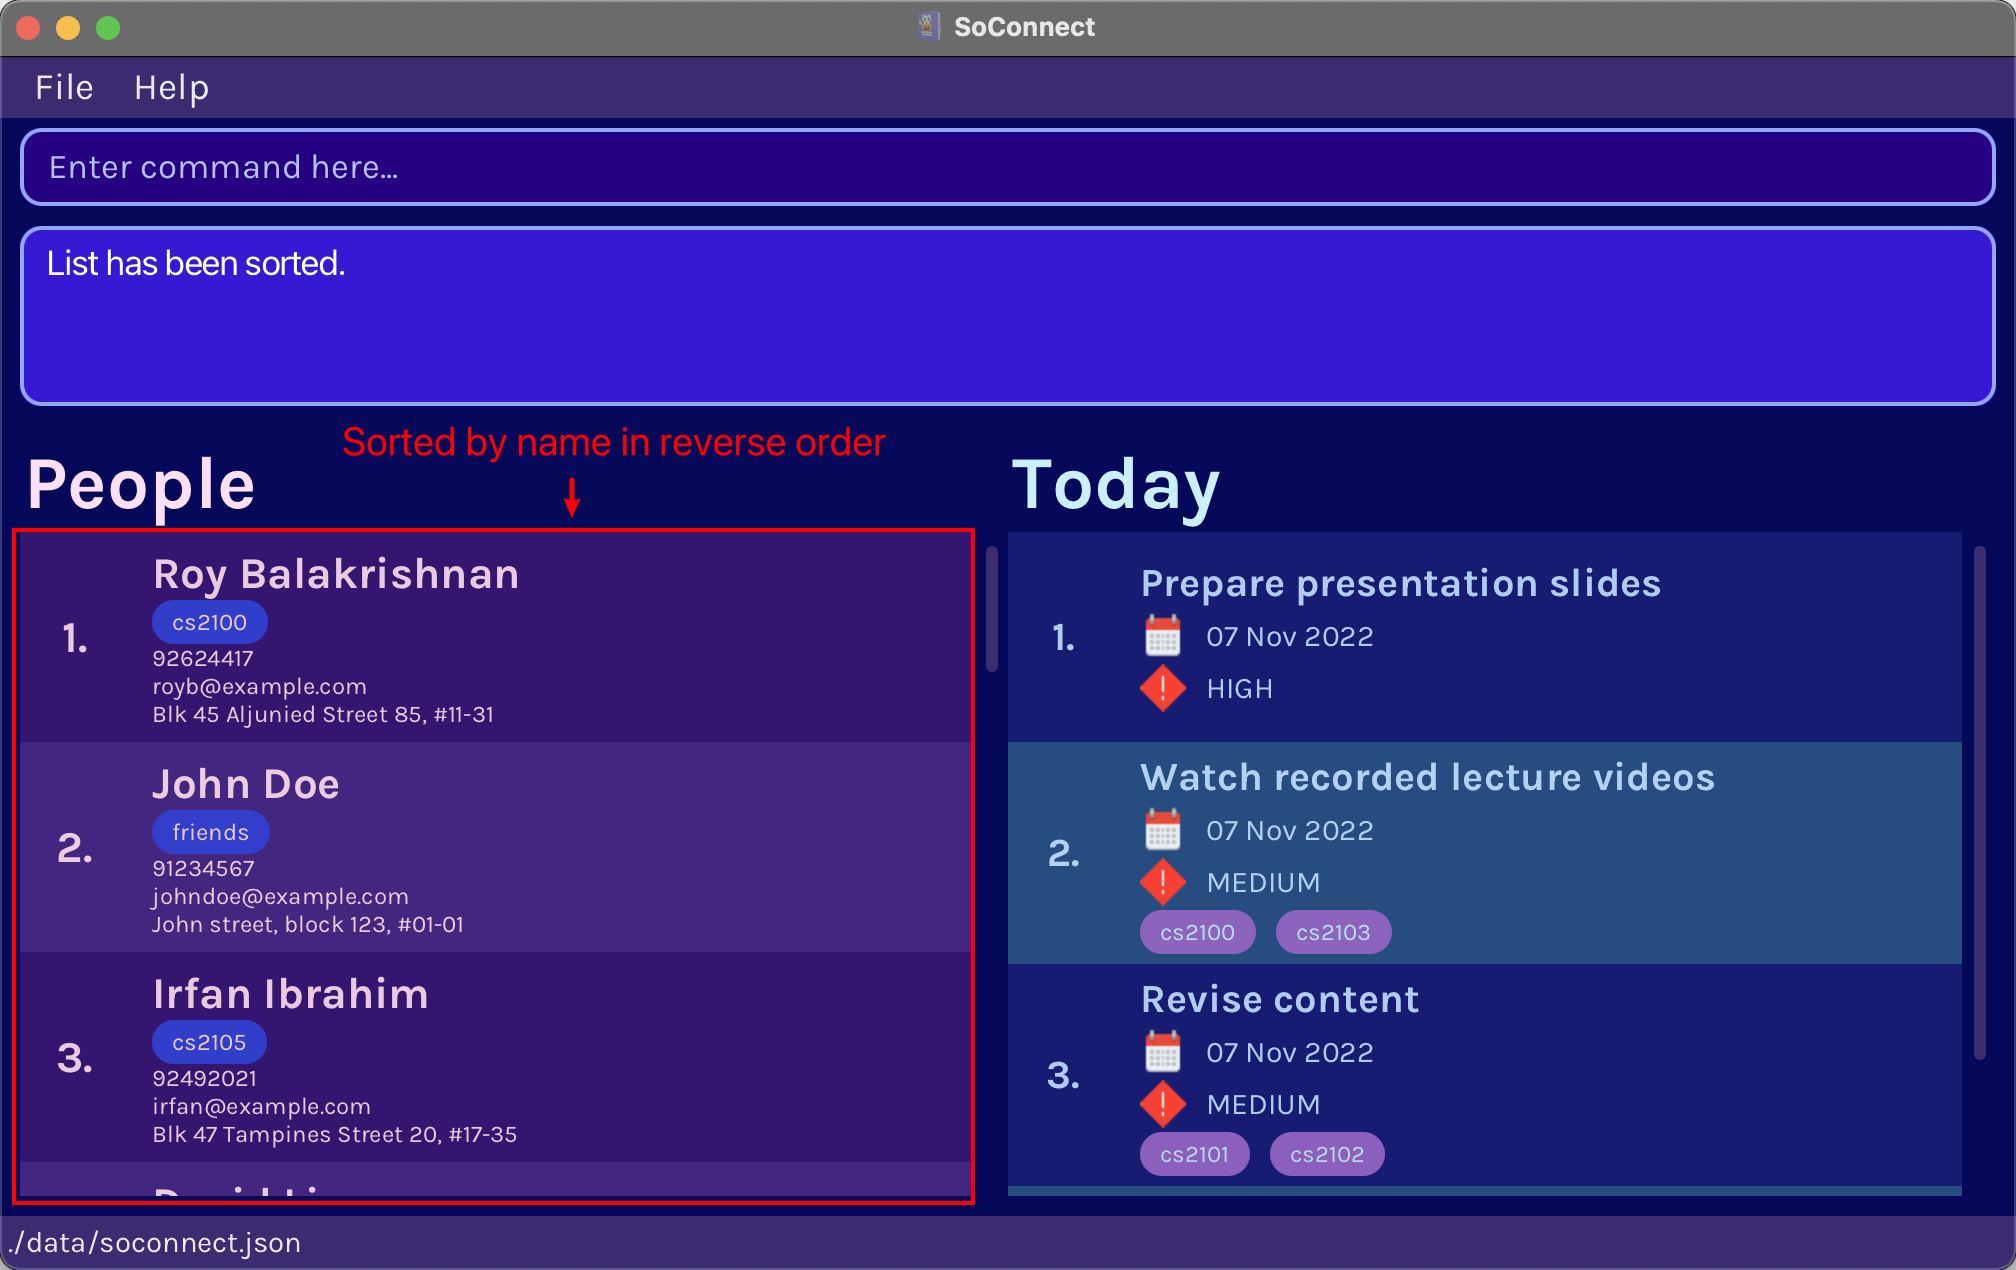
Example Input in Command Box:
sort t/cs2100 n/
Example Result:
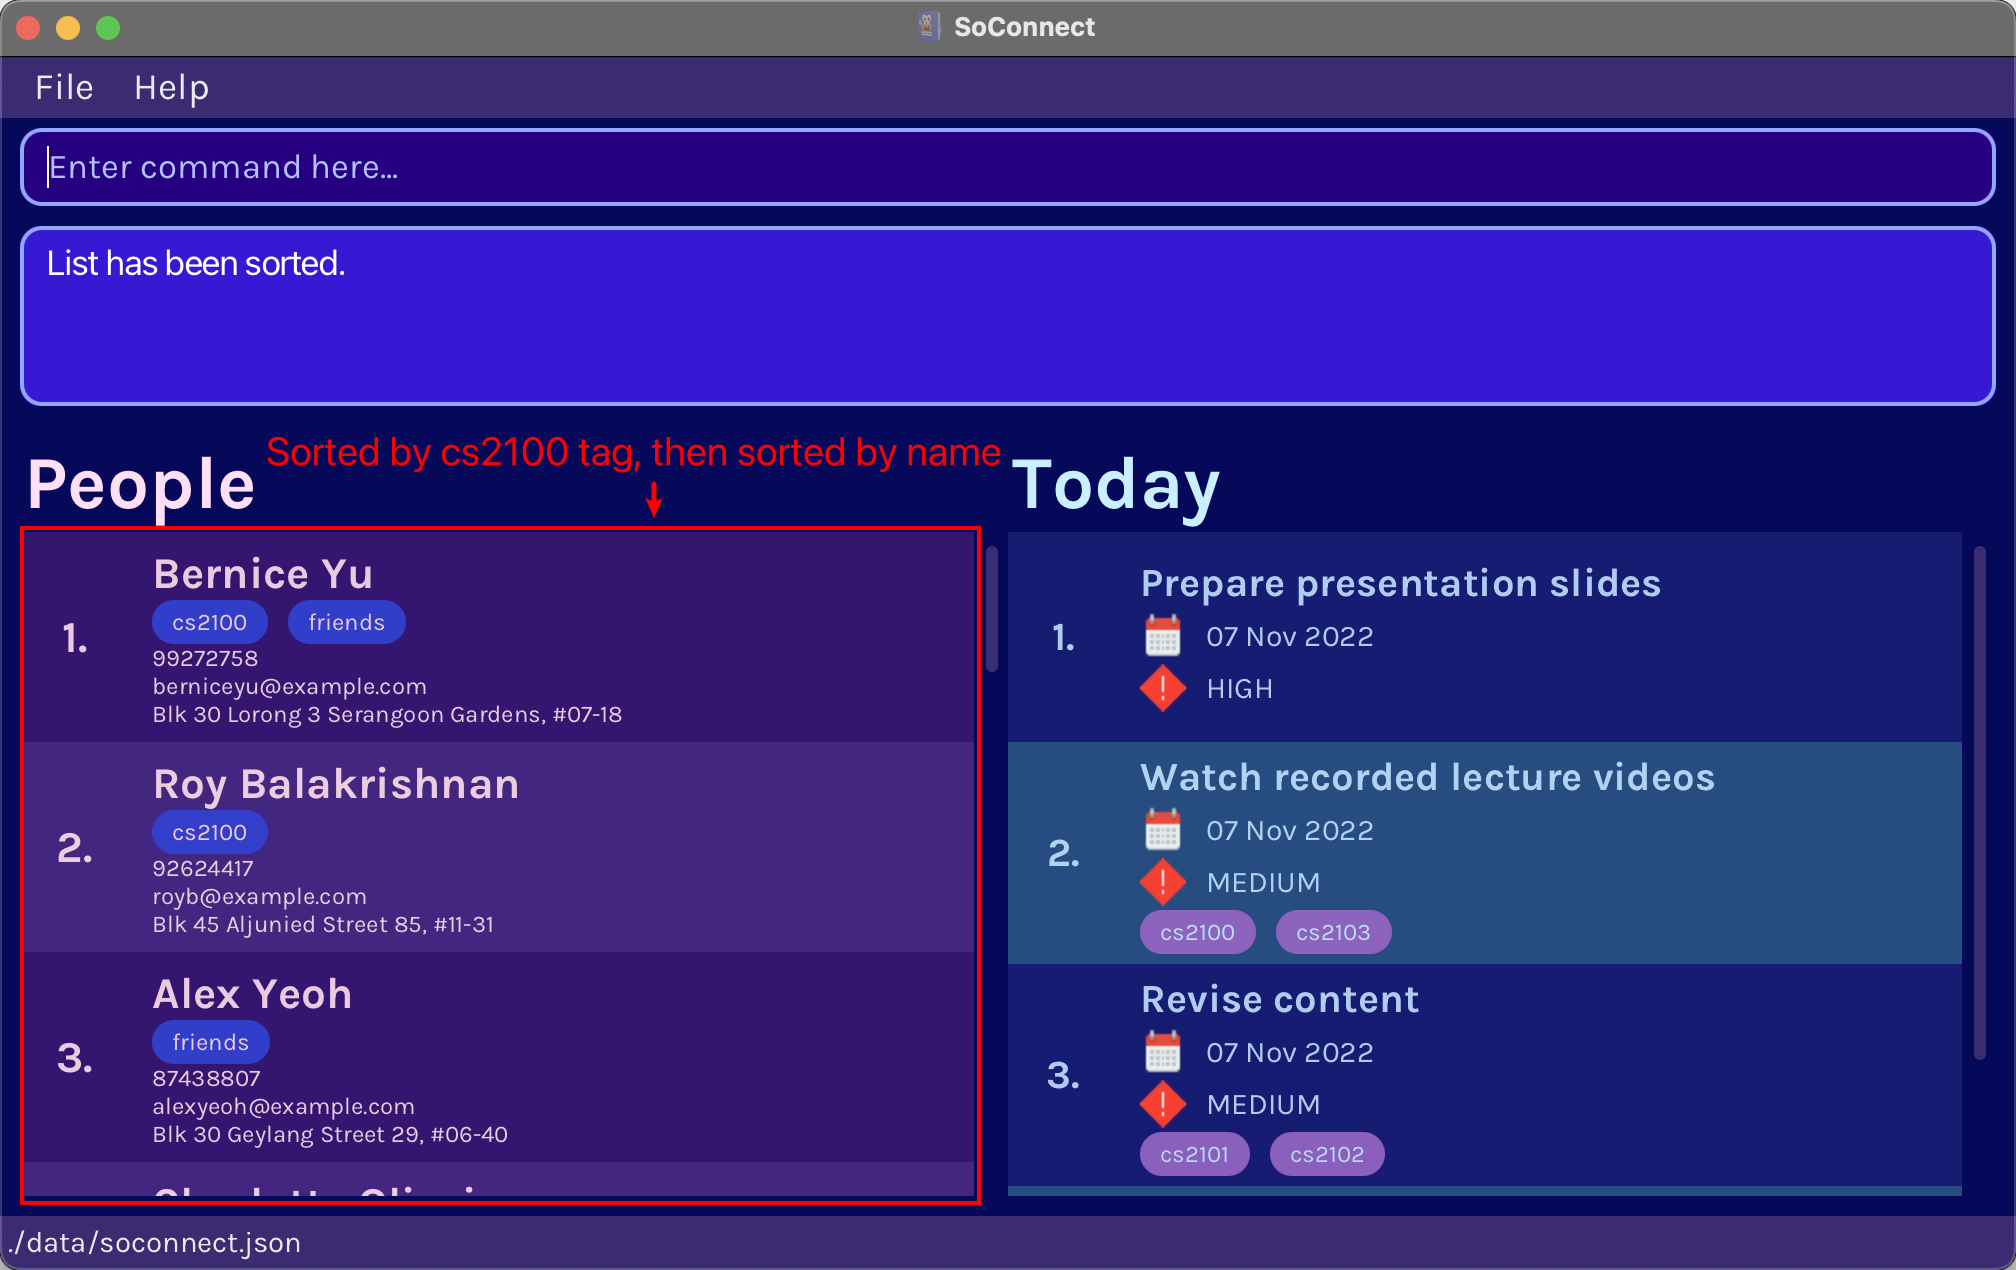
7.2.6. Deleting a contact : delete
If you added a contact by mistake, or you no longer wish to keep a particular contact, you can delete it easily using the delete command. All you need is the INDEX of the contact and poof, it’s gone!
Format: delete INDEX
7.2.7. Clearing all contacts : clear
Want a fresh start? You can reset and get a clean, empty list of contacts using the clear command. You can directly use the clear command without the need of any parameters!
Format: clear
7.3. Todo Management Commands
Welcome to the Todo Management Commands section! In this section, you can learn how to manage your todos using SoConnect. A todo represents a task that needs completing. With the todo list in SoConnect, you won’t have to worry about forgetting your school tasks and can find all your tasks conveniently in 1 place.
A todo consists of
- a description
- a date of the deadline of the task
- the priority of the task
- (optional) tags to help you categorise your todos
![]() Note
Note
- You might forget that you have already added a todo, but no need to worry about having duplicate todos! We help you to detect duplicate todos by checking existing todos whenever you add a new todo or edit an existing todo. Duplicate todos are todos with the exact same information for every parameter.
- What if you want to add 2 todos with the same description? You are still able to do so, as long as the todos have different tags, dates, or priorities.
- Priority of a todo can strictly only be
low,medium, orhigh.Coming soon in v1.5, we will add smarter priorities (to accept other variations such asLow,Medium,High,L,M,H).
7.3.1. Adding a todo: todo add
You can add a todo using the todo add command as shown below. While the DESCRIPTION, DATE, and PRIORITY parameters are mandatory, you can include as many TAG parameters as you wish (including none).
Format: todo add d/DESCRIPTION date/DATE pr/PRIORITY [t/TAG]…
-
DATEshould be of the format dd-MM-yyyy (e.g. 24-03-2022). - The todo list will always be sorted by date from earliest to latest (for todos with the same date, they will be sorted in decreasing priority order).
![]() Note
Note
Tags have to be created first before you can add them to a todo.
- Refer to
Creating a Tagon how to create a tag.
Example Input in Command Box:
todo add d/cs2103 UG date/07-11-2022 pr/high t/cs2103
Example Result:
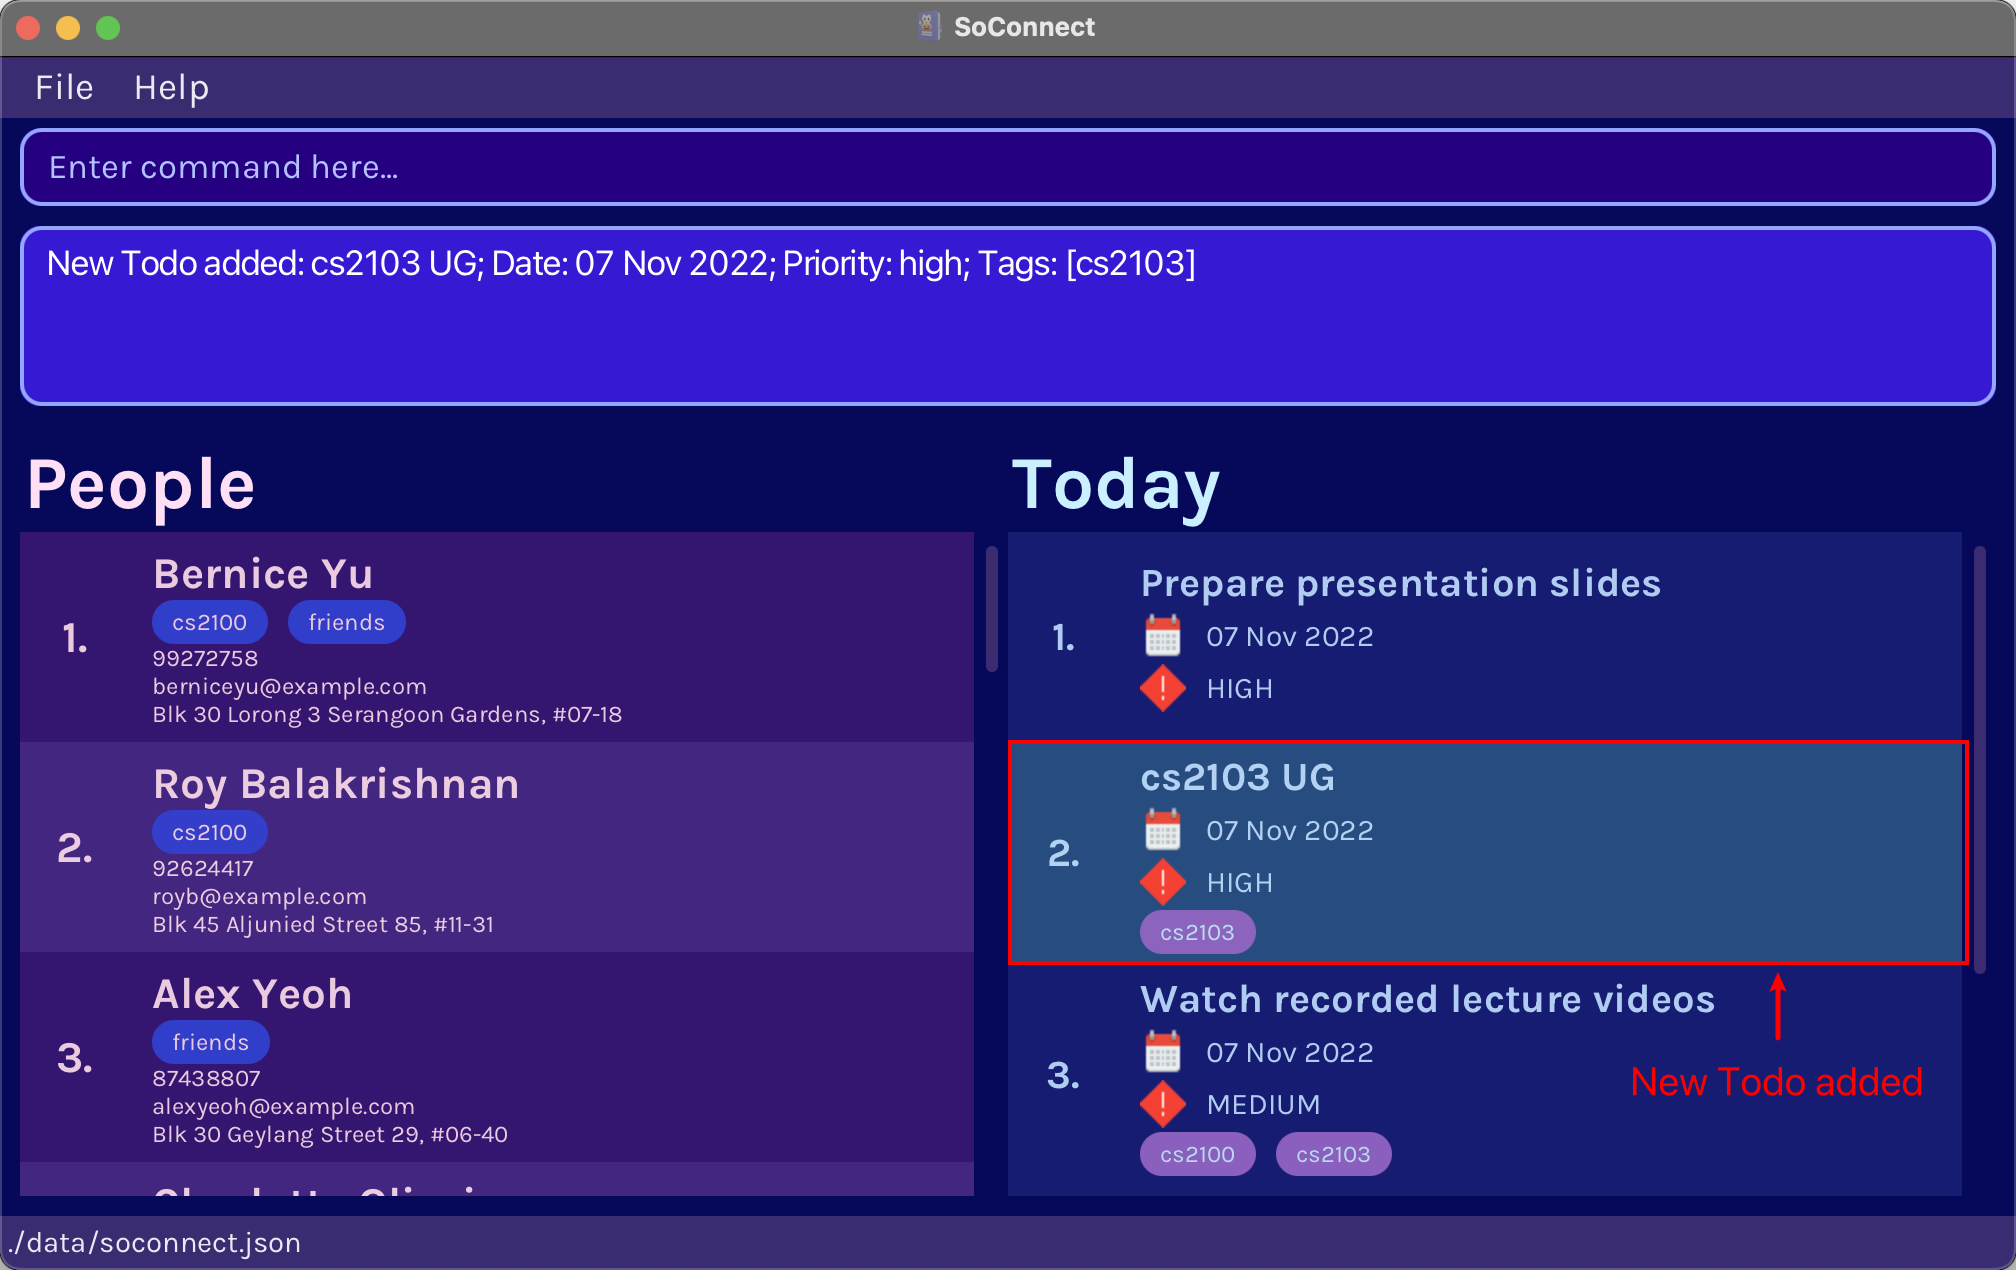
7.3.2. Editing a todo : todo edit
You can update the information of a todo easily using the todo edit command as shown below. All you need is the INDEX of the todo you want to modify along with the parameters you want to update.
Format: todo edit INDEX [d/DESCRIPTION] [date/DATE] [pr/PRIORITY] [t/TAG]…
- At least 1 of the 4 optional fields must be provided.
- Existing information will be overwritten with the parameters provided. Information of the parameters not provided will remain unchanged.
![]() Note:
Note:
Tags have to be created first before you can add them to a todo.
- Refer to
Creating a Tagon how to create a tag.
![]() info:
info:
- You can use
todo editcommand to add or remove tags to a todo.- To add a tag, you can include all the existing tags in the todo as parameter together with the new tags that you wish to add.
- To remove a tag, you can include all the existing tags in the todo excluding the tags that you wish to remove.
-
Coming soon in v1.5, you can usetag addandtag removeto modify tags in a todo instead of only usingtodo editto type all the tags in the todo to make modifications.
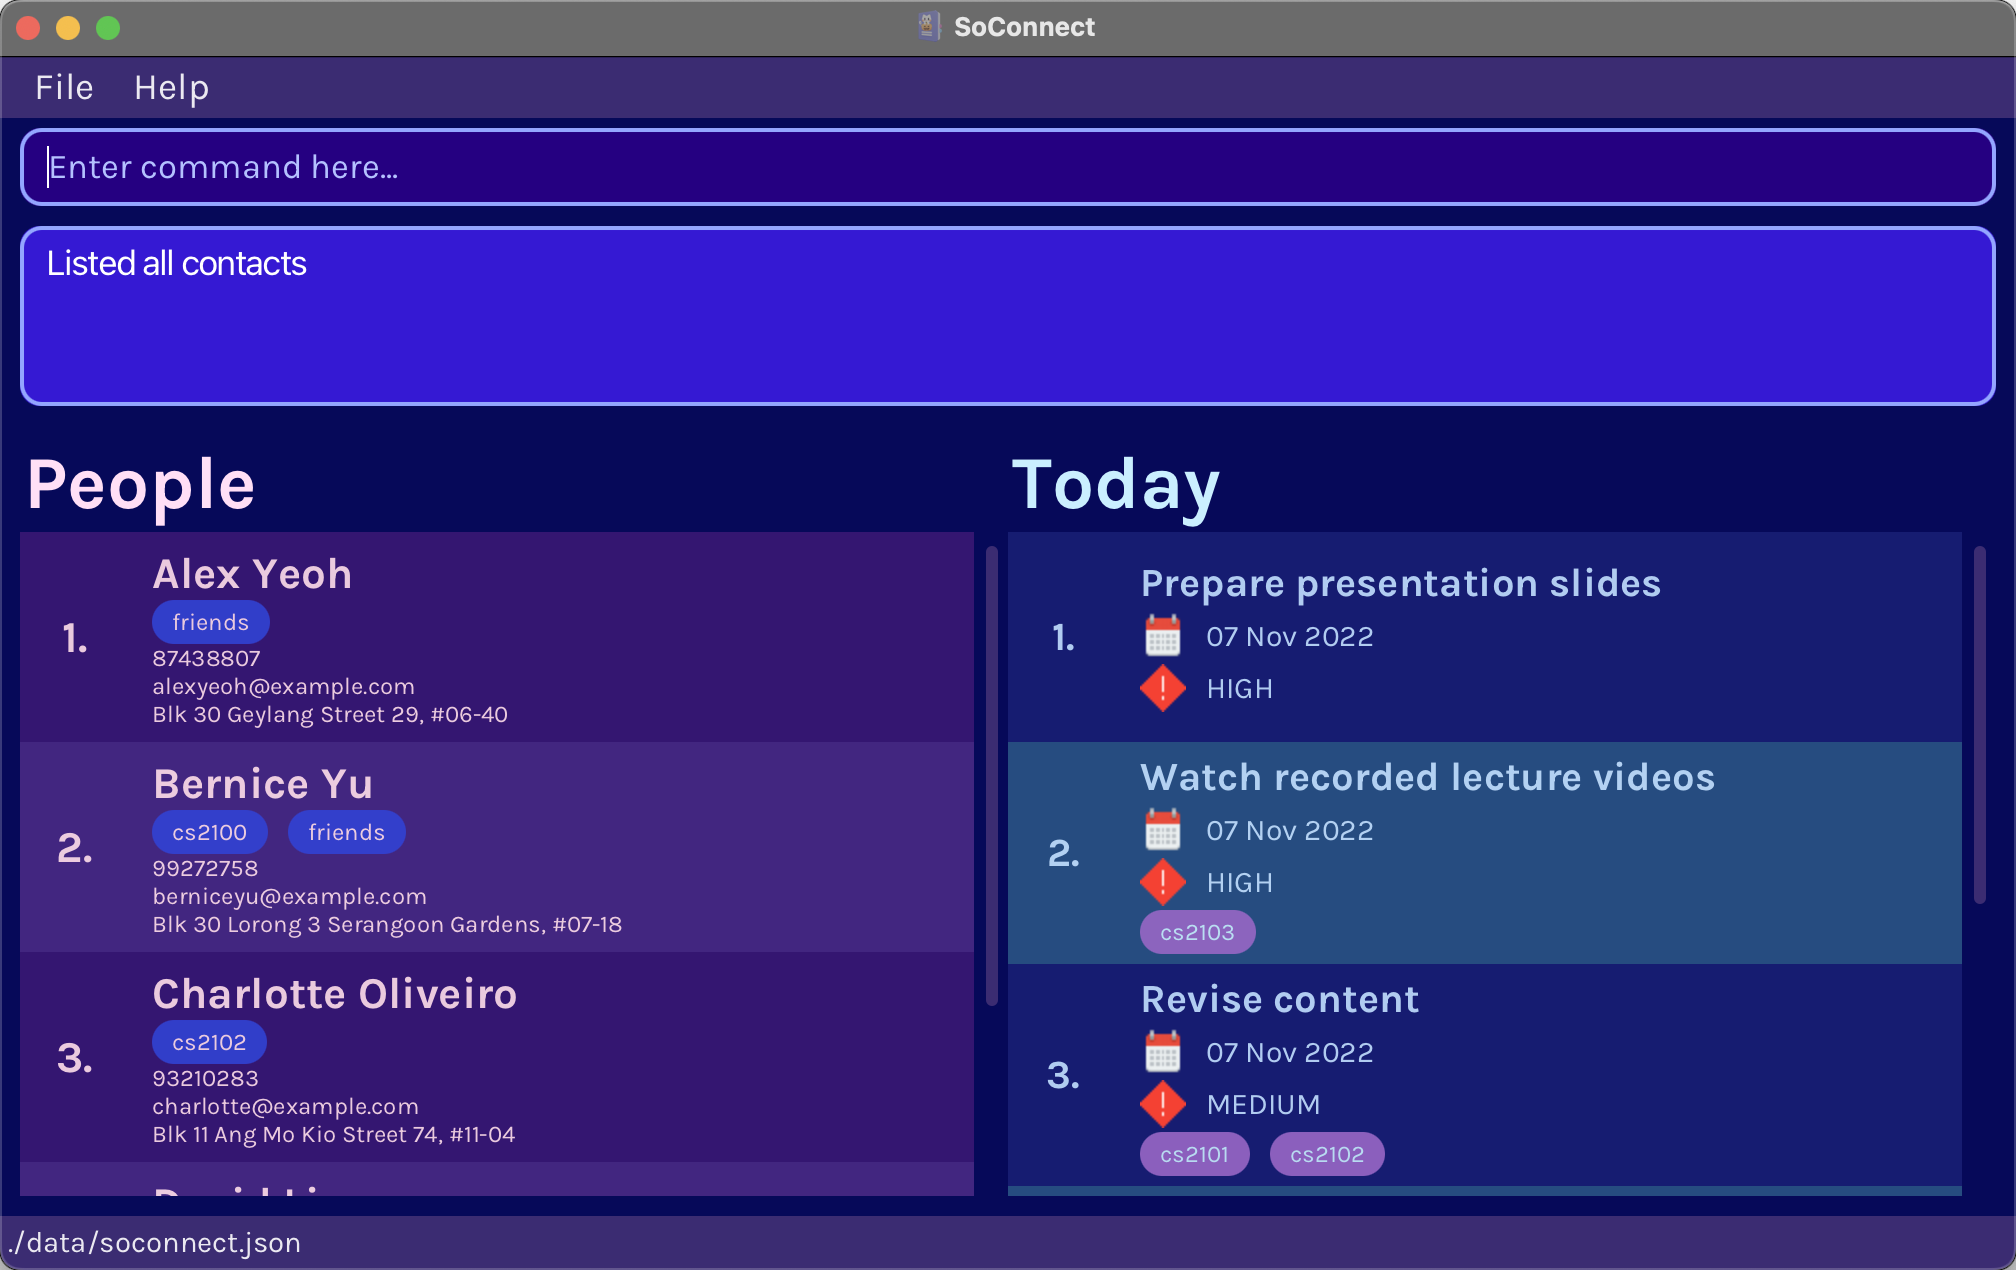
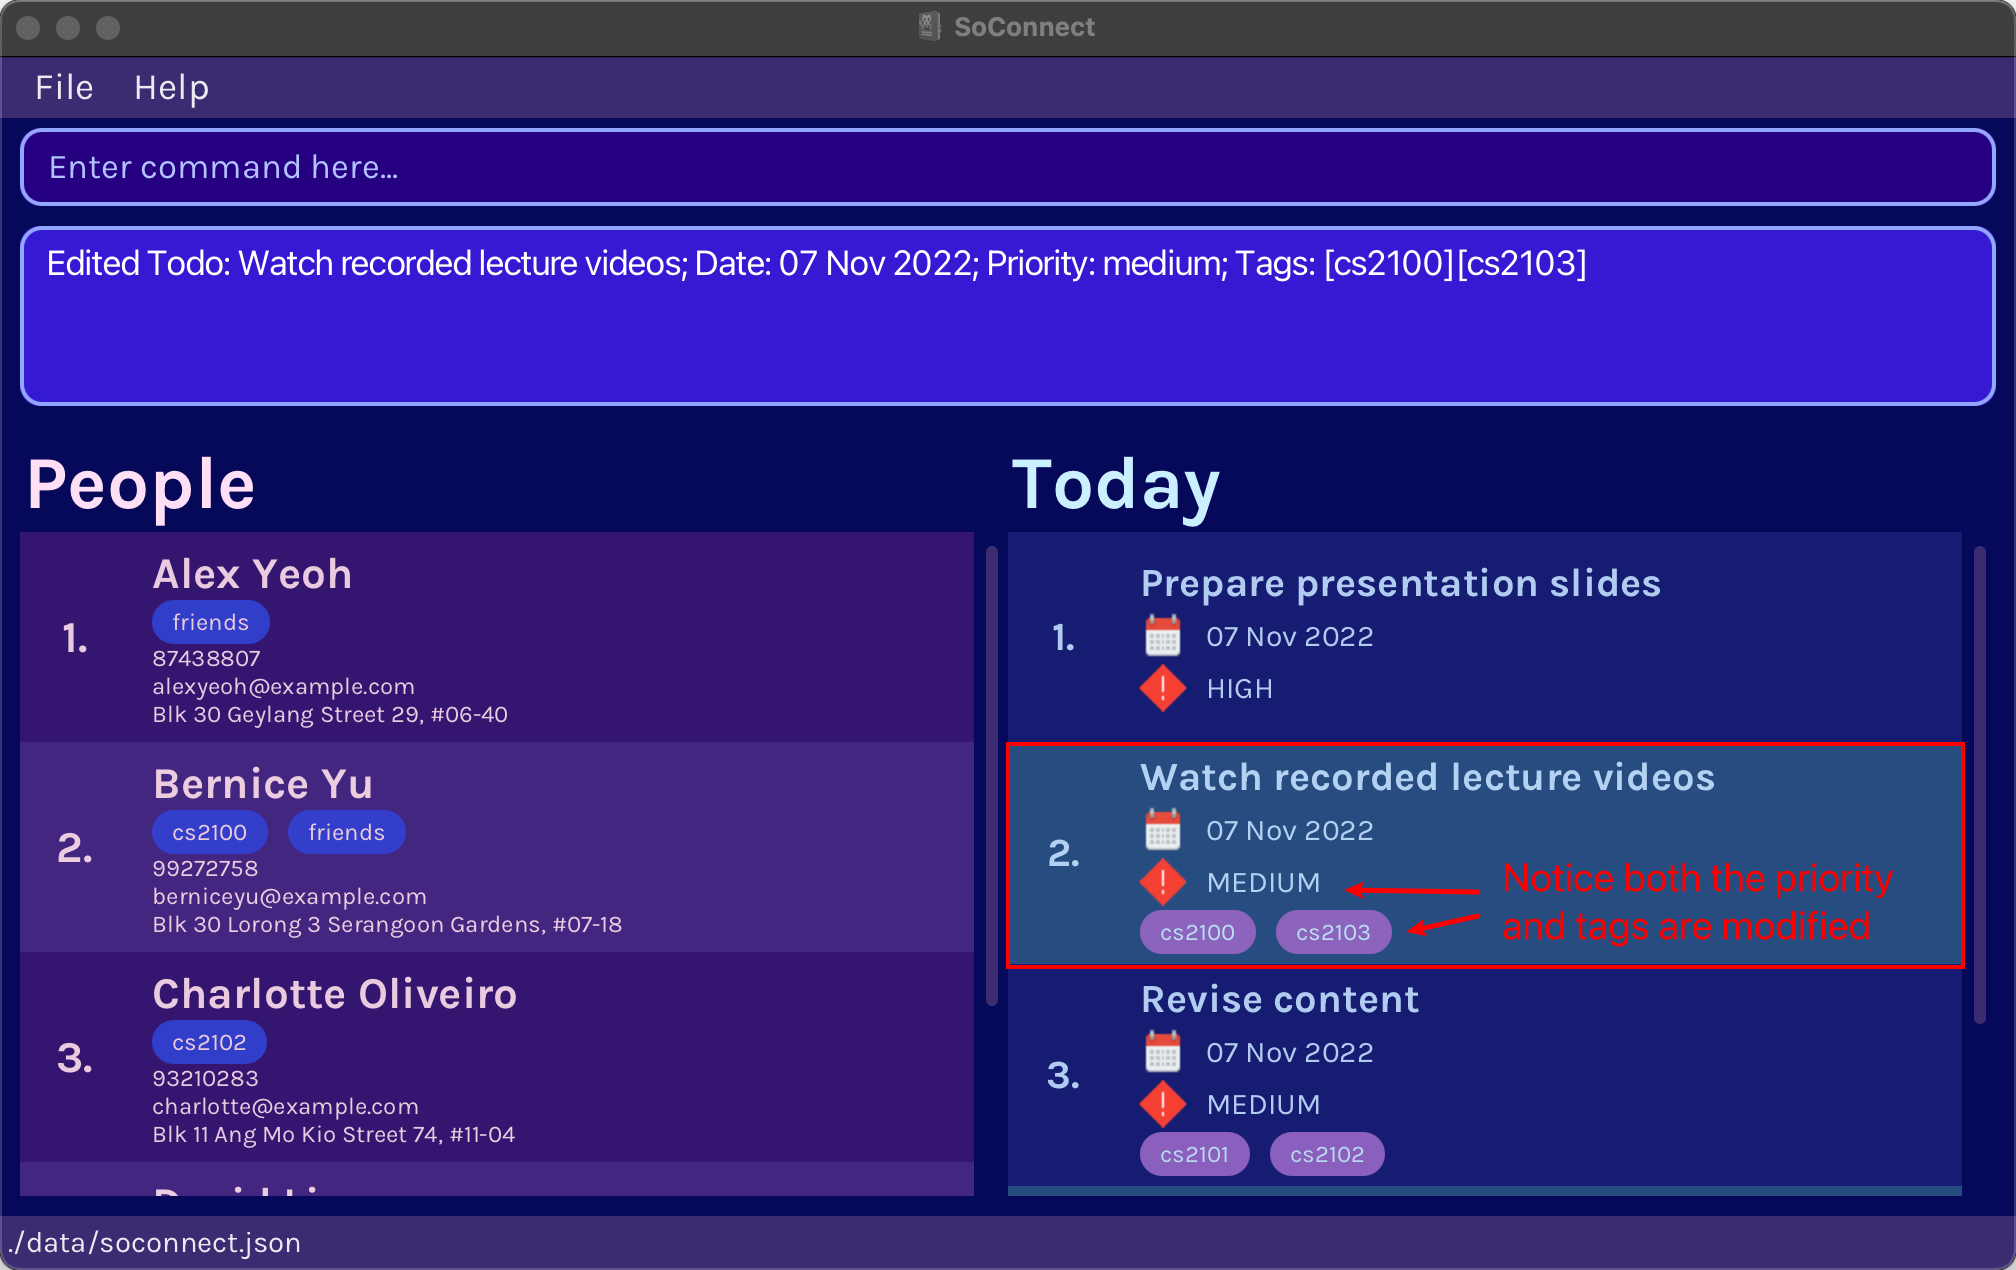
Example Input in Command Box:
todo edit 2 pr/medium t/cs2103 t/cs2100
Example Result:
Before:
After:
7.3.3. Deleting a todo : todo delete
You can delete a particular todo after you have completed the todo or you no longer wish to keep it. This can be done easily using the todo delete command. All you need is the INDEX of the todo!
Format: todo delete INDEX
7.3.4. Clearing all todos : todo clear
You can delete all your todos using the todo clear command. This resets and gets you a clean and empty list of todos.
Format: todo clear
7.3.5. Filtering todos shown : todo show
Want to view a particular list of todos? You can use the todo show commands to filter the todos that you want to see. There are different formats to the todo show command for different filter.
| Format | Result |
|---|---|
todo show |
Shows you all the todos in your SoConnect. |
todo show today |
Shows you all the todos that you have to complete for today. |
todo show date/DATE |
Shows you all the todos with the specified date. |
todo show date/DATE1 to DATE2 |
Shows you all the todos from DATE1 to DATE2. |
todo show pr/PRIORITY |
Shows you all the todos with the specified priority. |
todo show t/TAG |
Shows you all the todos with the specified tag. |
![]() Info:
Info:
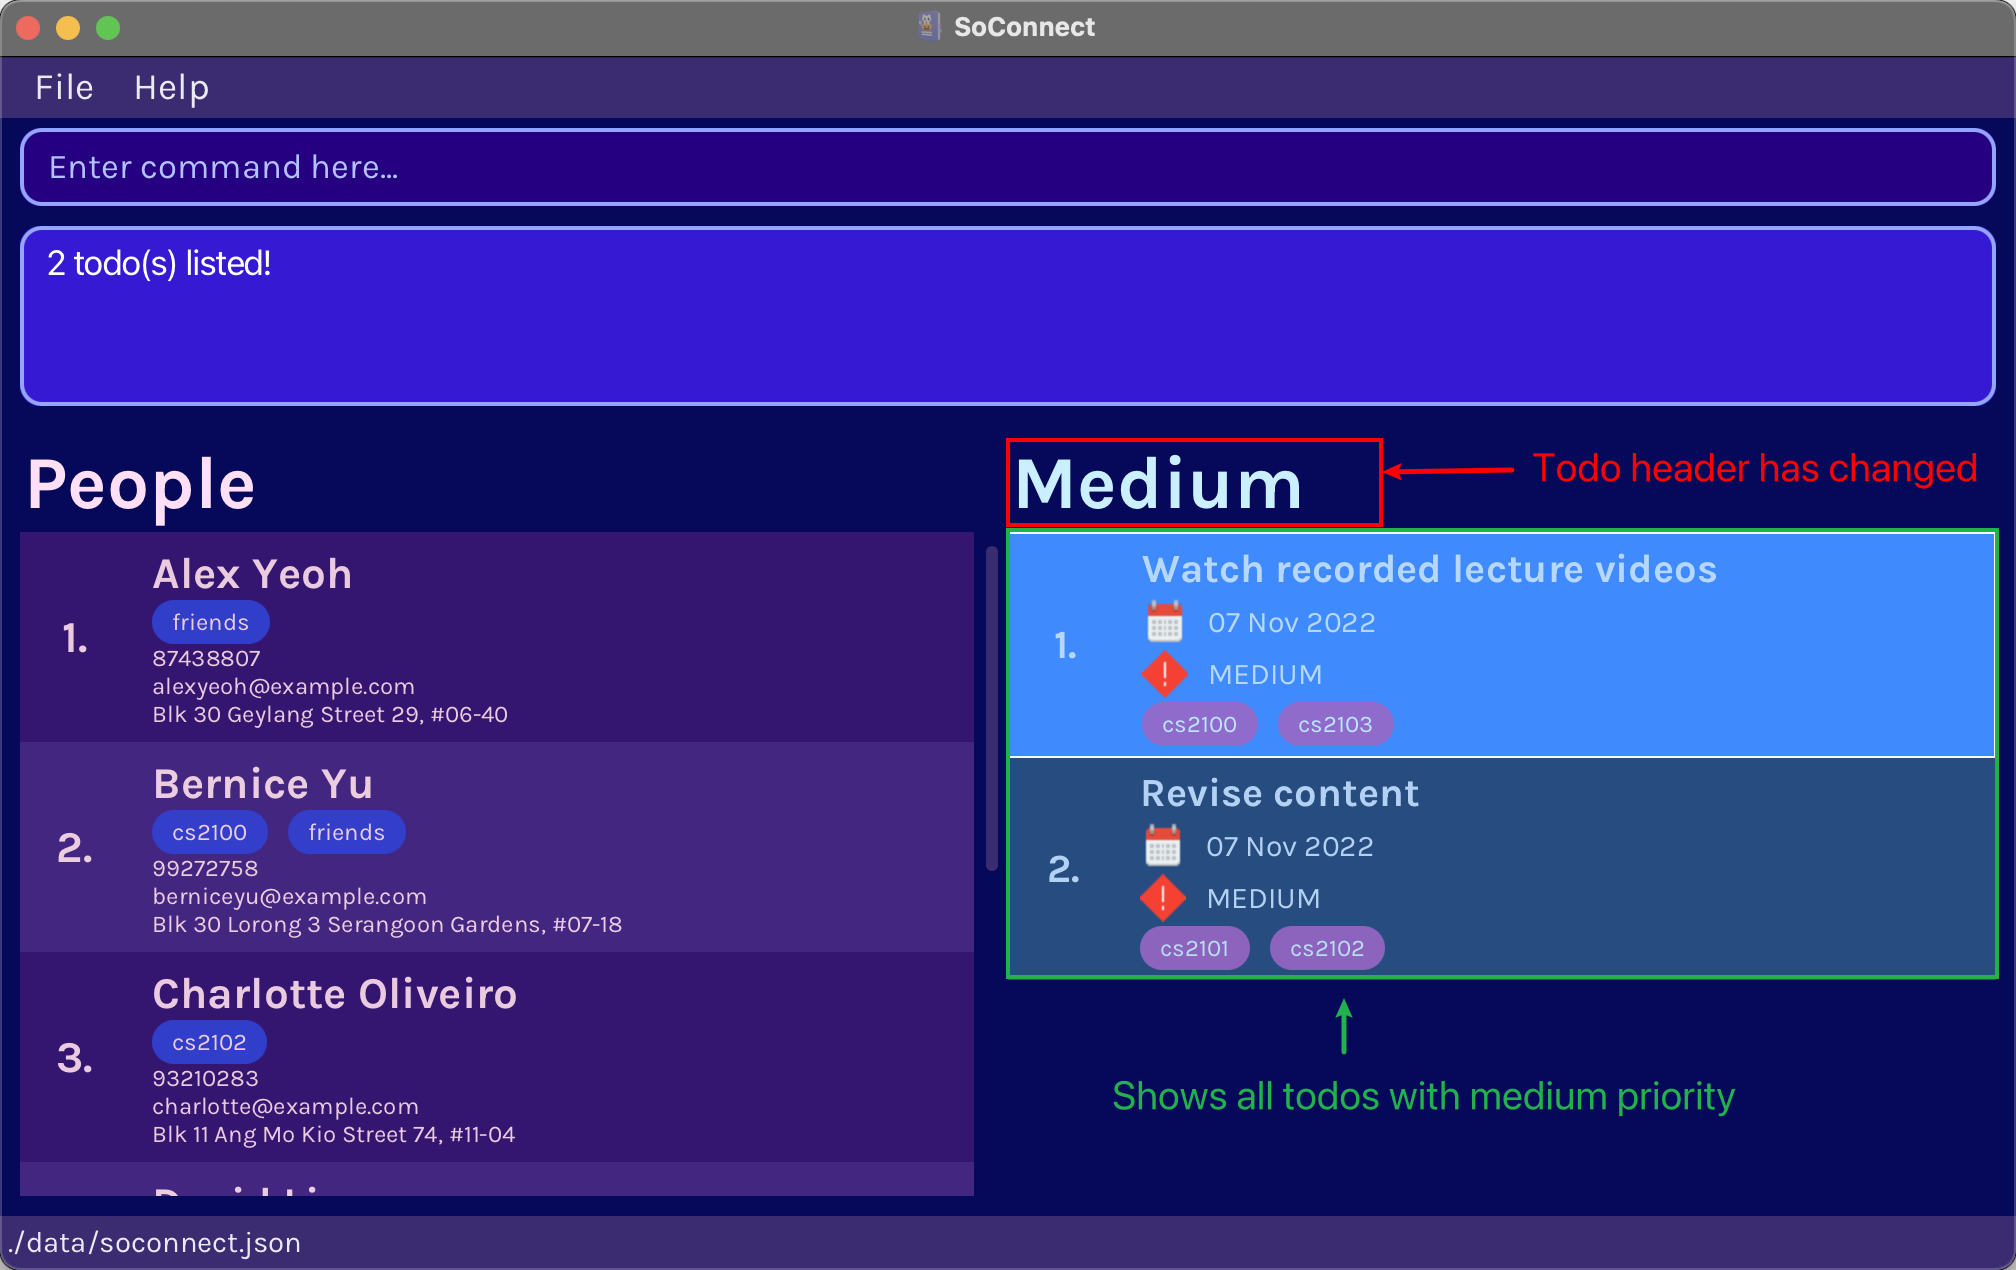
Todo header tells you the todos that are shown in the todo list.
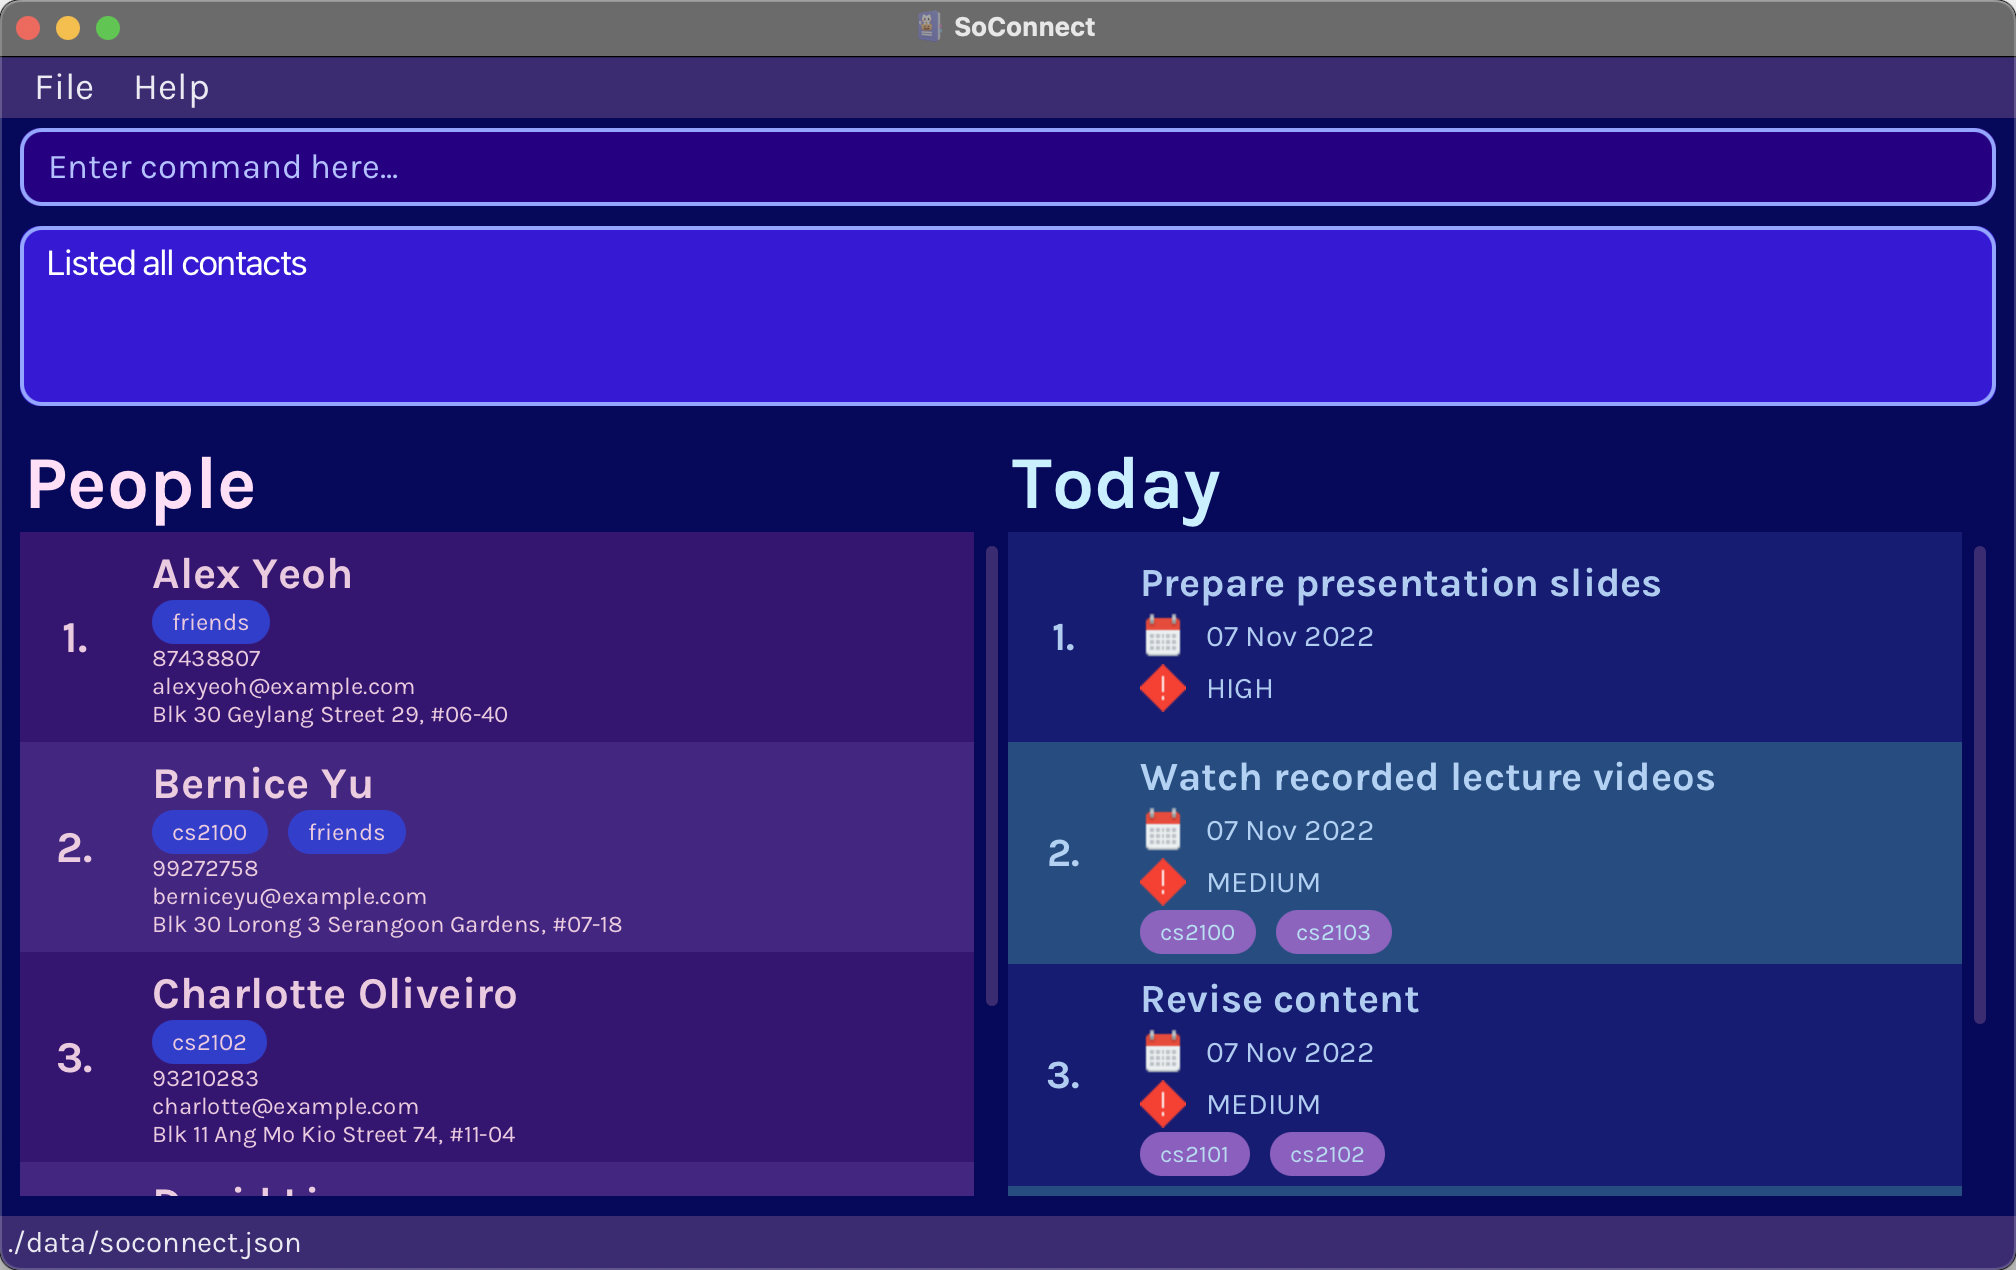
Example Input in Command Box:
todo show pr/medium
Example Result:
Before:
After:
7.4. Tag Management Commands
Welcome to the Tag Management Commands section! In this section, you can learn how to manage your tags using SoConnect. A tag represents a category which you can place contacts and todos in, to better organise them. You can also use tags to sort your contacts, search your contacts, or filter your todos.
A tag consists of a category name that can be a maximum of 10 characters.
7.4.1. Creating a tag: tag create
You can create a new TAG and add it into the tag list.
Format: tag create t/TAG
Example Input in Command Box:
tag create t/cca
Example Result:
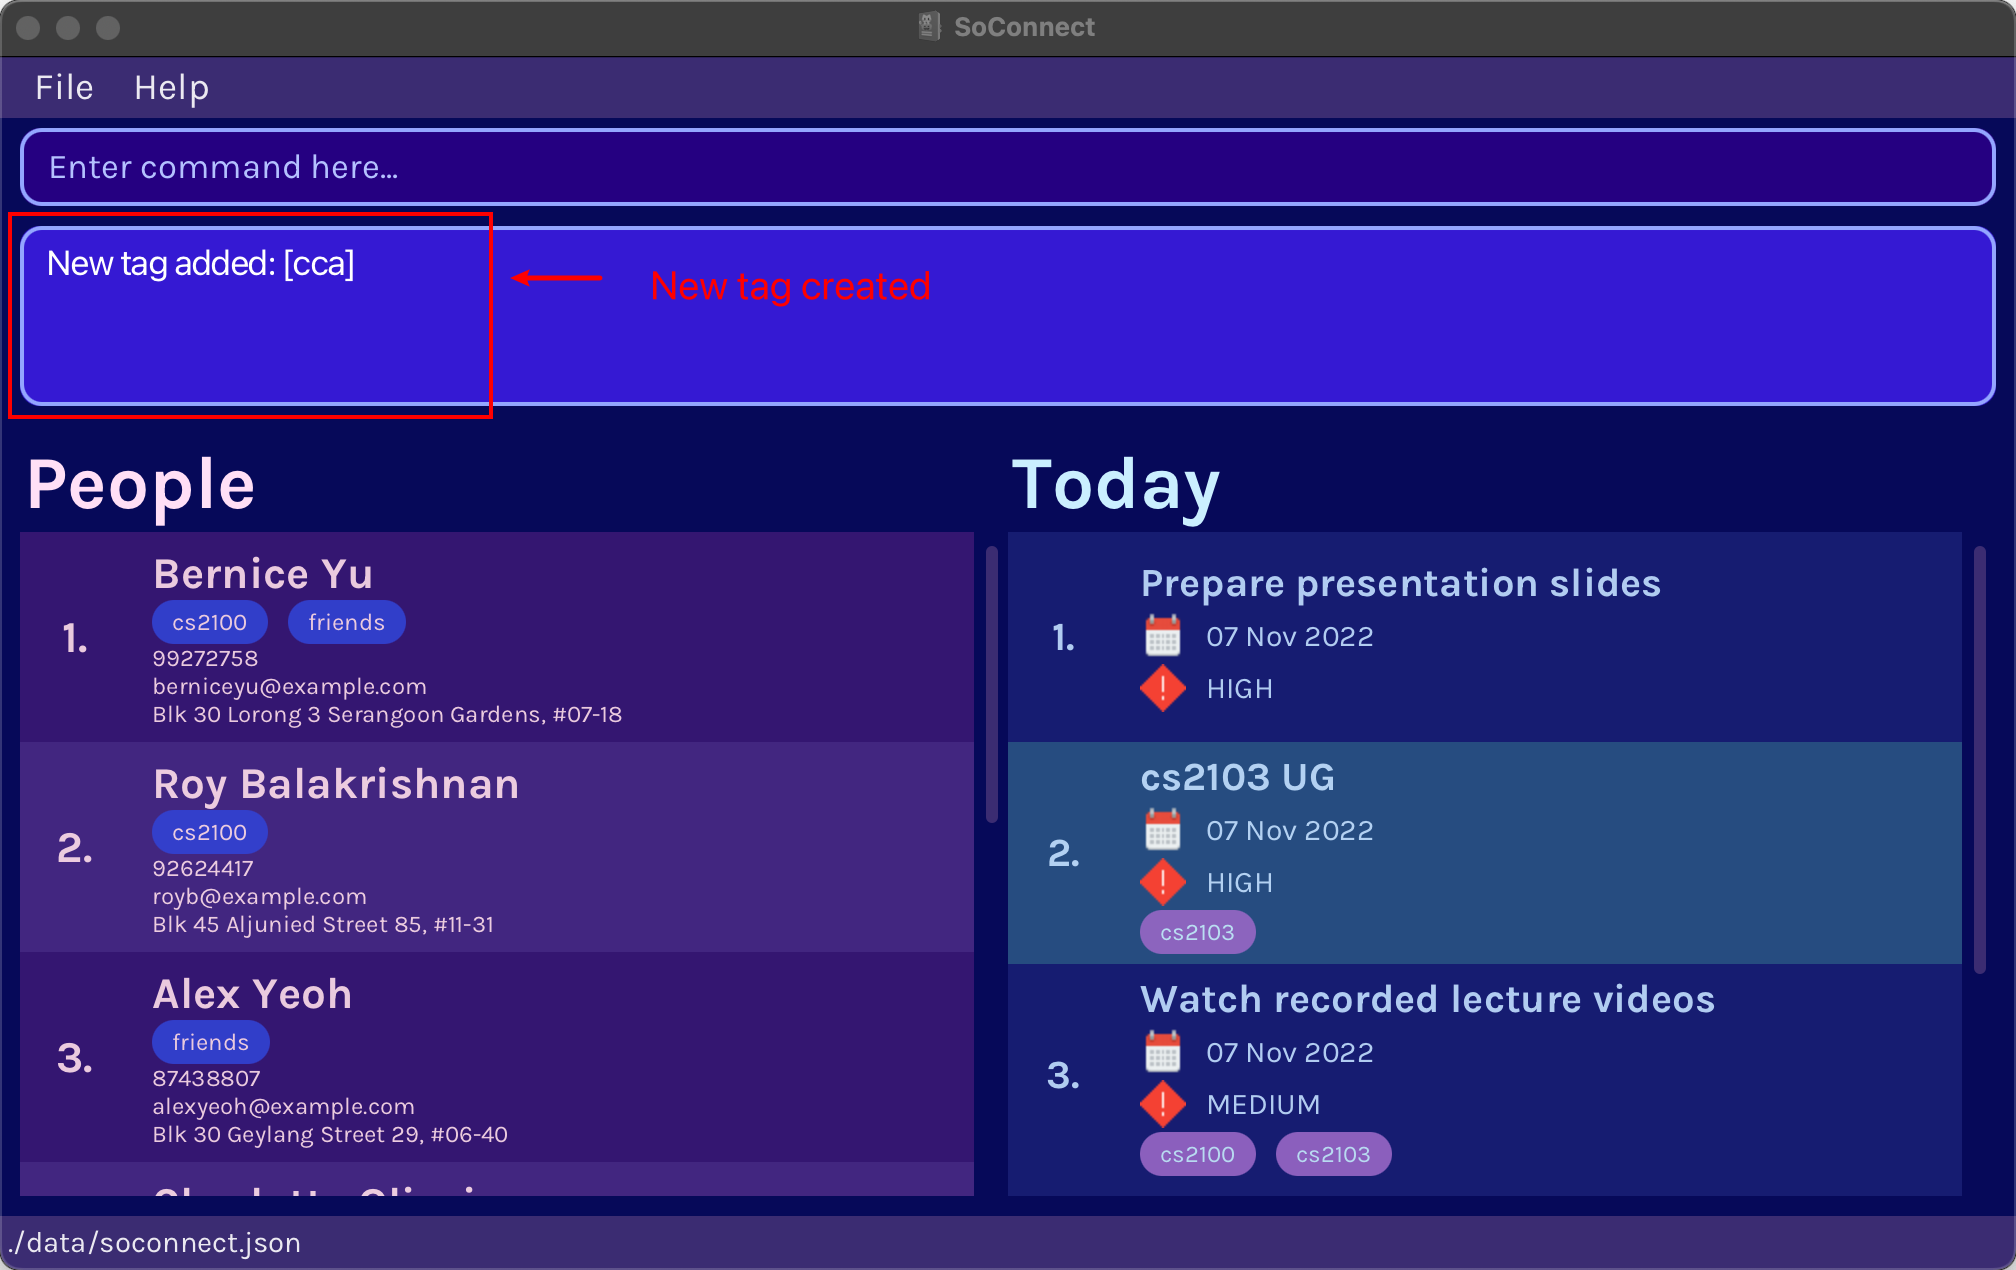
Great! You have successfully learnt how to add your first TAG you have made. Now, you can start utilising the other tag features.
7.4.2. Deleting a tag: tag delete
You can delete a TAG from the tag list.
Format: tag delete t/TAG
![]() Info
Info
When TAG is deleted, TAG is removed from all the contacts which previously had it.
Expected Input in Command Box:
tag delete t/friends
Example Result:
Before:
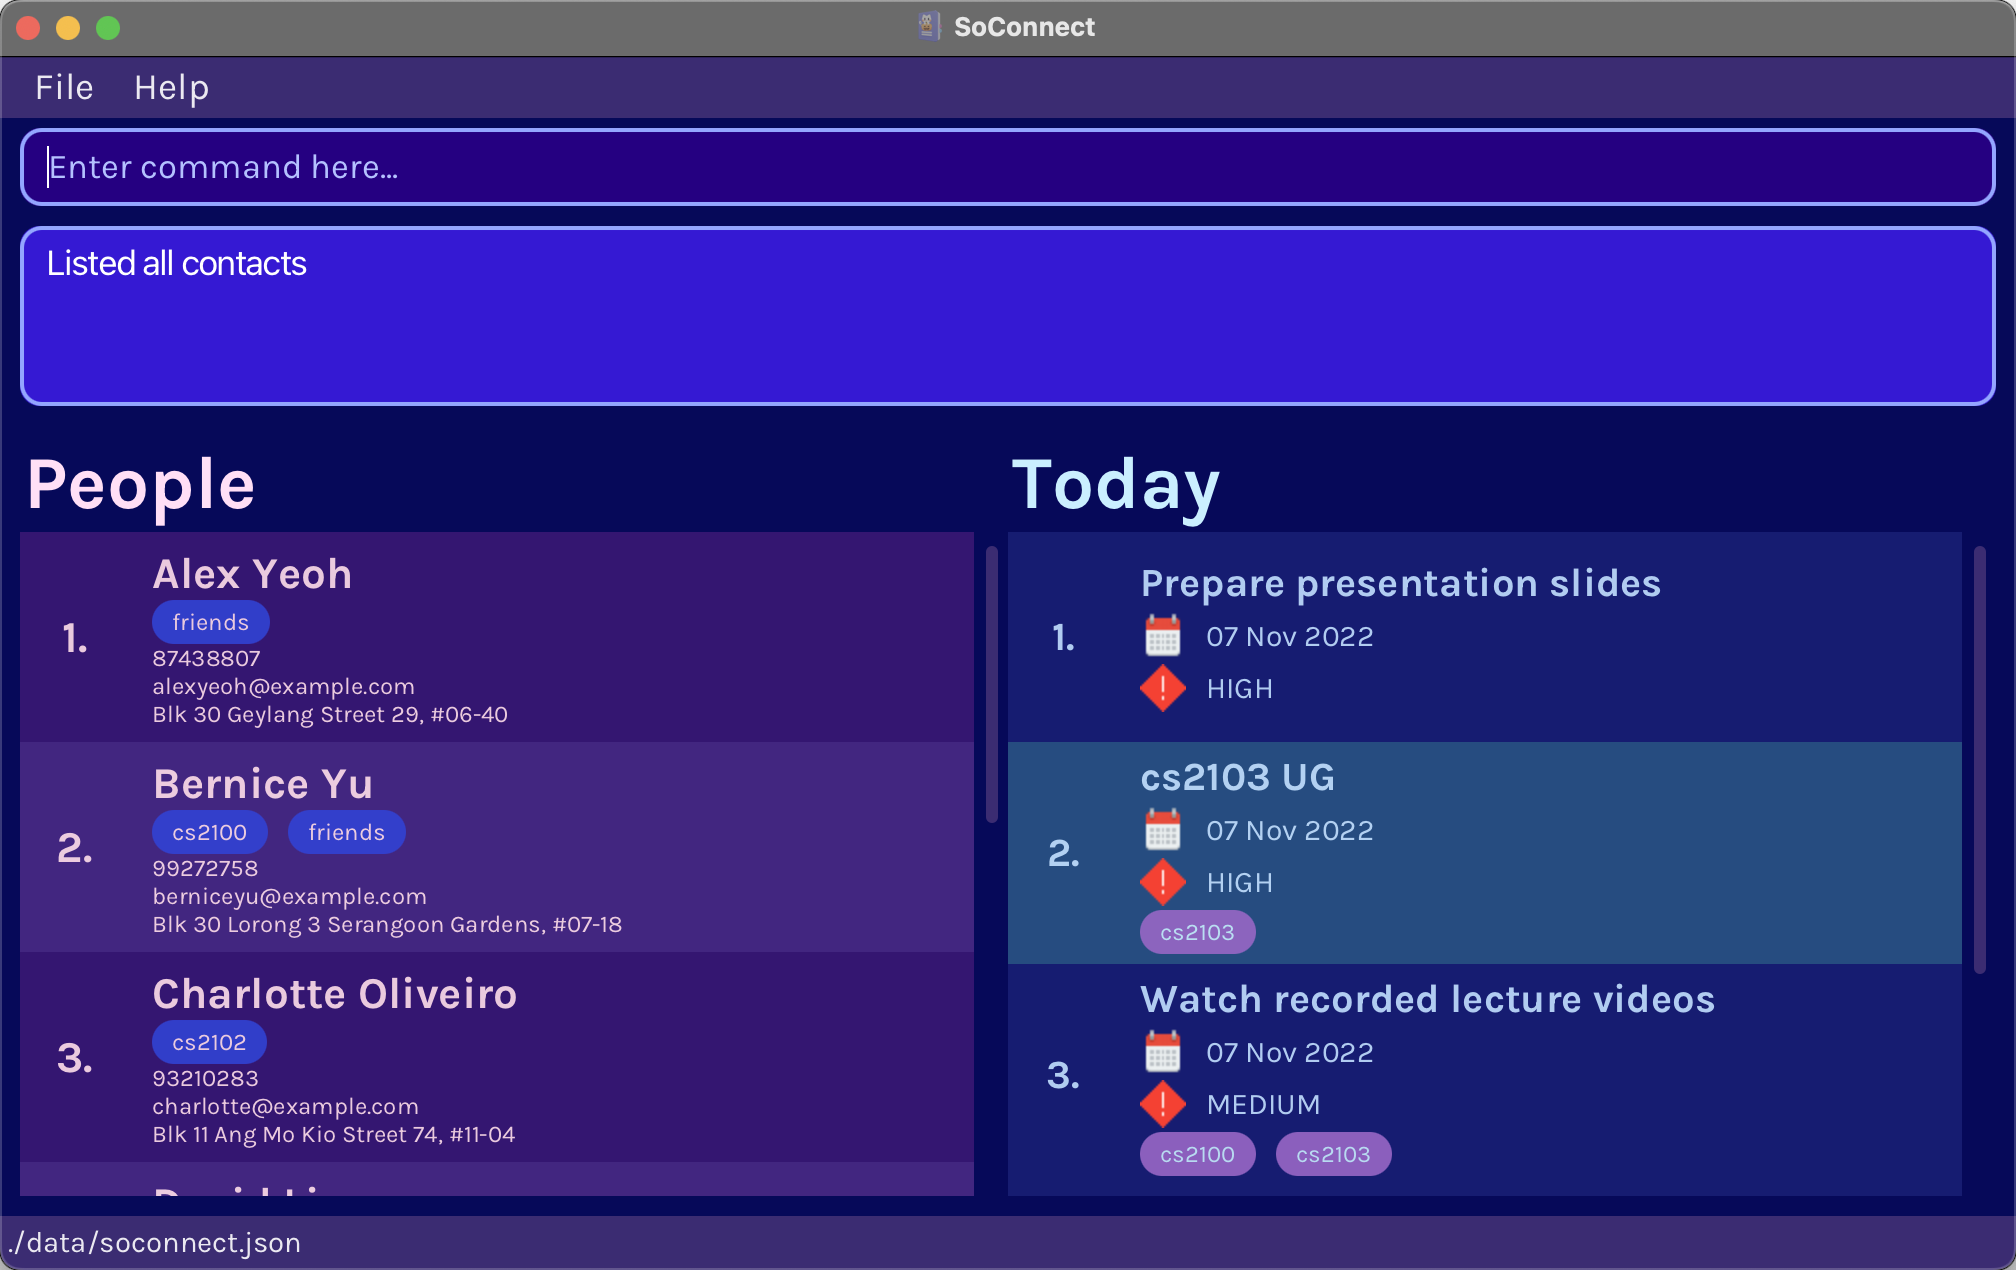
After:
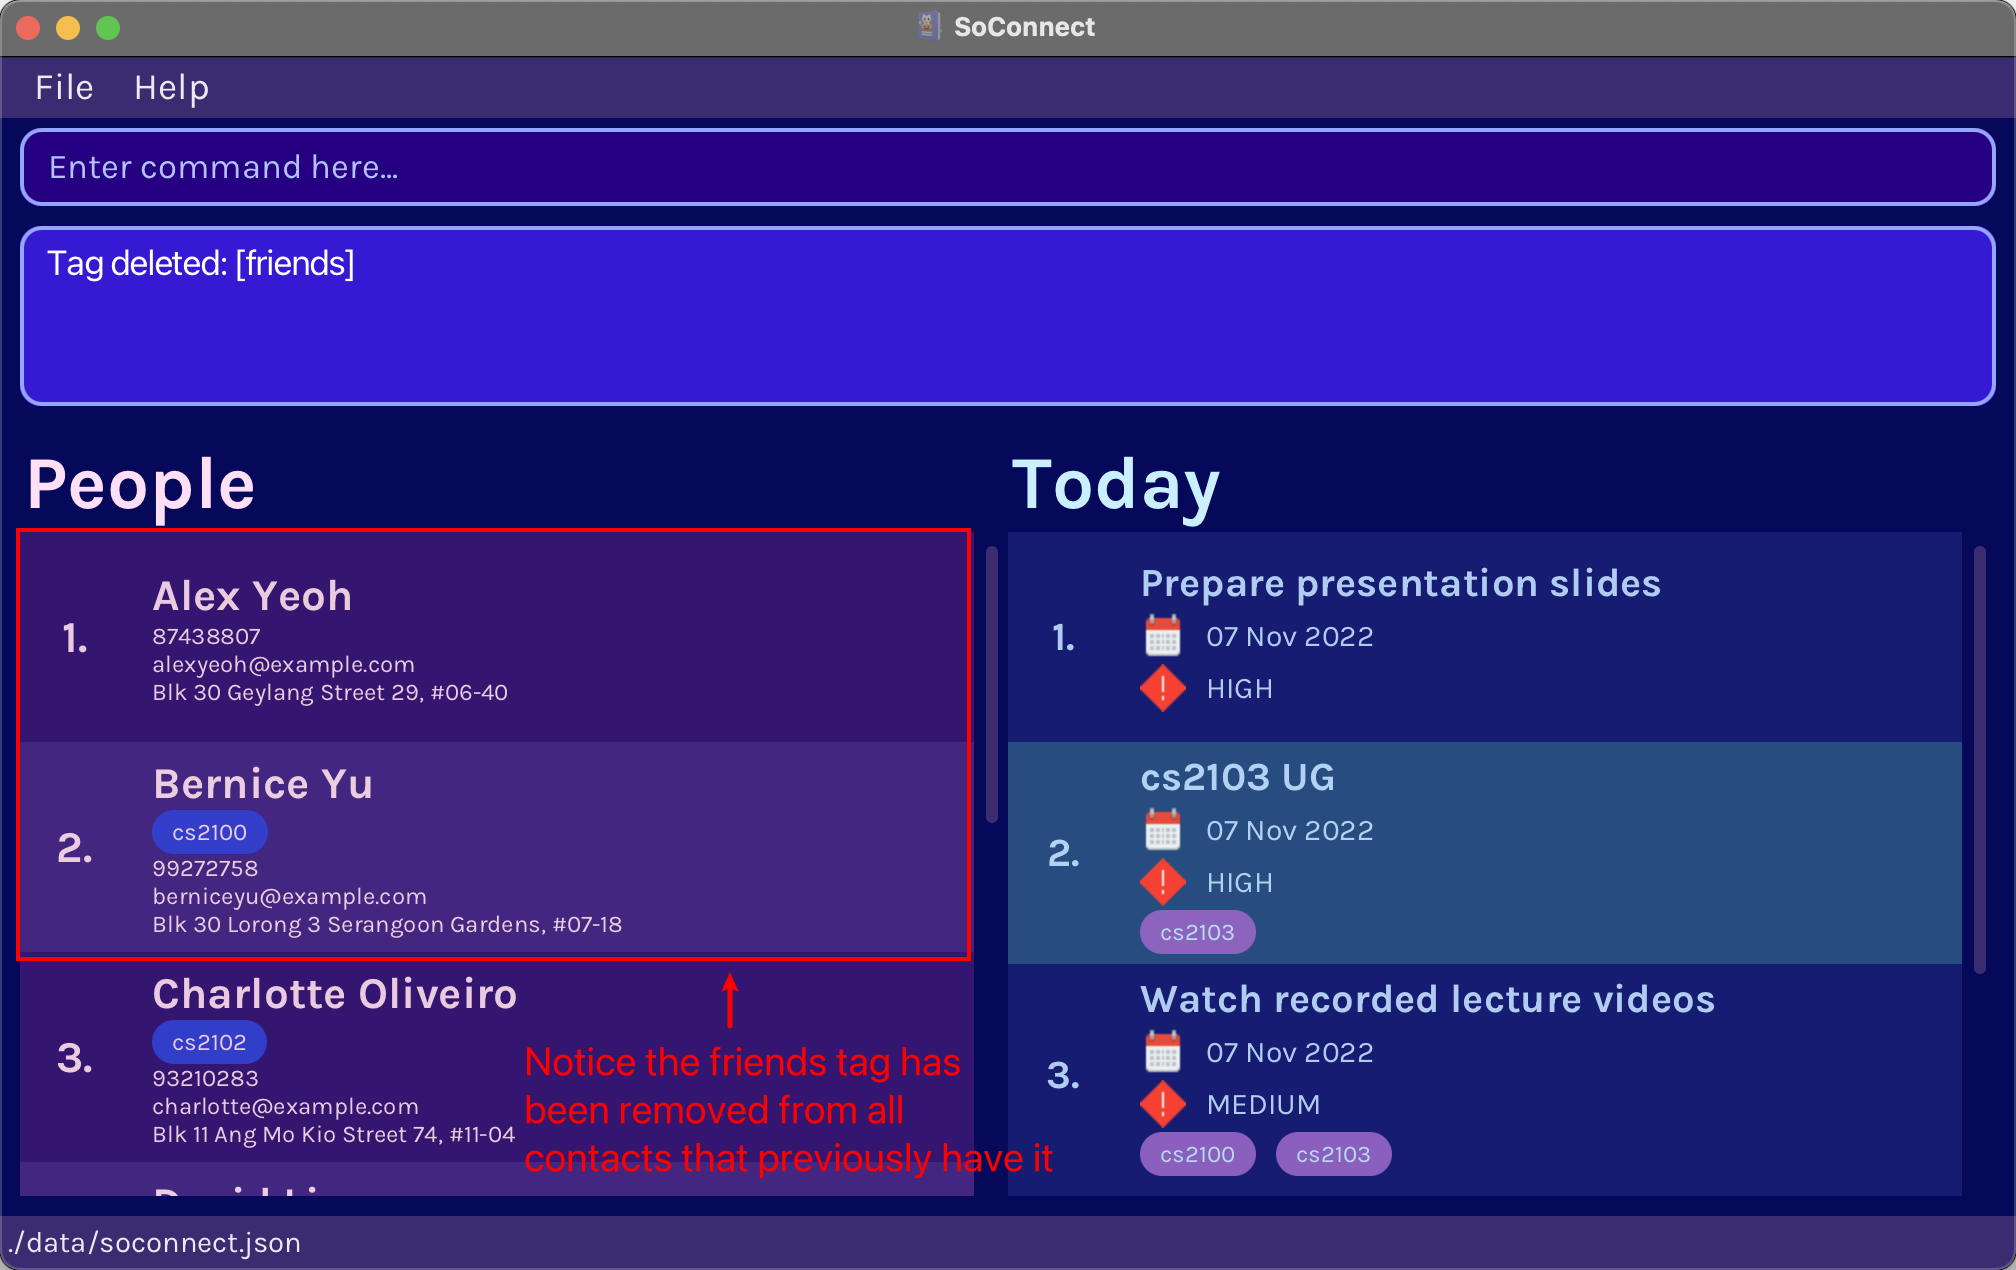
Wonderful! You have successfully deleted a tag.
7.4.3. Editing a tag: tag edit
If you make a mistake or want to update your TAG, you can simply update it with this command.
Format: tag edit t/TAG1 t/TAG2
![]() Info
Info
- The new Tag must not have the same name as any other existing tags.
-
TAG1represents the current name of the tag andTAG2represents the new name of the tag. - This command will replace
TAG1in all contacts and todos toTAG2.
Example Input in Command Box:
tag edit t/friends t/bestFriend
Example Result:
Before:
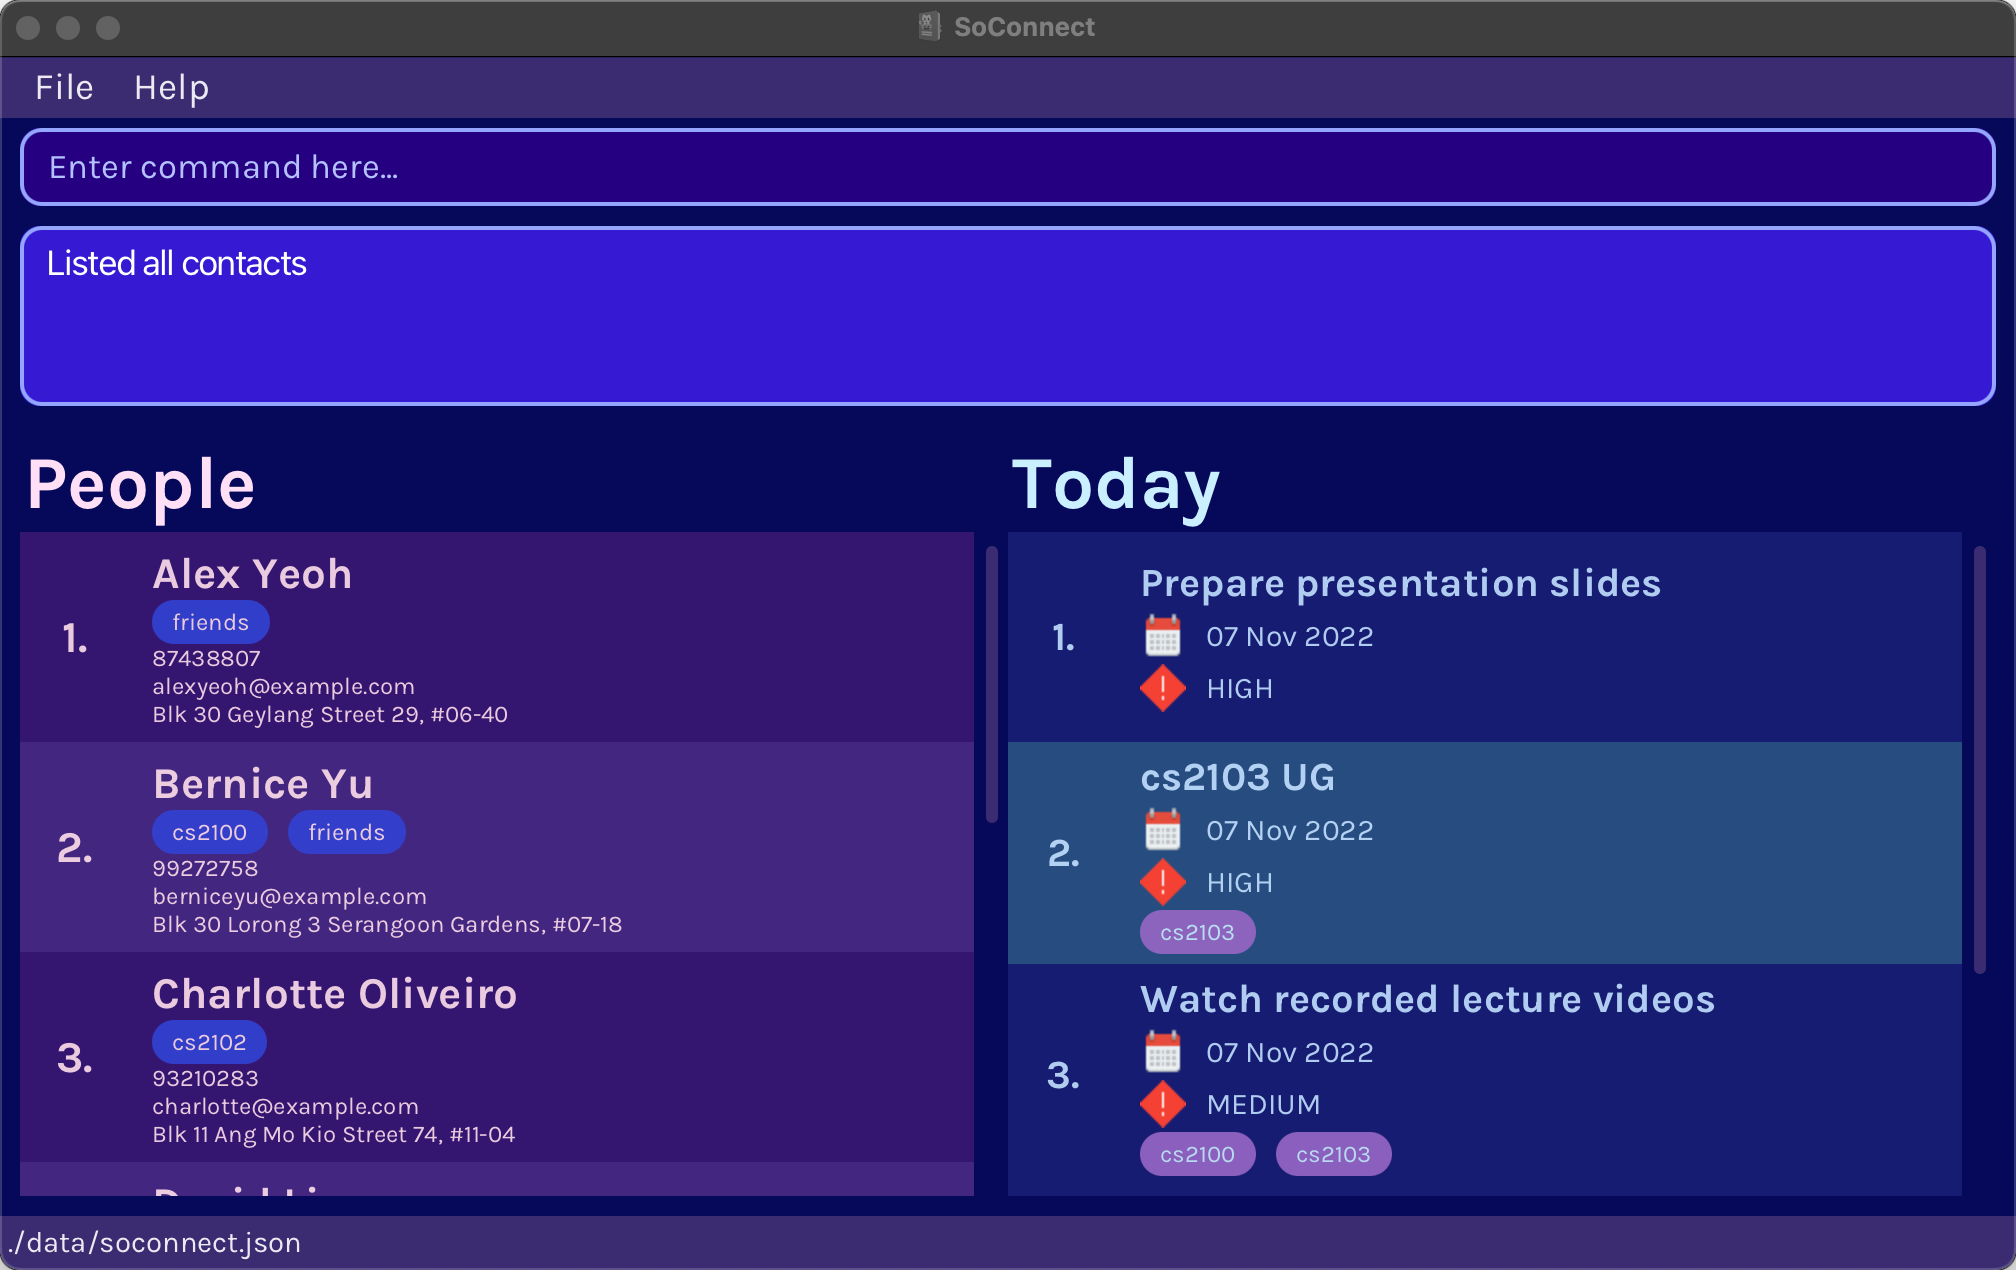
After:
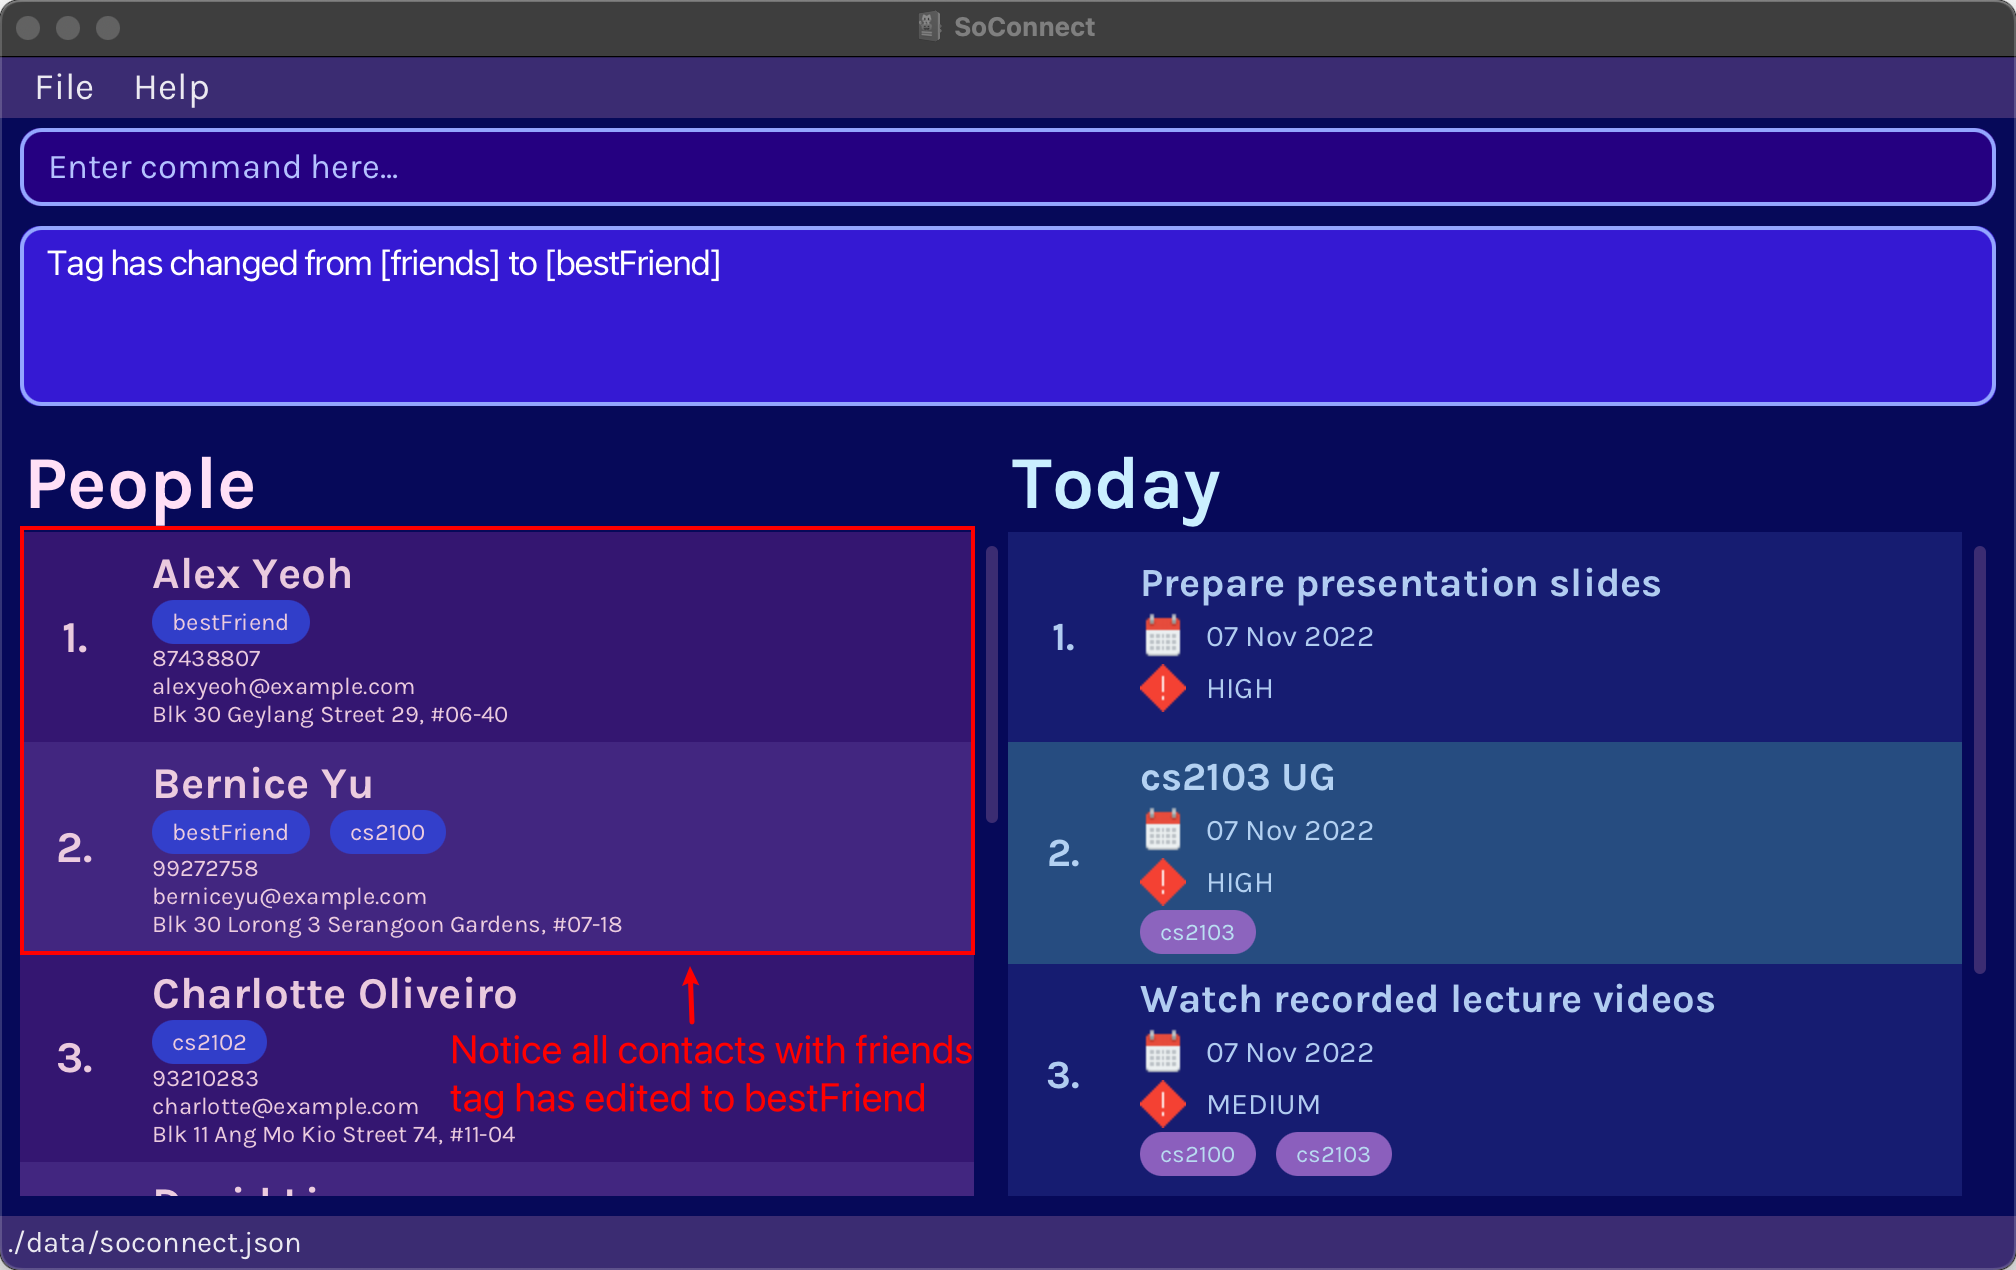
Fantastic! You have successfully learnt how to change tags.
7.4.4. Adding a tag to a contact: tag add
You can add a TAG from the tag list to a contact.
-
Coming soon in v1.5, we will upgradetag addto add tags to todos. - Consider using Adding a todo or Editing a todo to add tags to todos.
Format: tag add INDEX t/TAG
A contact can have any number of tags. Add as many as you want.
![]() Info
Info
The tag has to be created first before you can add it into a contact.
Refer to Creating a Tag on how to create a tag.
Example Input in Command Box:
tag add 3 t/bestFriend
Example Result:
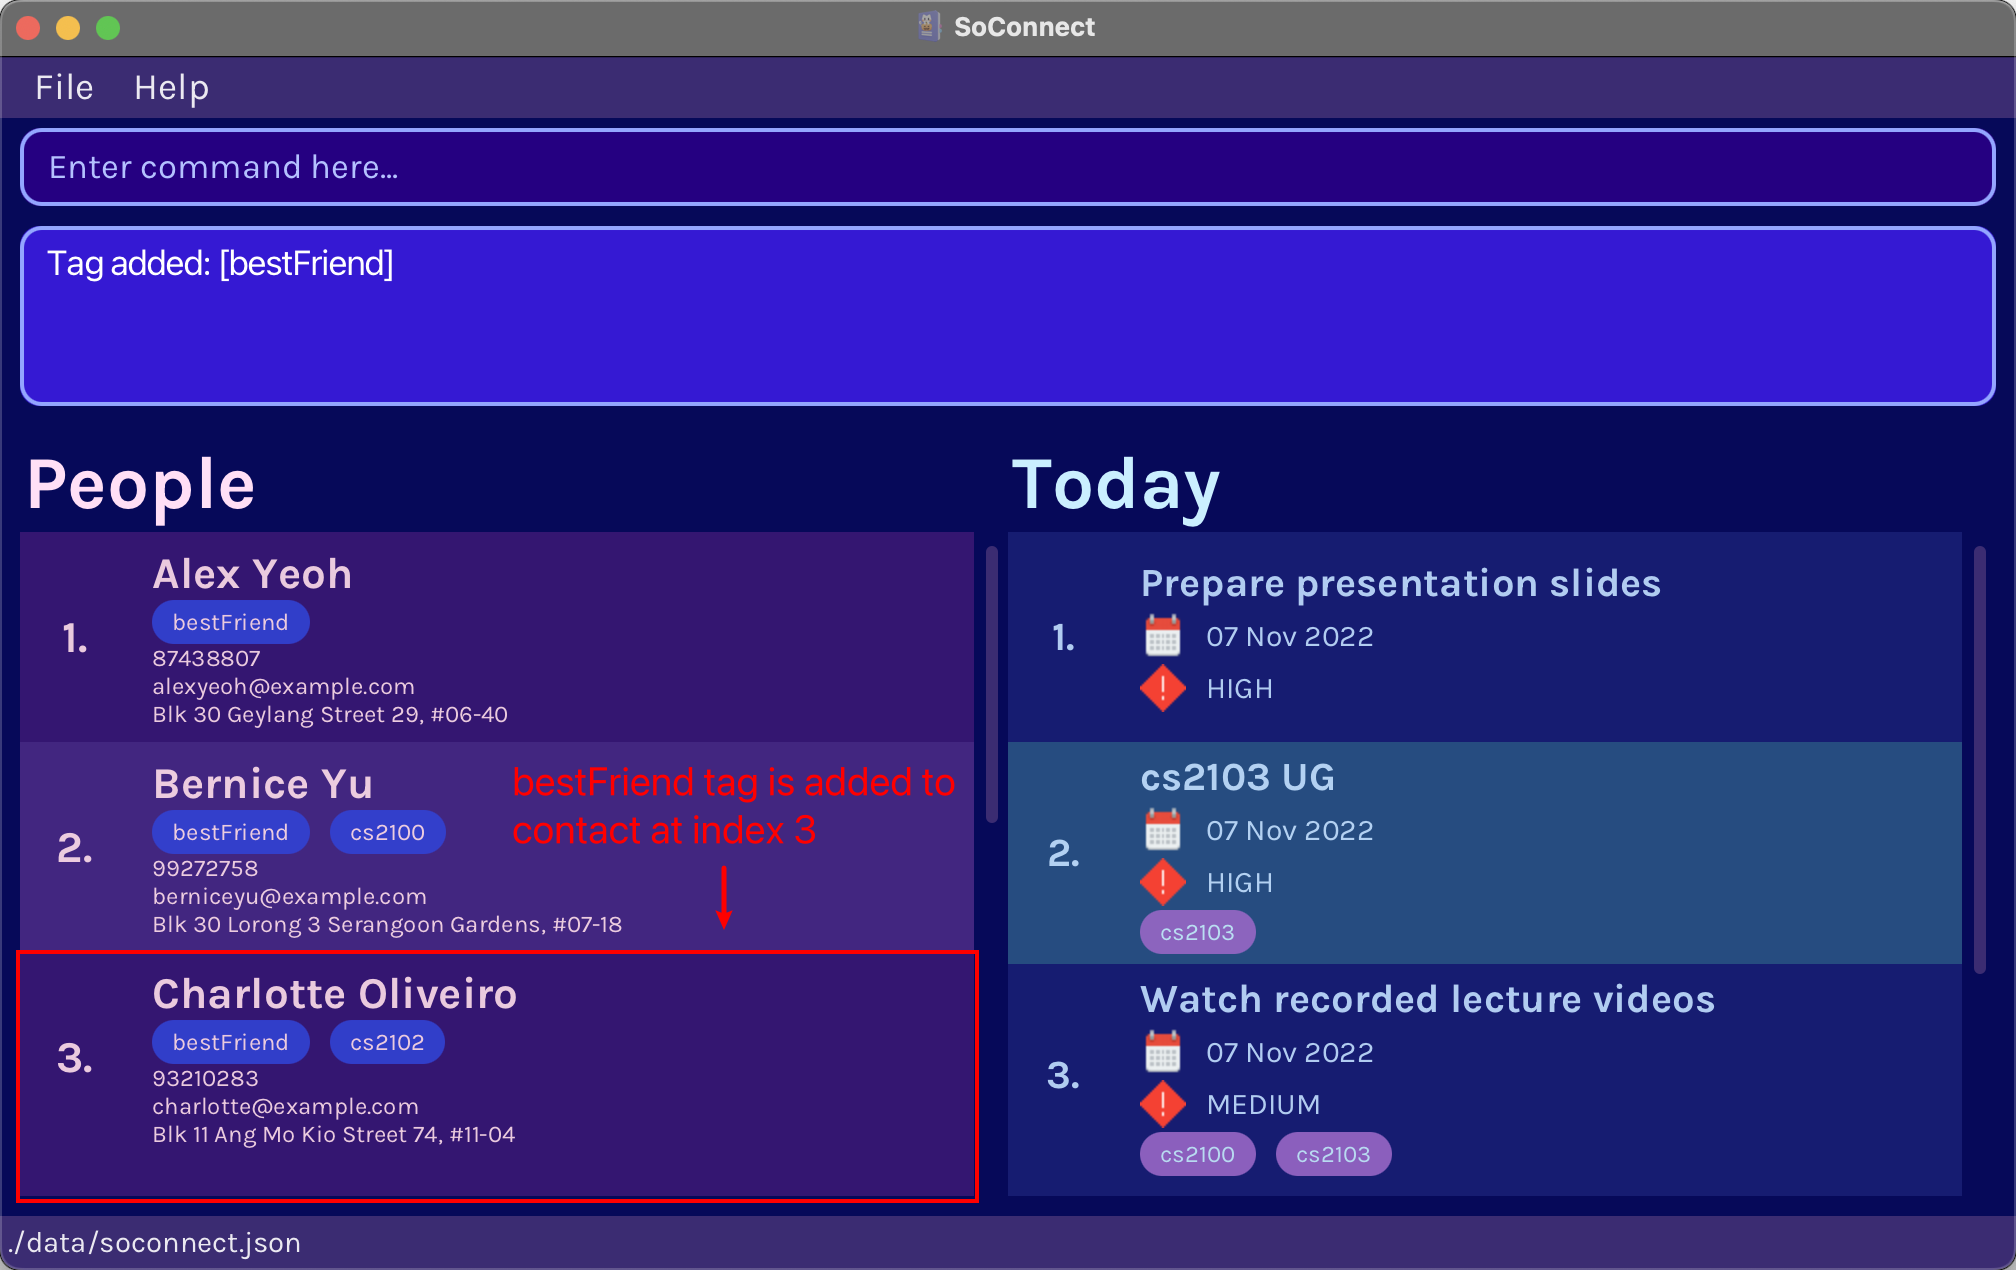
Awesome! You have successfully learnt to add a tag to a contact.
7.4.5. Removing a tag from a contact: tag remove
You can remove a TAG from a contact.
-
Coming soon in v1.5, we will upgradetag removeto remove tags from todos. - Consider using Editing a todo to remove tags from todos.
Format: tag remove INDEX t/TAG
Example Input in Command Box:
tag remove 3 t/bestFriend
Example Result:
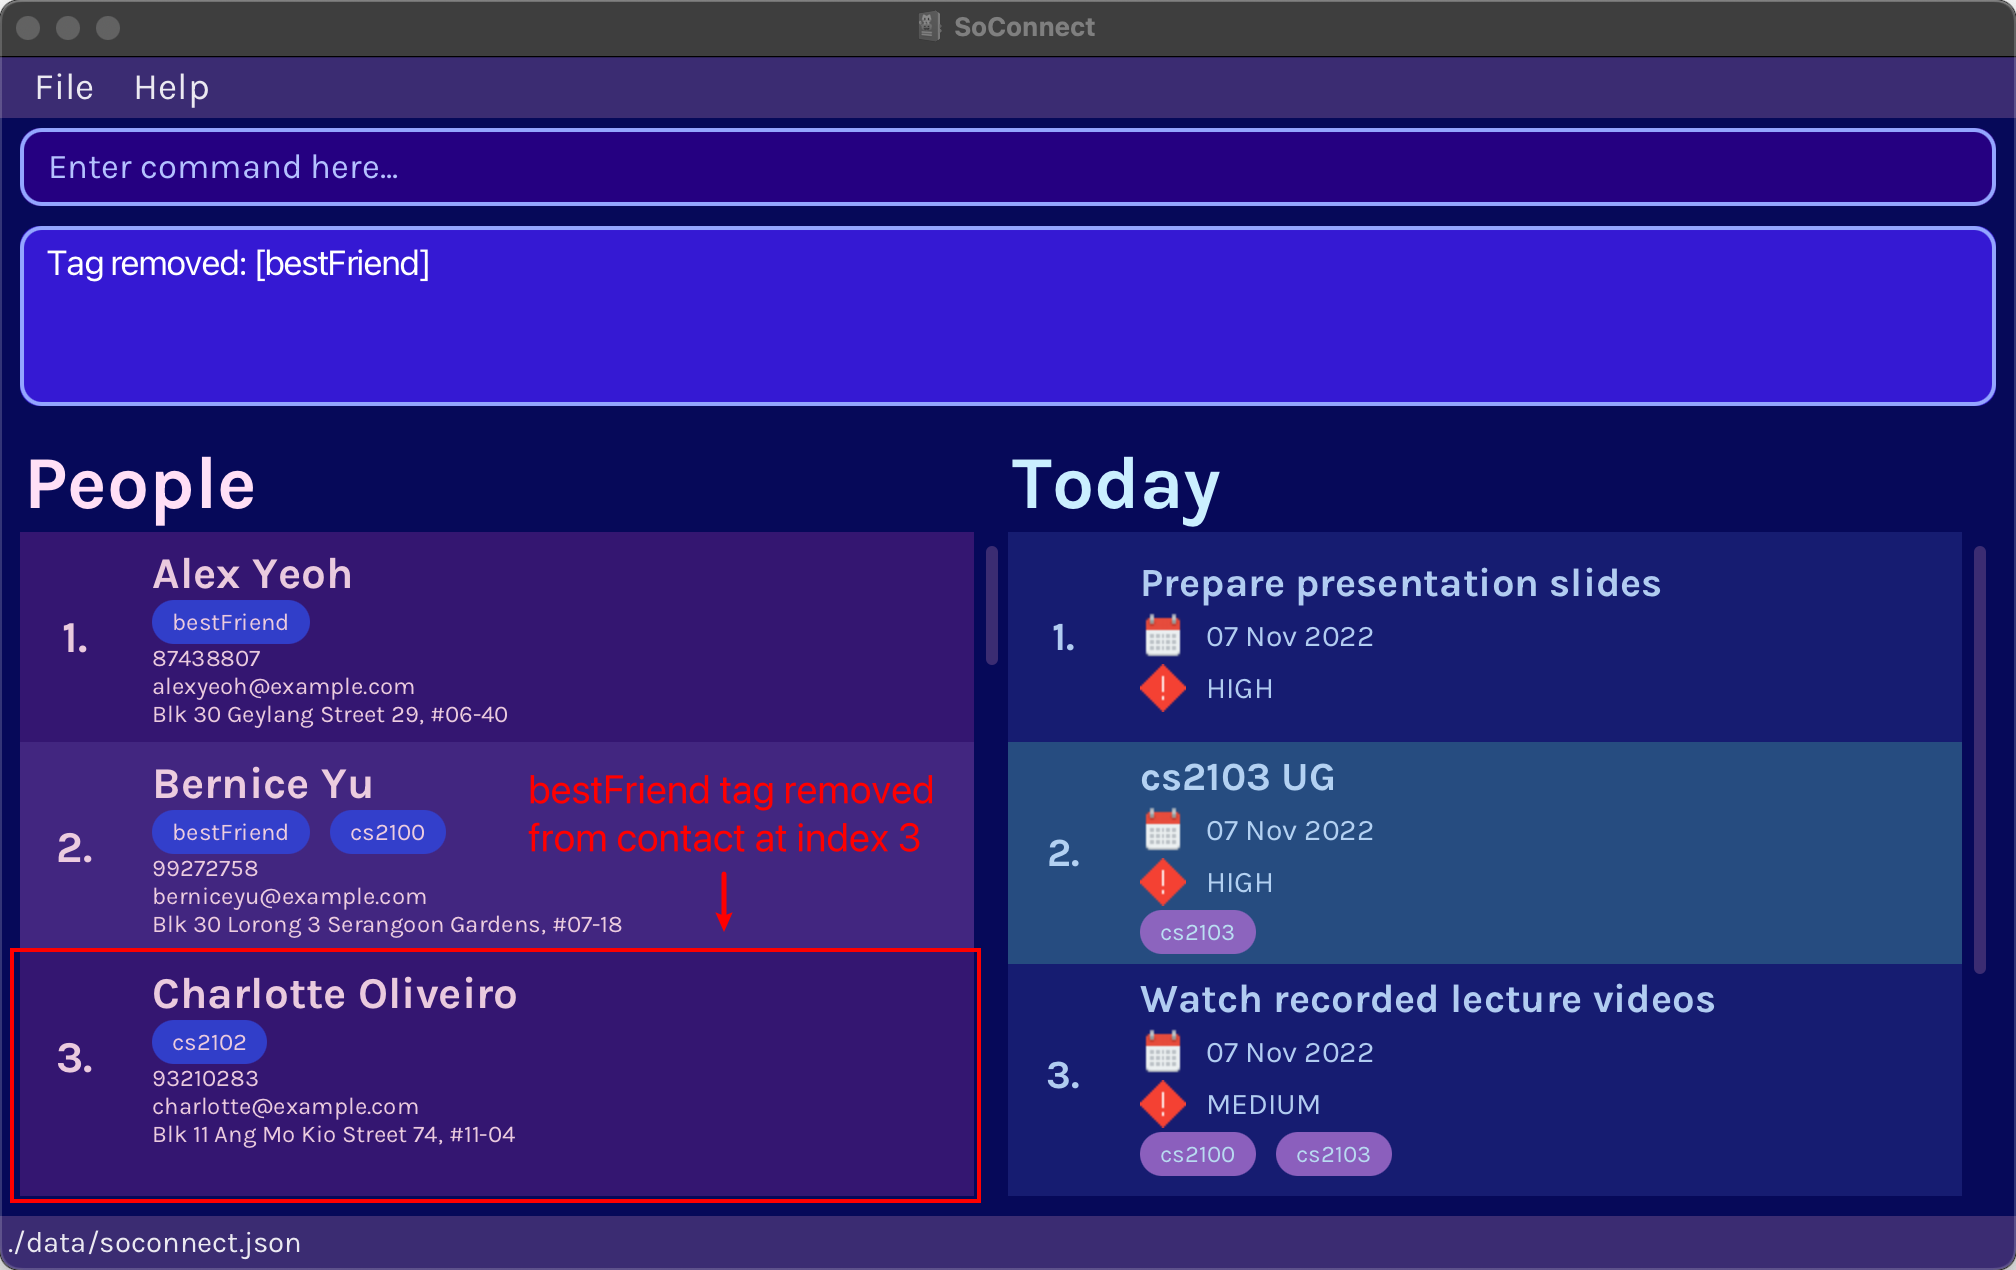
Nice! You have successfully removed a tag from a contact.
7.5. Customisation Commands
Welcome to the Customisation Commands section! In this section, you can learn to customise how your contacts are displayed in SoConnect. You have your own needs and preferences that you would know best. So with our customise commands, we would like to provide you as much freedom as possible in deciding what you want to see and how you want to see it!
![]() Note
Note
- You might be wondering why you can only customise contacts and not todos. Fret not, we are working hard on making that possible for you!
Coming soon in v1.5, we will introduce customisation commands for todos.
7.5.1. Customising order of details: customise order
You can customise the order of information shown for all contacts.
Format: customise order [t/] [p/] [e/] [a/]
- You will always see the contact’s name at the top of each card.
- You can change the order of the following information: Tags, Phone Number, Email, Address.
- Unspecified information will be ordered last according to the default order (Tags > Phone Number > Email > Address).
Example Input in Command Box:
customise order a/ e/ p/
Example Result
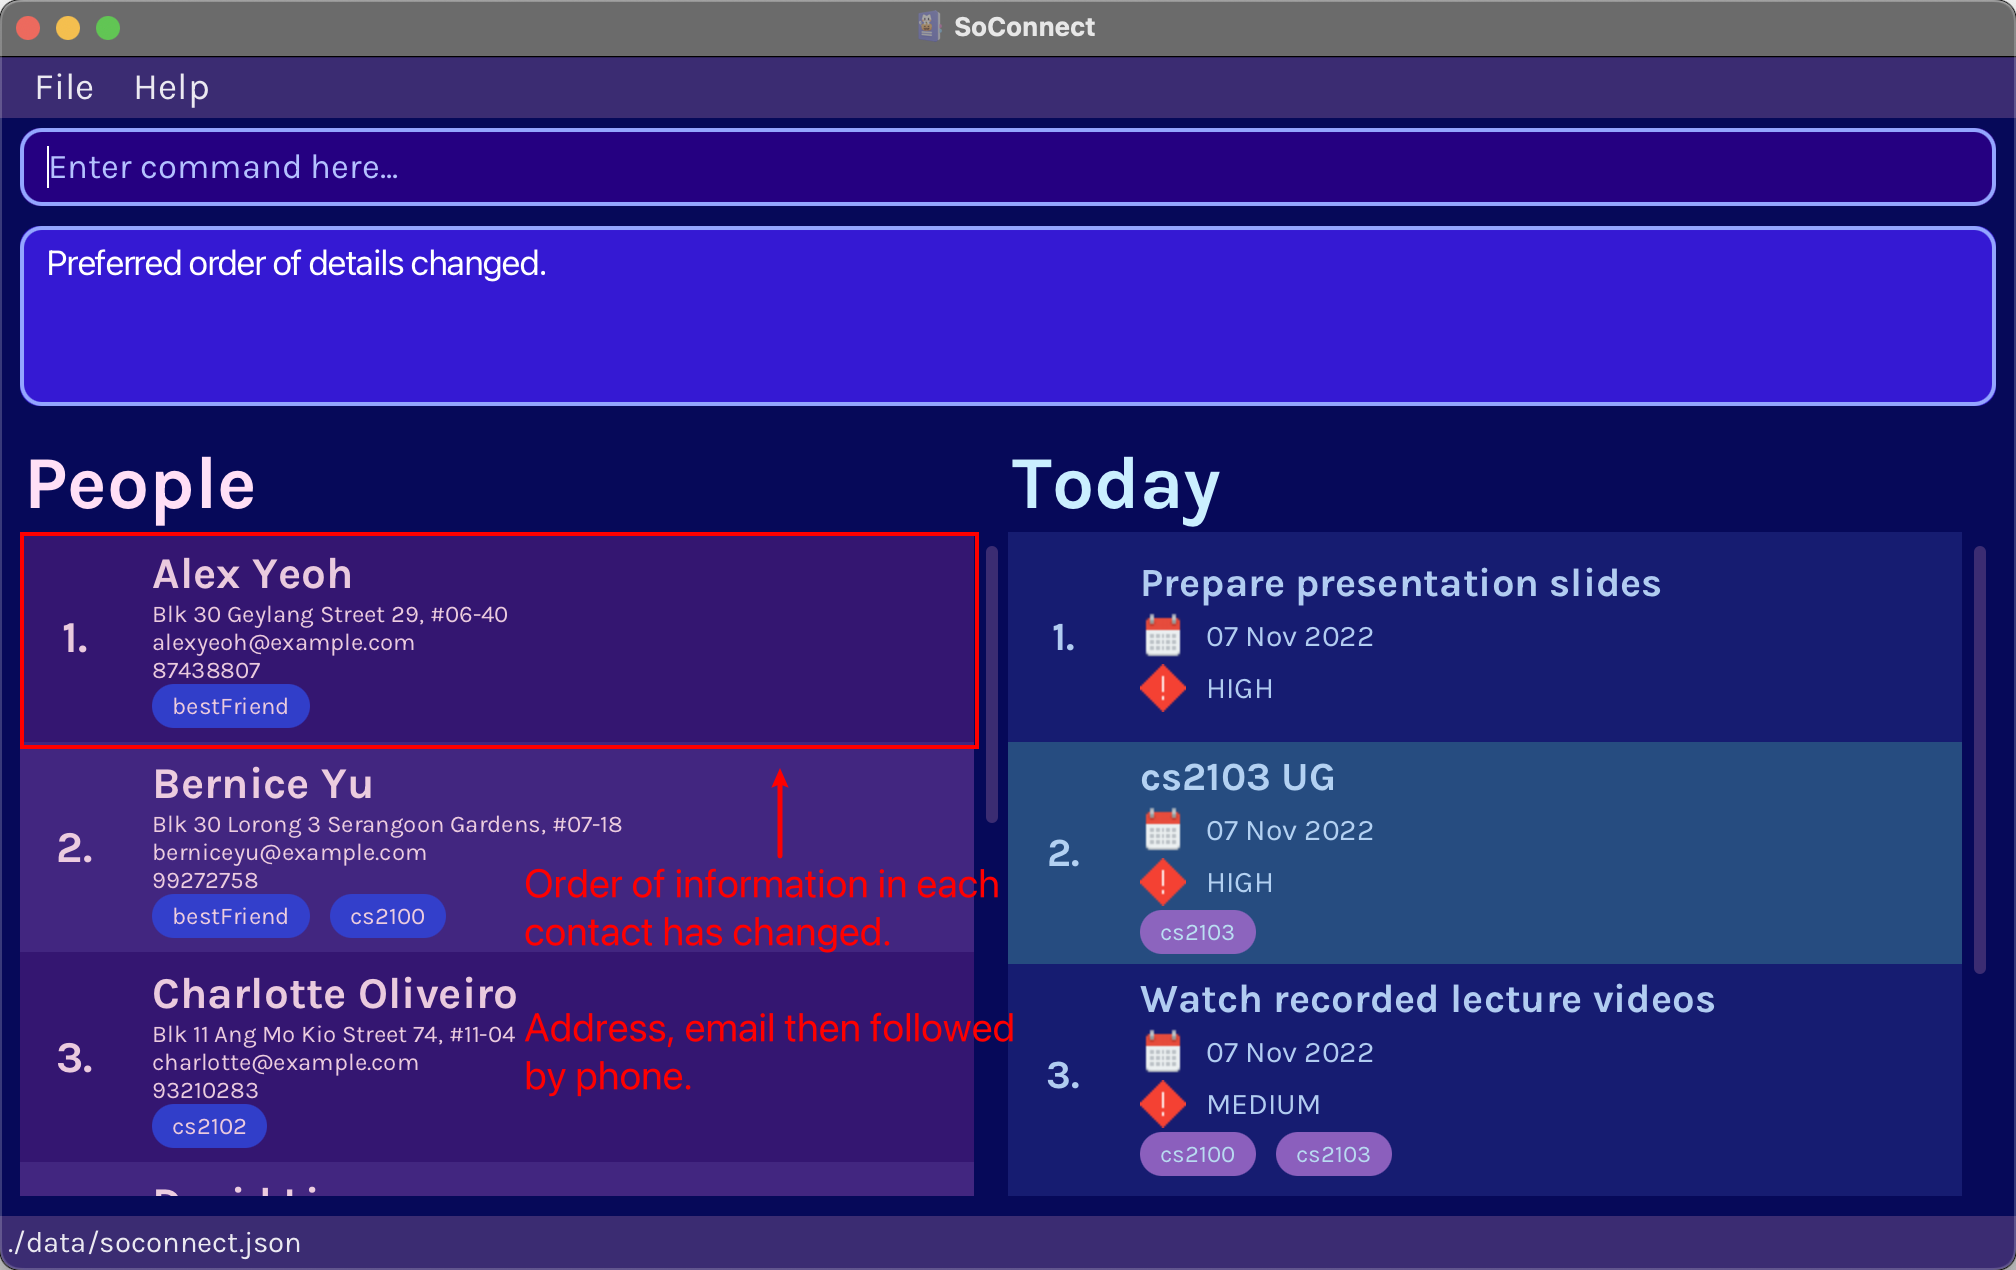
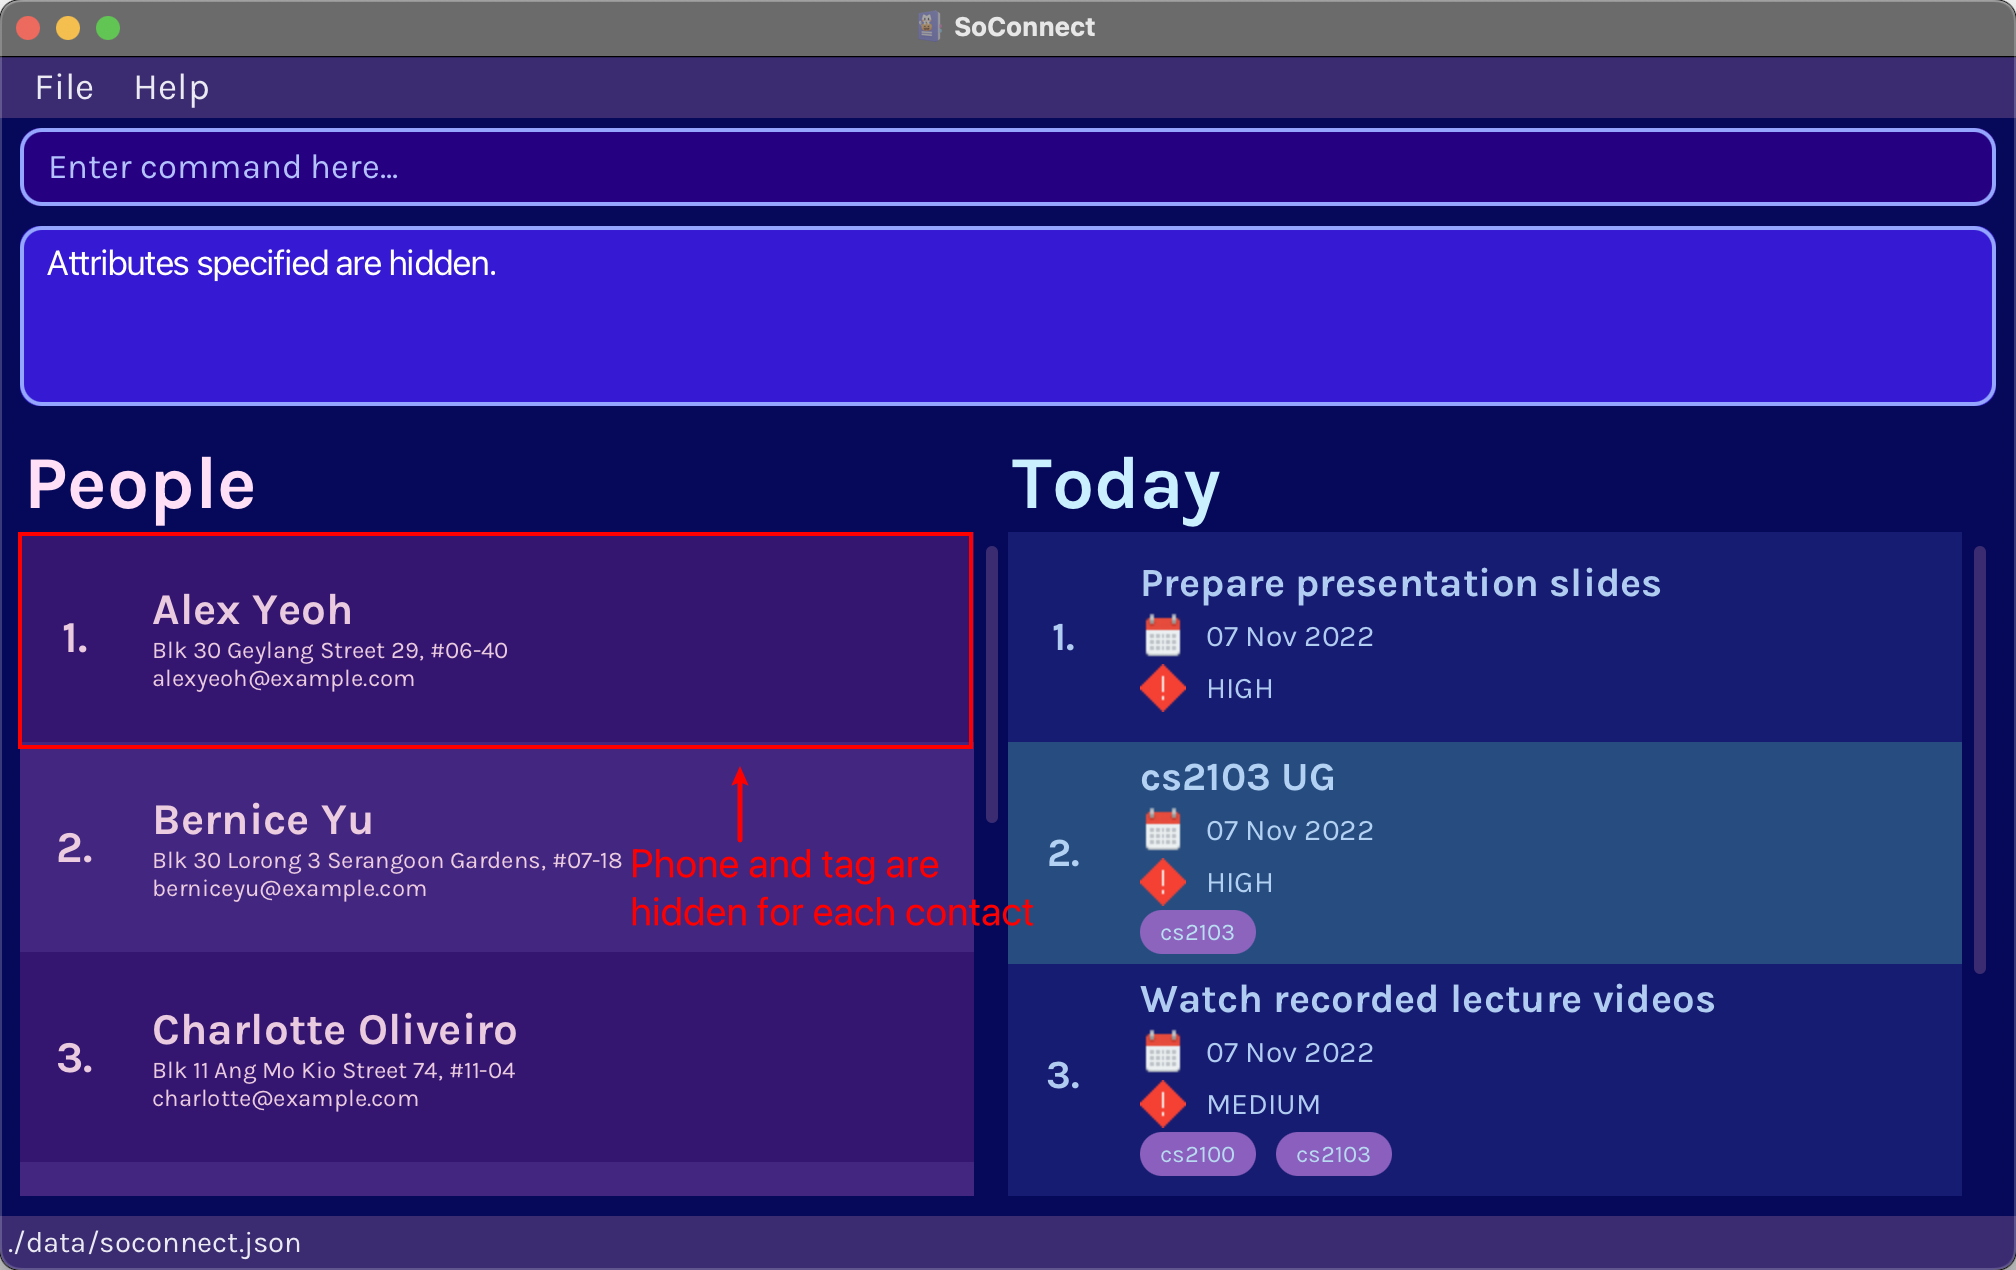
7.5.2. Hiding contact details: customise hide
You can hide certain information fields from all contacts.
Format: customise hide [t/] [p/] [e/] [a/]
- You can hide the following information: Tags, Phone Number, Email, Address.
- After you use this command, the information specified is hidden.
- If the information that you specify is already hidden, it will stay hidden.
Example Input in Command Box:
customise hide p/ t/
Example Result:
7.5.3. Showing contact details: customise show
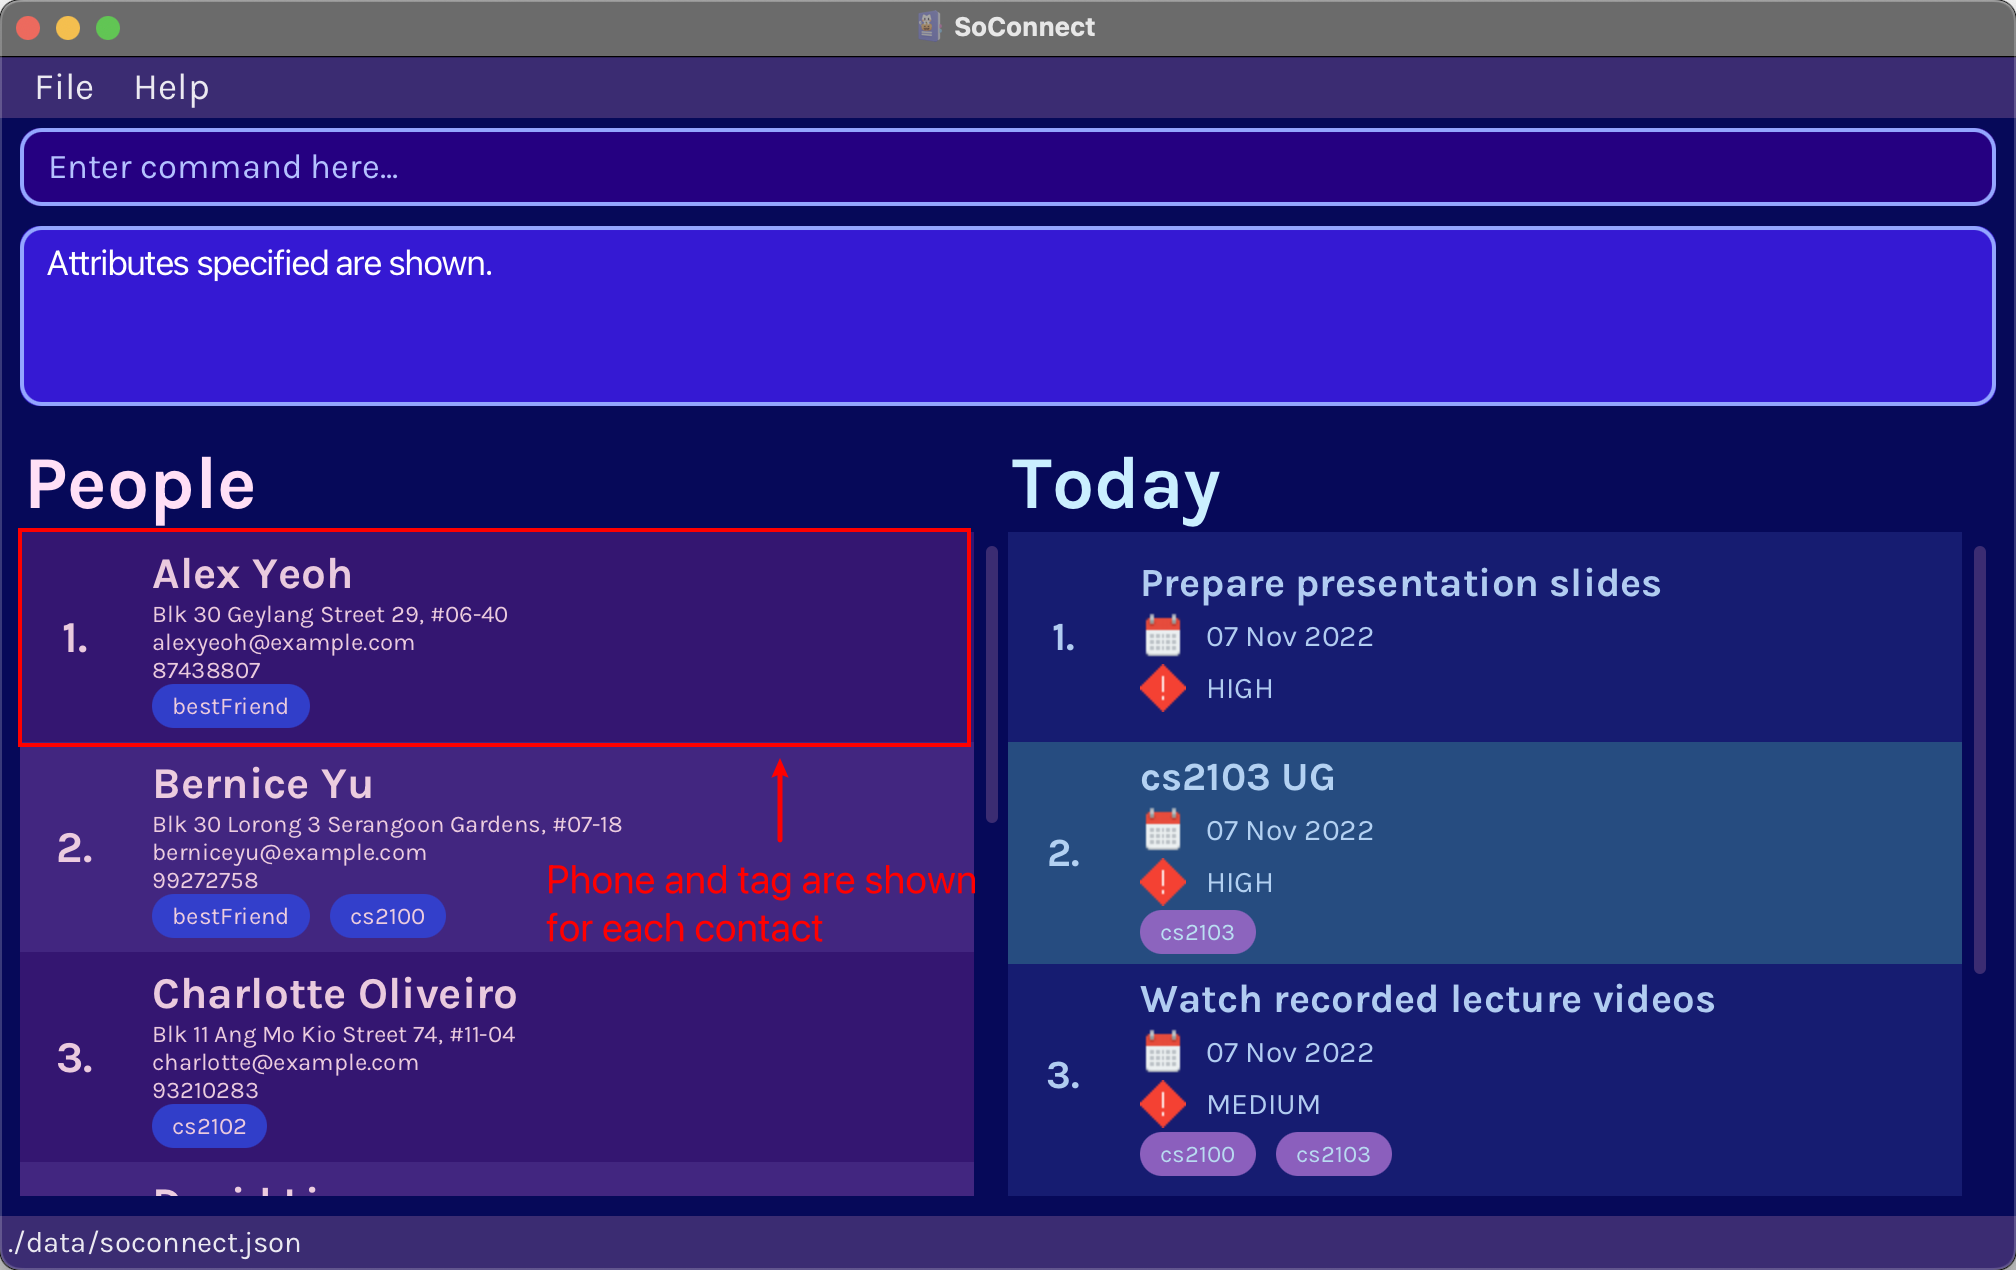
You can show certain information fields for all contacts.
Format: customise show [t/] [p/] [e/] [a/]
- You can show the following information: Tags, Phone Number, Email, Address.
- After you use this command, the information specified is shown.
- If the information that you specify is already shown, it will stay shown.
-
Coming soon in v1.5, we will includecustomise show all, a shortcut to show all information.
Example Input in Command Box:
customise show p/ t/
Example Result:
8. FAQ
Q: How do I transfer my data to another Computer?
A: Copy the home folder of your SoConnect app over to the other Computer. This folder should contain your SoConnect.jar file and your data folder.
Q: What if I do not have the phone number/email address/address of a person whose contact I am trying to add?
A: When SoConnect has more users, we plan to gather feedback for which information should be made optional. In the meantime, you can go ahead and add the contact by replacing the fields you do not have with dummy information. (e.g. Using 123 for the phone number, xyz@email.com for the email, or xyz for the address)
Q: Do you have any plans to make the app more customisable?
A: Of course! Coming soon in v1.5, we will introduce customisation commands for todos. We won’t stop there either, for we are always working on ways to make the app more customisable so that you can make your SoConnect app truly yours!
Q: Where can I find the data file with the tags I have created?
A: Your tags are stored together with your contacts in soconnect.json. The tag list stored affects both your contacts and your todos.
Q: Why can’t I include a particular tag when adding a contact/todo?
A: Tags have to be created before they can be added to a contact or todo. You may also want to double-check if you have spelled the tag correctly.
Q: Why is the todo I have just added missing from the todo list?
A: Check if the todo list is currently showing a filtered list of todos. Refer to Filtering todos shown on how to filter the todo list.
Q: Why are the tag add and tag remove commands not working on todos?
A: You can use the todo edit command to modify the tags of a todo. Refer to Editing a todo for more information.
9. Command Summary
| Action | Format and Examples |
|---|---|
| Help | help |
| Exit | exit |
| Add contact |
add n/NAME p/PHONE_NUMBER e/EMAIL a/ADDRESS e.g. add n/James Ho p/22224444 e/jamesho@example.com a/123, Clementi Rd, 1234665
|
| Edit contact |
edit INDEX [n/NAME] [p/PHONE_NUMBER] [e/EMAIL] [a/ADDRESS]e.g. edit 2 n/James Lee e/jameslee@example.com
|
| List all contacts | list |
| Search contact |
search [CONDITION] [n/NAME] [p/PHONE_NUMBER]…e.g. seach or n/John Doe t/cs2103t
|
| Sort contacts |
sort [n/] [p/] [e/] [a/] [t/TAG]… e.g. sort t/!friend n/
|
| Delete contact |
delete INDEXe.g. delete 3
|
| Clear all contacts | clear |
| Add Todo |
todo add d/DESCRIPTION date/DATE pr/PRIORITY [t/TAG]… e.g. todo add d/Revise priority/high
|
| Edit Todo |
todo edit INDEX [d/DESCRIPTION] [date/DATE] [pr/PRIORITY] [t/TAG]… e.g. todo edit t/CS2101
|
| Delete Todo |
todo delete INDEX e.g. todo delete 3
|
| Clear Todo | todo clear |
| Show Todo |
todo showtodo show today todo show date/DATE todo show date/DATE to DATE todo show t/TAG todo show pr/Priority e.g. todo show, todo show pr/high, todo show t/CS2100
|
| Create Tag |
tag create t/TAG e.g. tag create t/friend
|
| Add Tag |
tag add INDEX t/TAG e.g. tag add 1 t/friend
|
| Edit Tag |
tag edit t/TAG1 t/TAG2 e.g. tag edit t/friend t/bestFriend
|
| Remove Tag |
tag remove INDEX t/TAG e.g. tag remove 1 t/friend
|
| Delete Tag |
tag delete t/TAG e.g. tag delete t/friend
|
| Customise order |
customise order [t/] [p/] [e/] [a/] e.g. customise order a/ p/
|
| Hide contact details |
customise hide [t/] [p/] [e/] [a/] e.g. customise hide a/ e/ p/
|
| Show contact details |
customise show [t/] [p/] [e/] [a/] e.g. customise show a/
|
10. Glossary
Alphabet letters and numbers only.
A feature that shows a list of completed words or strings without the user needing to type them in full.
A sentence that has been autocompleted with autocomplete.
A text-based user interface used to run programs.
A graphical user interface (GUI) is a form of user interface that allows users to interact with programs through graphical icons and audio indicator.
A Java library used to develop client applications.
JSON stands for JavaScript Object Notation. JSON is a lightweight format for storing and transporting data.
Stands for thousands of lines of code.
Windows, Linux, Unix, OS-X.
National University of Singapore.
A contact detail that is not meant to be shared with others.
School of Computing, a computing school in NUS.
A category which you can place contacts and todos in.
A task that the user needs to complete.